This lesson is courtesy of Rod Webb. Rod is a veteran Watercolorist from New Zealand. You can learn more about Rod and view more of his work by following this link to reach his Website.
Watercolour Painting My Way :Still Life
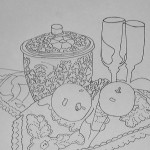
Note from the author: Since authoring “Still Life Painting, My Way!” I have had a lot of emails, from folks all around the world thanking me for the demo. Some have asked for a line drawing. I have created a line drawing for folks who are interested in following along. It is a large image, so a good size printout is possible without becoming too pixelated.To view the actual line drawing, follow this link, or click on the thumbnail to the right. To save it to your hard drive, SHIFT-CLICK on the link, and save it out to your PC. Enjoy!
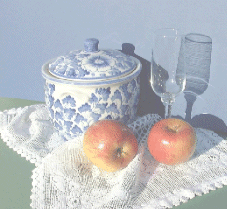
Set up the still life study outside in the sun. Background and base are pieces of masking board. Adjust items for best composition and then photograph using a digital camera.You could use a normal camera and have the photo scanned at your local photo shop.
Using your computer image software, first crop the image and then adjust contrast/brightness to give a faded image. When printed in mono this will use far less ink.
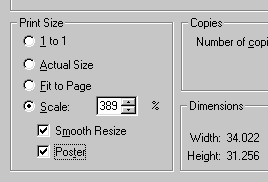
Set up your printer to the size required for your watercolor paper you normally use. Mine is set to 34cms wide and 31cms high. As this is larger than A4 the poster and smooth resize will need to be ticked. Set to mono , we do not need a color print.
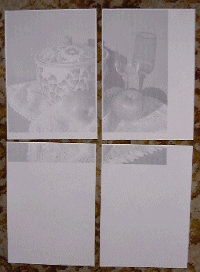
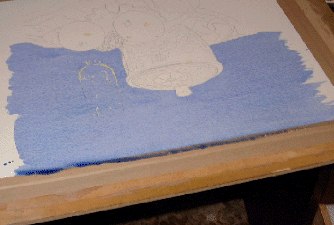
We now trim and paste together.
Glued and lined up, repeat and trim all four ready for tracing.
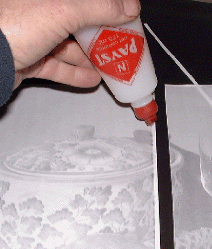
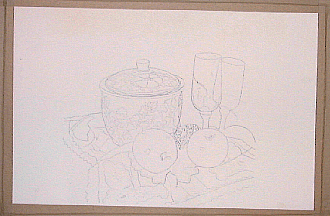
I use “Graphite Transfer paper” which should be available from your local art shop. If not cover the back of the printed sheet with soft lead pencil or charcoal pencil. Then drawn around outlines you want transferred to your watercolor paper.Don’t press too hard or you will damage the paper!

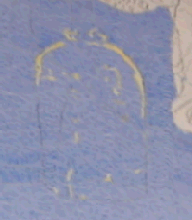
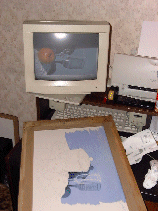
Here is the transferred image on “Saunders 300gm Not” paper stretched and held with gummed paper strip. We are now ready to start painting.We have our sketch and the original image can be displayed on the computer while we are painting. This has the advantage that you can now eat the apples while painting.
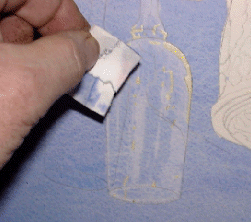
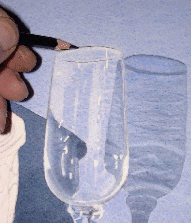
Masking fluid is applied to the glass, apples and jar to save highlights. The brush shown is an old one. The bristles have been trimmed and washing liquid applied to protect by stopping the masking fluid collecting around the ferrule. With this brush, I can apply fines lines of fluid.
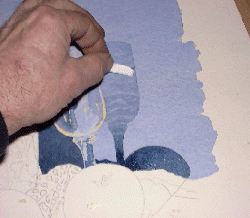
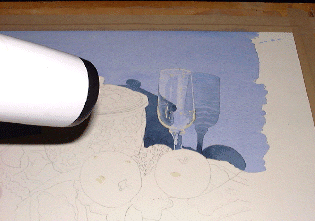
Mix up plenty of wash for the background, mixture of ultramarine and touch of light red. With the painting upside down, I applied a flat wash around the objects and to the top of the painting. See the nice bead of paint collecting at the edge? This is typical when applying a fluid wash with the board tilted at 15 degrees. Don’t throw away the remaining background wash, save it you will need it later. Don’t worry if it dries in the palette, water can be added when required.
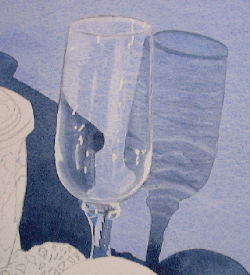
We have applied the wash over the glass, as the background can be seen looking through it.
Before the wash is dry. A piece of blotting paper is used to lift some of the paint, giving the reflective look of glass.
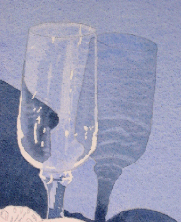
Using some of the original wash, add Payne’s Grey to darken and paint the shadow between the jar and glass. Shadow of glass was painted using background wash and darkened at the bottom with Payne’s Grey. Shadow inside glass painted with background wash and Payne’s Grey dropped in while wet into the center portion.

Using the edge of a piece of blotting paper lift lines of paint on glass shadow on a curve, to represent ripples of light.
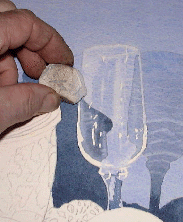
Dry thoroughly using a hairdryer and remove masking fluid from the glass.
The white of the paper now shows through for highlights, and ripples show in the shadow where paint was lifted.
Pencil marks erased using a putty rubber.
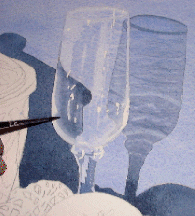
Some edges are softened by brushing on clear water and dabbing with a tissue.
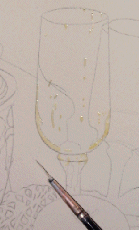
Computer aid: if a part of your painting is easier to paint from the side, rotate the image on your computer to match. You can’t do this with a normal still life setup!
The fine edge for the top of the glass is added with a sharpened watercolor pencil. The pencil is used dry, but can be softened if you wish by lightly brushing with clear water. Detail is added to the shadow using the original wash. Add the band around the top rim and random curves across from top to bottom.
Shadow inside glass darkened slightly at the middle.
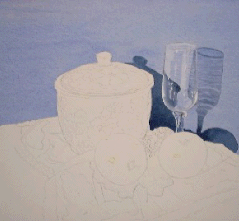
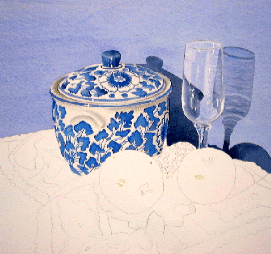
Progress so far: background, glass, and shadows completed. The jar will be tackled next!
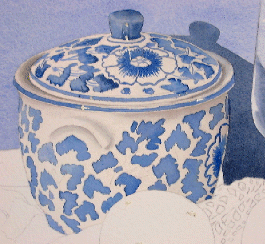
First, we have to define the jar and give it some shape.
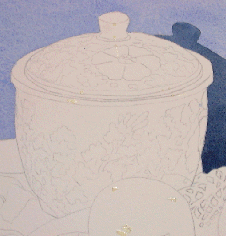
The shading is added using a mixture of burnt umber, Payne’s Grey and a touch of light red. While it was still wet, some extra was added around lid edge to darken. Side handle shown simply by painting in the shadow.
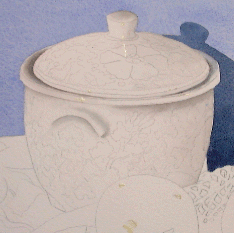
A light wash of raw sienna painted over all of the jar to give it an off-white china look.Masking fluid is visible on lid and front edge.

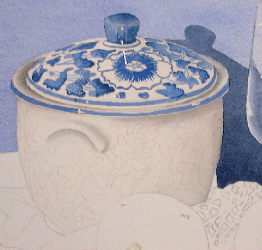
A strong rich blue mix was made from winsor blue and ultramarine. The pattern is painted in and edging darkened before first paint dries.
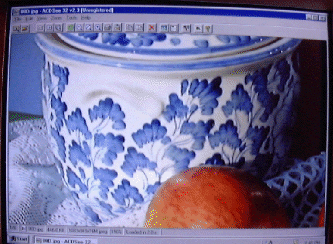
When painting detail, magnify the image on your computer. It helps!
After painting the pattern on the side, the left was lightened slightly by lifting some paint with a tissue.
Fine detail added after first was dry using a rigger brush. Masking fluid removed from jar, sparkle can be seen on lid and top edge, where the preserved white paper now shows.
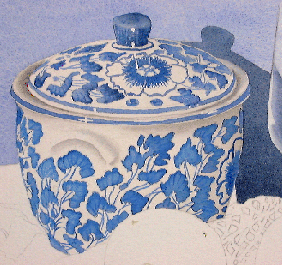
Progress so far. Next step is to paint the apples. By the way they were delicious.
Very nice. Thank you so much for sharing.
Great techniques! But may I suggest an even better way to get your drawing onto paper: just put your paper over the computer screen, and use sticky tape to hold it there. Dim the lights in the room, and then you have the image showing through, ready to trace. You can do a large image in sections. Just like the old “lightbox” that illustrators have used for many years.
This is exactly how an art demo should be. Lots of detailed instruction. I hate it when instructor provide a free demo and then leave out half the details or skip over parts. We’re not mind readers but we are trying to learn from the experts. Thank you so much for this tutorial.
What a fantastic tip Shirley! Thanks!
I really admire your work. This is exactly what is called a real tuttorial that all learners need and look for. Thank you, thank you very much.
Take a piece of paper and a pencil and learn to draw from looking at the subject and then take it further than just copying. With this you might as well stick to the photo and hang that on a wall.