About Allan Kirk
After training to teach, I taught Art in secondary school for five years before following a career in computing. I moved permanently to France in January 2008 to launch Tarnincolour Painting Holidays. I have also developed a very popular range of Step-by-Step watercolour lessons, which I sell on my website to customers from all over the world. I run workshops in France in summer, Canada in the fall and UK in spring. I have contributed articles to SAA Paint magazine, Artist & Illustrators magazine and watercolorpainting.com.
To find out more, go to www.tarnincolour.com.
Enjoy this free Watercolor Painting Tutorial
Try Your Hand At Bright Sunshine
Add the ‘Darks’ to get the sunshine with watercolour artist Allan Kirk in southern France.
Trying to capture bright sunshine in my work is a challenge that can’t be avoided, painting in southern France. Living and working as an artist here for the last three years, I have finally learned that if you want sunshine in your work you need to paint the dark shadows as strong as you dare.
I admire the work of Alvaro Castagnet, Joseph Zbukvic and David Taylor, all watercolour artists who have grown up painting in the hot sun. Alvaro repeats again and again in his instructional DVDs that if you want sun, paint the darks.
Schooled in traditional English watercolour methods and brought up painting the northern English coast and moors, I find it a struggle to represent the strong contrasts that a bright sun visits on the villages and landscape in this sunny region.
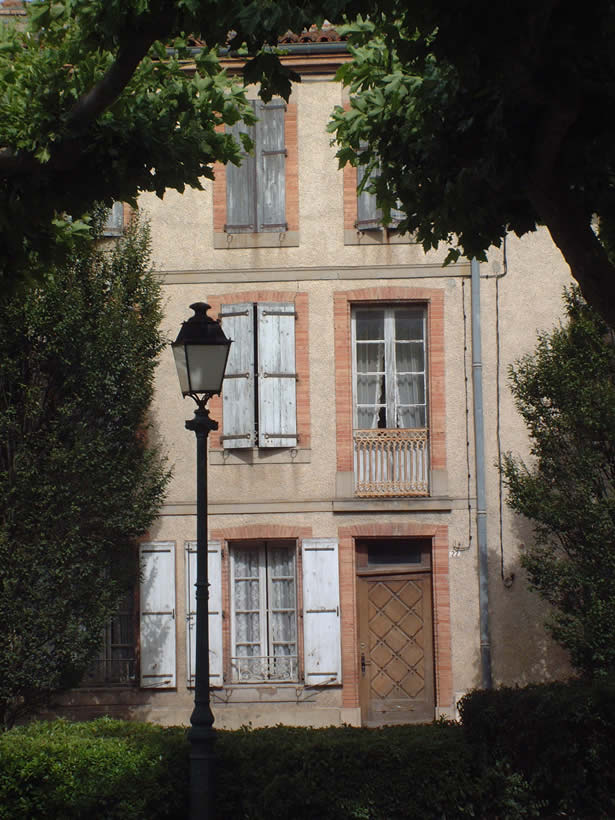
This exercise is particularly suited to the task. Sitting in the shade at a café in a dusty French village, I see the sun transform the windows and doors on the buildings opposite. I took the photo as I sketched. Take a deep breath and boldly grasp the opportunity to record the heat and brightness of a typical sunny French view.
We will turn the old rule of thumb ‘paint light to dark’ on it’s head, and follow the Australian, David Taylor, who often paints his darkest tones very early in the painting process. He employs this technique often when painting his sunny Australian street scenes.
As you begin this work, keep in mind the outcome that you want. I like to fix the outcome in my head; in this case, I want a free, energetic watercolour sketch where the sunshine ‘pops’ out at the viewer. I find it useful to keep one central idea like this at the forefront as I work.
Materials
– Watercolour Paper 300gsm rough texture (I used Langton Prestige rough)
– Masking Tape
– Board
– Watercolour paints
- Burnt Sienna
- Raw Sienna
- Burnt Umber
- Cobalt Blue
- Ultramarine Violet
- Cobalt Violet
- French Ultramarine Blue
– Brushes
- Sable size 8
- Small Sword Liner
- Rigger size 2
– 4B Pencil
Step 1 – Drawing
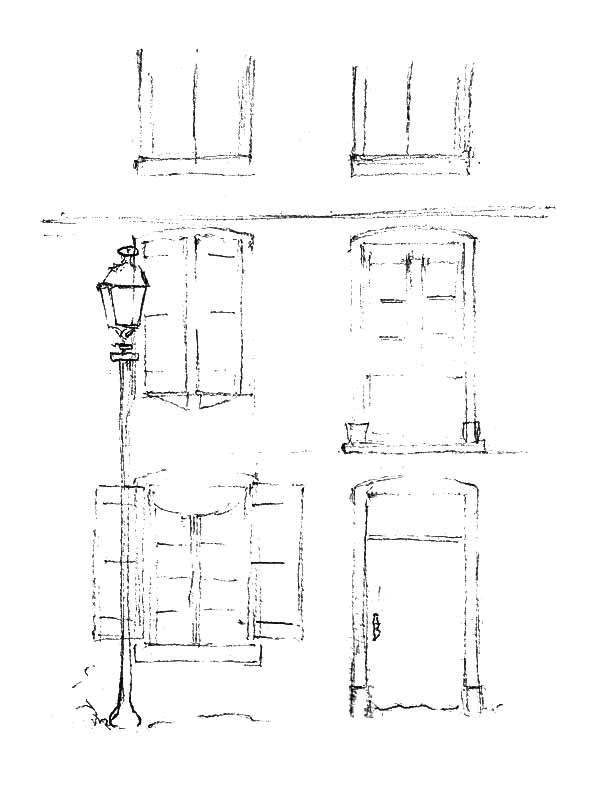
Use a soft pencil, 4B or higher, to lightly draw the two main windows and door. When you draw the windows, indicate the dark shadows – they obscure the window frames and glass in parts. Keep your pencil work loose and free, and when you draw the streetlight, do not worry about straight lines. You do not need to draw any of the branches and leaves. When I draw iI tell myself to “keep the pencil moving” this helps me keep loose and stops me getting slow and rigid with my lines.
Step 2 – First Wash
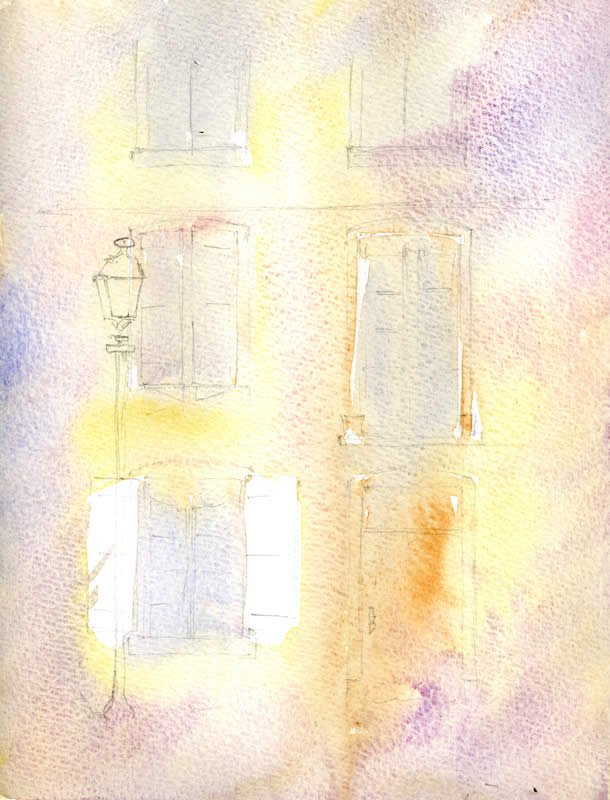
In your palette prepare very wet separate wells of Raw Sienna, Cobalt Violet, Cobalt Blue and Burnt Sienna. The key to the first wash is to keep your washes very wet. Apply mainly Raw Sienna across the paper. Leave a lighter wash and some white on the windows, and add a little Burnt Sienna to the door, but otherwise ignore the drawing marks altogether.
Whilst the paper is still wet, apply Cobalt Violet and Cobalt Blue to the parts of the paper that would be covered in shadow Let these colours mix on the paper. Do not worry about washes running together or colours not staying within pencil line boundaries. When you have completed this wash, allow it to dry and resist the urge to tinker or add more colour. I usually get up and make a coffee out of temptation’s way at this point.
Step 3 – Painting the Shadows
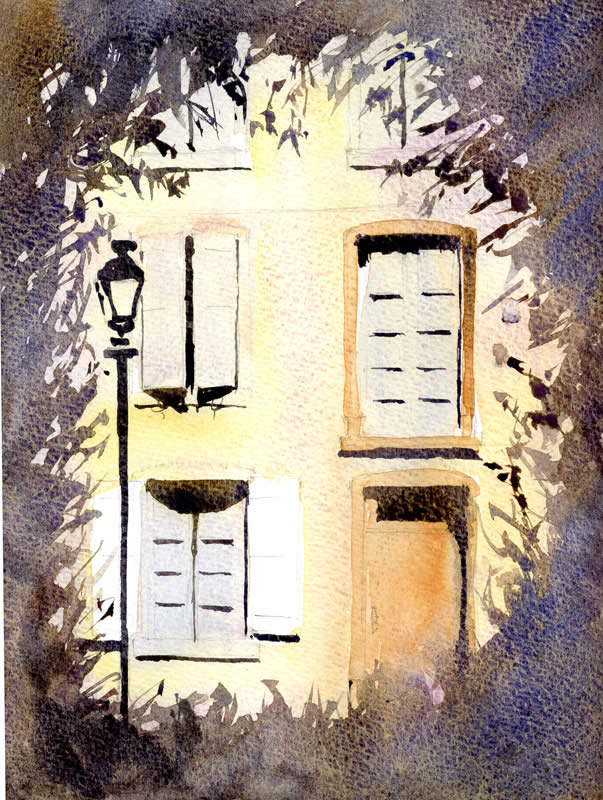
“Whacking in” the shadows so soon in the painting process is the key to this work. Use the existing colours in your palette (freshen them up if needed).
Also add a mix of Burnt Umber, Ultramarine Violet and French Ultramarine Blue. This combination produces a rich, dark and warm shadow colour. As you work vary this shadow mix by adding more Ultramarine Violet at one moment, then more Permanent Mauve or Ultramarine Blue at another. Varying your mix with each brushstroke will keep your shadows lively.
Using a rigger or Sword :iner brush for the finer lines of shadow in this step gives you two clear advantages. Firstly, it gives you the control you need at the edge of the shadows where you need to indicate a leaf or branch and where you need to paint the shadows on the windows and door. Secondly, it will give a free and energetic quality to your brushwork.
Add the shadows around the outside of the paper and also on the windows and doors. Have fun with the brush and try to work quickly. Do not be slow when painting the lamp post and lamp; work quickly and do not worry about the line being perfect. When the shadows have dried, add Burnt Sienna to the door and window boundaries.
Step 4 – final Details
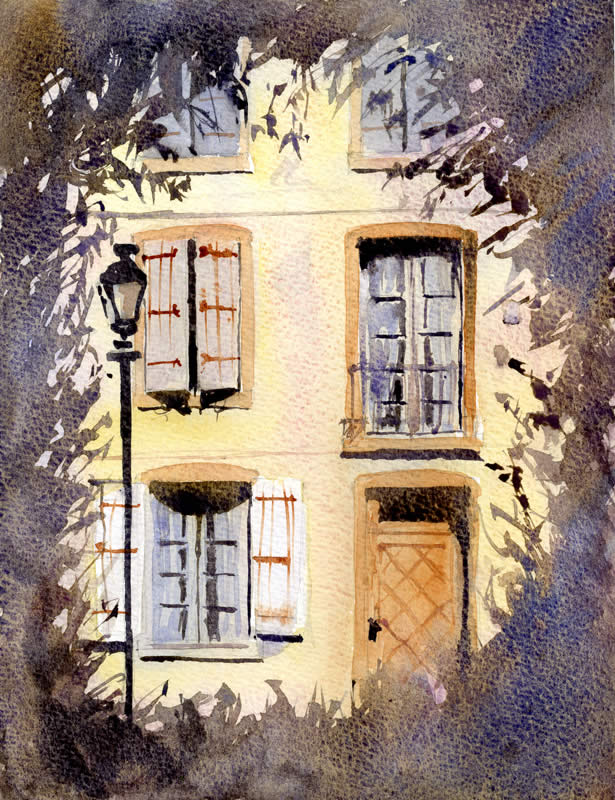
Complete the final step only after the last wash has dried. In this last step use a standard rigger to add the details to the windows and door. The watercolour artist Joseph Zbukvic calls this final step ‘ adding the jewellery’. Use the colours in your palette to add the details.
For the window curtains mix a weak grey wash from the colours in your palette.
Use Burnt Sienna on the window shutters and door. After the washes had dried I mixed the darkest tone I could from my palette and using my rigger, added the wrought ironwork at the bottom of the window and door handle.
I find finishing a work difficult, but I tell myself to stop and to resist making even the smallest change. It is so tempting when looking at a finished work to think that it could benefit from a few tweaks. With a work like this such action can be fatal. You want a clear energetic sketch that has an immediate and powerful appeal. It is often the case that the longer you look at a work the more areas you find for what you think are ‘improvements’. The advice I try to follow is ‘leave it alone’.
I think your perception of getting to your end result is amazing. I would have not thought of using the “darker” colors as freely as you did and get your end result. It is amazing. I am thinking of trying this with not so many washes with the colors you have chosen. God bless your gift!
Happy Thanksgiving…
What are you speaking of “moderation”?