About
I have been painting with watercolor since 1998.
My paintings cover a wide range of subjects including portraits ,seascapes, landscape, flowers, wildlife and townscapes. I do not feel inclined to specialise in any one category as any subject can make an interesting work of art.
I have been exhibiting at regional and National art shows over this period at which I have sold many paintings and received many of awards. In 2009 I won the prestigious John Copes Watercolour Prize.
I have also also exhibited and sold paintings at other major exhibitions such as the Sydney Royal Agricultural Easter Show and the Blacktown Art Show.
The Australian Artist Magazine has published my articles on two occasions.
I am a member of the Macquarie Towns Art Society as well as the Nepean Art Society at which I teach watercolour and run regular workshops.
I have created this site so it can act as a resource for my students and as a repository of some of the things I have learnt about watercolor.
To learn more about Joe and to view more free watercolor demonstrations, please visit his website by following the link below:
===> http://www.paintingwithwatercolors.com/
Bridge Steet, Melbourne
Street Scene Demonstration in Watercolor
(Click Images For Larger Views)
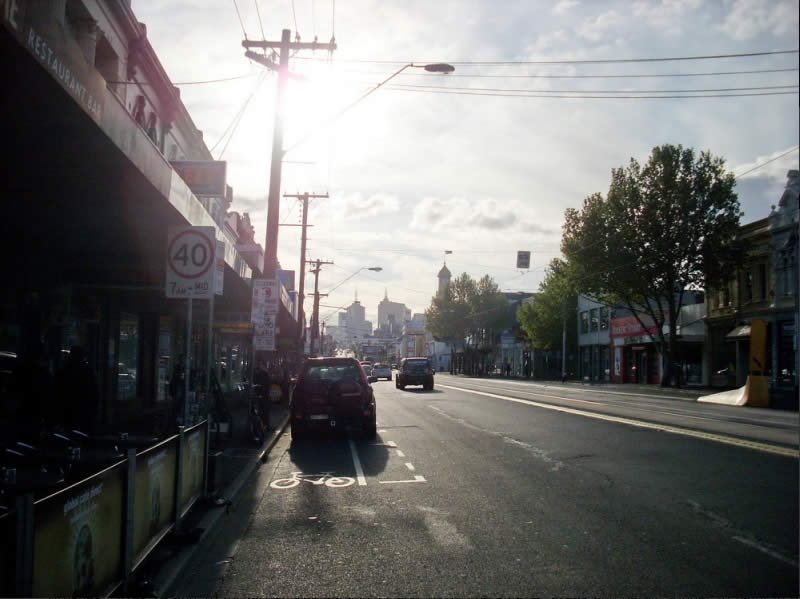
Reference Photo
Required Materials
Arches 300gsm Rough Watercolour Paper
Brushes: Sizes 24 and 16 for larger washes and 12 and 10 for the smaller areas and detail. Rigger to paint in the power lines.
Paints: All Winsor and Newton – Cobalt Blue, Cadmium Orange, French Ultramarine, Burnt Sienna, Alizarin Crimson are the main colors.
Backing board, masking tape, old towel to control wetness of your brushes.
Step One
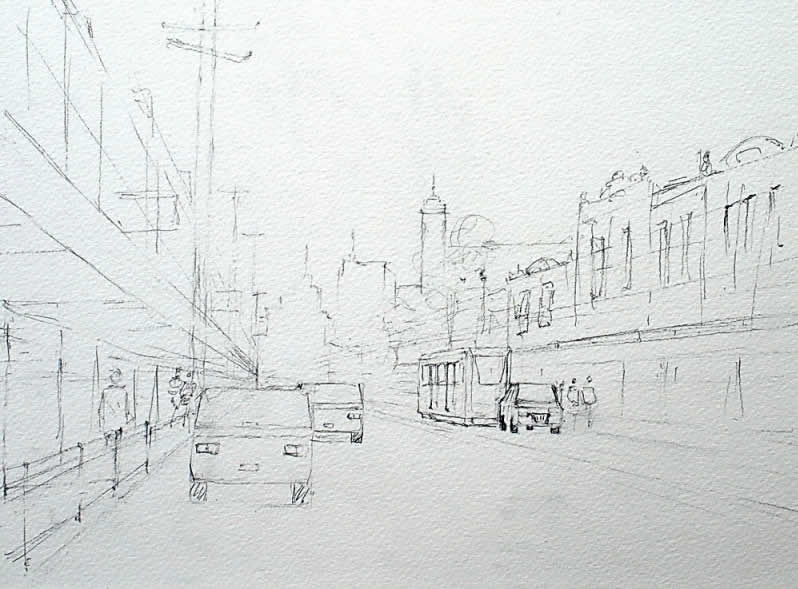
Draw a line across the sheet at eye level and then adjust everything from there. Start by drawing a person, in this case the one on the bottom left hand side of the painting. Then draw the car near him. Think about the proportions of the car to the man, the man to the awning above in etc, when doing the drawing. In this way everything should look like it fits together. I will be doing a future demonstration on just how to draw a street scene.
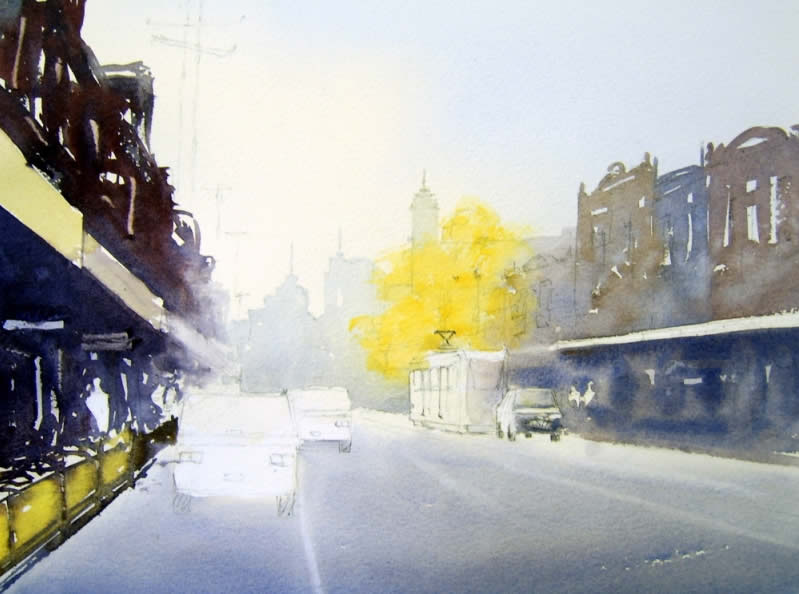
Notice in the drawing below that I made adjustments I felt added to the overall design of the image e.g. I put in the tram and car on the other side of the road and made the road a little narrower. I removed some of the trees on the right hand side and simplified the buildings there. When I do a painting like this I do not stick completely to what is in the photograph or the scene in front of me when painting from life. If I want an image with everything in it as is then I might as well just frame my photograph. Instead I make adjustments which I feel will give the message I want to convey with a minimum of brush strokes and drawing. In this case I wanted to show the sunset with people no doubt on their way home after a days work!
Step 2
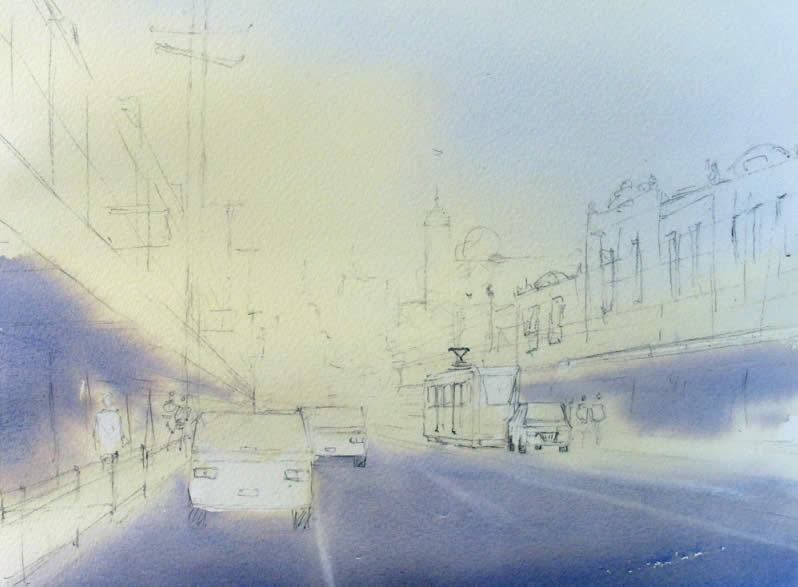
After you are happy with the drawing you will do your first wash. I make, very pale, separate mixes of Cobalt Blue and then another of Cad Orange. These will go into the sky as in Figure 3. I also use a mix of French Ultramarine, Alizarin Crimson and a touch of Burnt Sienna for the road surface.
I start by laying down the wash of Cad Orange (remember this must be very pale or it will lose its transparency) and Cobalt Blue in the sky. These washes go over the building areas as in the image. This under wash over the buildings will act as the cool and warm highlights later in the painting.
Make sure the sky washes have lots of water in them and let the Cad Orange mix bead at the top of the distant road surface. They put in the road wash. In this case you want to create a graded wash from light in the distance to strong tones in the foreground. Furthermore the Cad Orange bead should flow into the road and create a lighter section which will enhance the distance effect.
Drop some of the road mixture under the awnings to act as an under wash for the shadows there.
Leave this to dry thoroughly.
STEP 3
We will now paint the buildings on the right hand side of this scene.
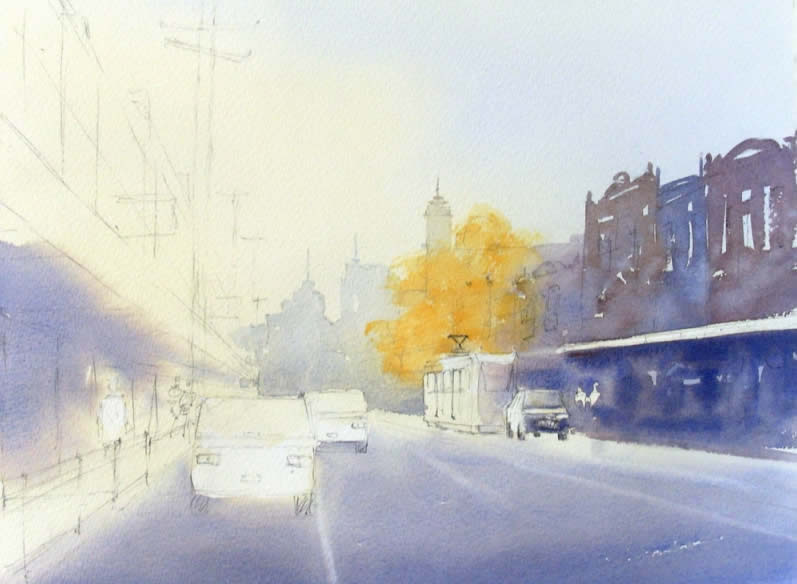
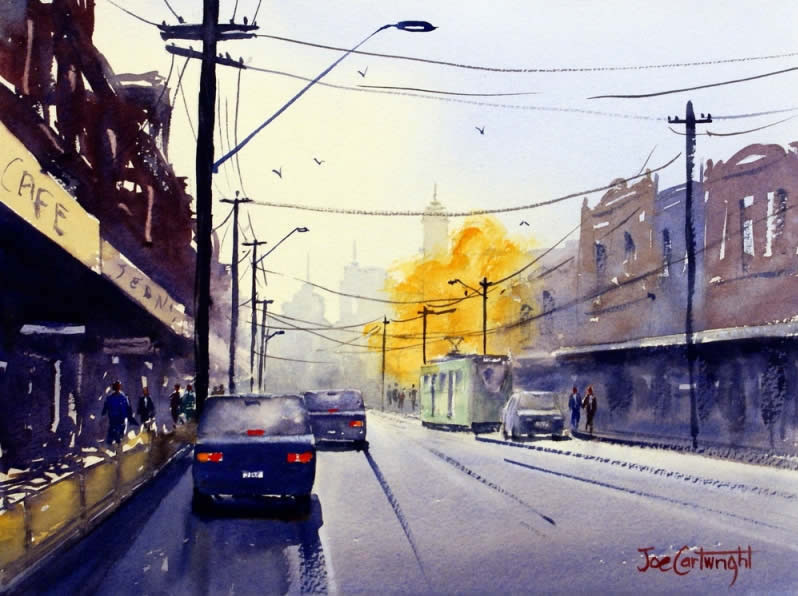
Make the distant ones very light and not so distinct with the colour leaning towards the blue grey (e.g. Cobalt Blue with a touch of Burnt Sienna and then as your move towards the edge of the paper add more pigment to strengthen the mix and warm it up with warmer colours (Burnt Sienna, French Ultramarine (instead of Cobalt Blue), Alizarin Crimson. Keep varying your colors. The tree is painted using Cad Orange. With swift expressive brush strokes leave highlights on the closer buildings to hint at windows and high lit parts of the walls.
I paint underneath the awning with French Ultramarine, Alizarin Crimson and Burnt Sienna leaning towards the blue. I leave some highlights here too.
I run some of the building colour into the front of the car and tram to connect them with the bigger shapes.
STEP 4
Next we paint the buildings on the left hand side.
Start with a strong mix of French Ultramarine, Burnt Sienna and some Alizarin Crimson for the parts above the awning and then lighten (by adding more water) and cool (by adding more blue) as you move towards the distant sections of the scene. At first leave highlights and sharp edges and then soften these edges towards the distance.
Under the awning lean the color more towards the blue as can be seen in figure 5. Leave unpainted areas as impressions of windows, signs and table tops. Paint around the figures if you can.
STEP 5
Painting the lamp posts, cars and tram come next. Keep in mind where the light is coming from as this will tell you which sections of each object will be lighter than and which will be dark. Make sure as well that objects which are closer to the foreground are stronger in tone that those in the distance. I used a pale green colour for the tram.
We can now finish the painting by doing the figures (again more detail and stronger tones of the figures closer to the viewer), shadows under the cars and tram as well as texture and shadows on the road surface.
I also added more color to the tree (more Cad Orange).
Finish off with signage, power lines, birds, etc.
Happy painting!
Joe Cartwright
This one is the best.
I have learned a lot.
Thank you very much.
Excellent tutorial – makes me want to pick up my india inks again!
Excellent tutorial i like
Wonderfull tutorial!, very detailed, thank you for sharing! I
Great tut! It truly demonstrates how rough the reference can be to a canvas for inspiration to an original piece.
Thanks for the tutorial, it is great. I have one basic question, look all over internet but get no answer. How do you mix the yellow and the blue in the sky and not get greenish tone where they meet. Thanks!