Barbara has achieved a tremendous following on both the national and international level as a watercolor painter with a vivid and unique style.
Her paintings have been featured in solo and group exhibitions in museums and galleries throughout the United States, including the Phillips Museum of Art in Lancaster, Pennsylvania; the Millicent Rogers Museum in Taos, Mexico; the Salmagundi Club New York City; The Neville Museum in Green Bay Wisconsin; and the Pittsburgh Center for the Arts
Barbara is a signature member of the National Watercolor Society, the International Guild of Realism, the Pennsylvania Watercolor Society, and the Northeast Watercolor Society, among others.
She has been published in the major watercolor publications Splash: the Best of Watercolor Painting, and Secrets of Watercolor Masters. Barbara has been a featured artist in the leading national art magazines American Artist and Watercolor Magic.
Barbara is represented by the Oxford Gallery, 267 Oxford Street, Rochester, NY 14607
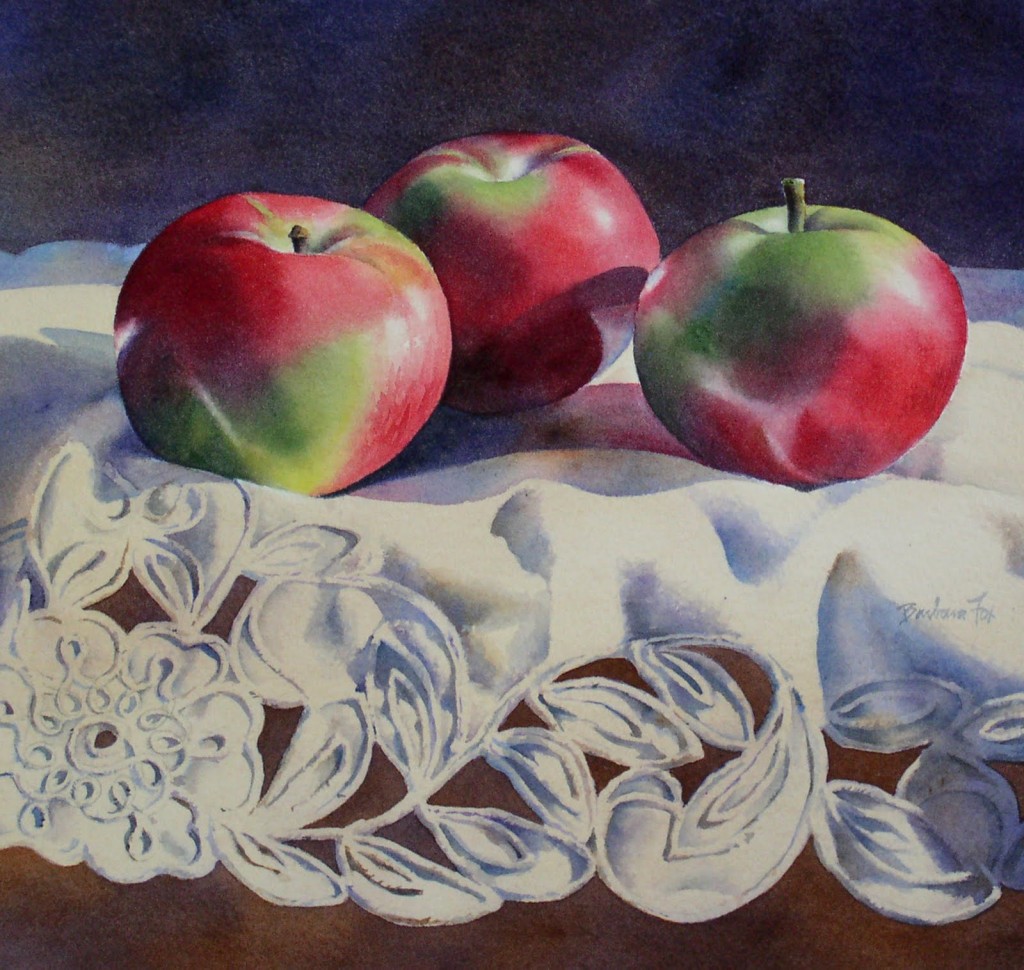
3 MacIntosh Apples – Step by Step Watercolor Painting Tutorial
3 MacIntosh Apples watercolor 11 x 11"
This demonstration uses lots of richly colored layers.
Paints I used (These paints are either Winsor Newton or M. Graham brand paints):
Dioxazine Violet
Permanent Rose
Napthol Red (Cadmium Red medium is comparable)
Cadmium Orange
Alizarin Crimson
Sap Green
Hookers Green
Prussian Blue
Ultramarine Blue
Cobalt Blue
Burnt Umber
Burnt Sienna
Raw Sienna
Sepia
Paper I use is Jack Richeson 300 # cold press watercolor paper
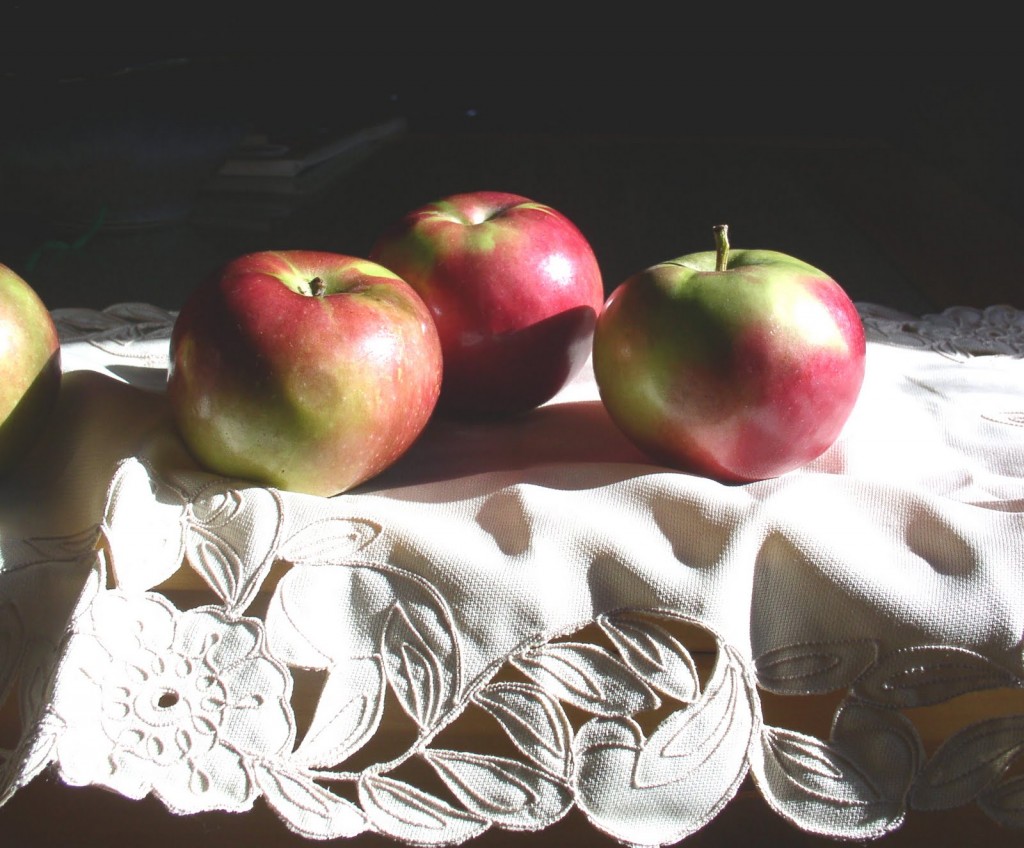
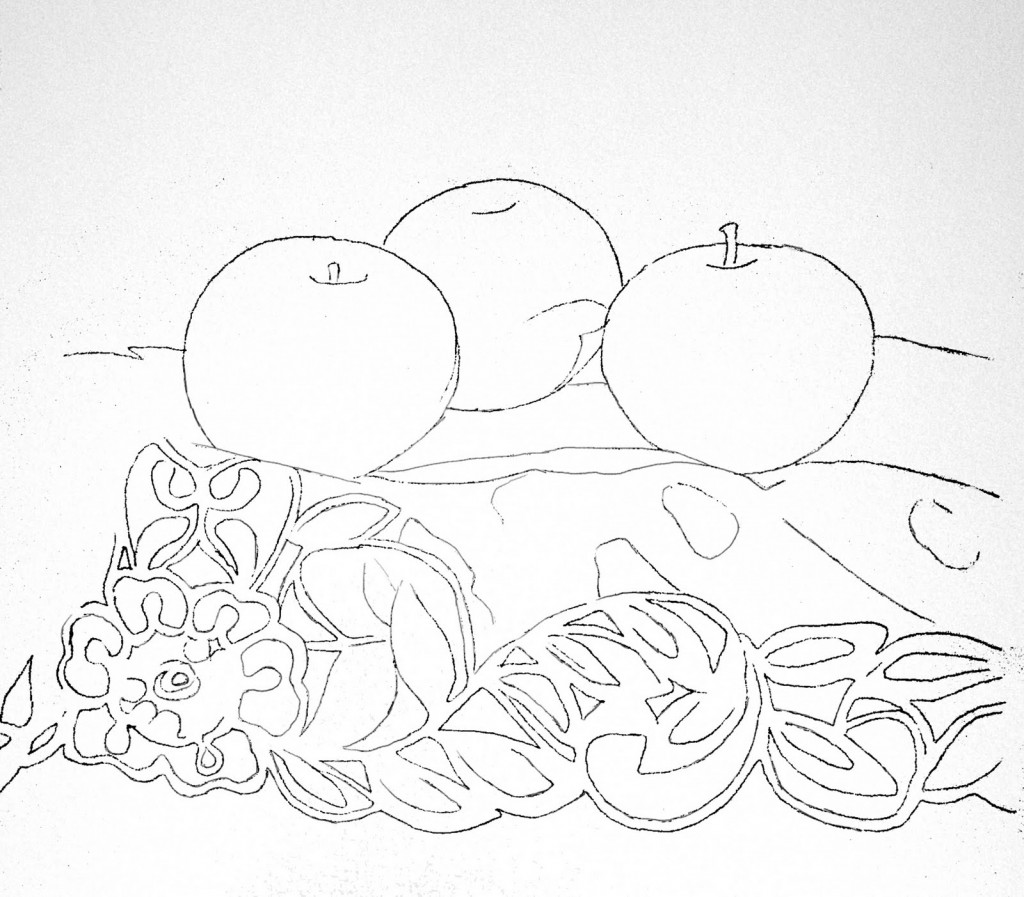
Here is the photograph I worked from. I generally do a simple outline drawing, then blow it up to the size I want to paint.
Here is the drawing.
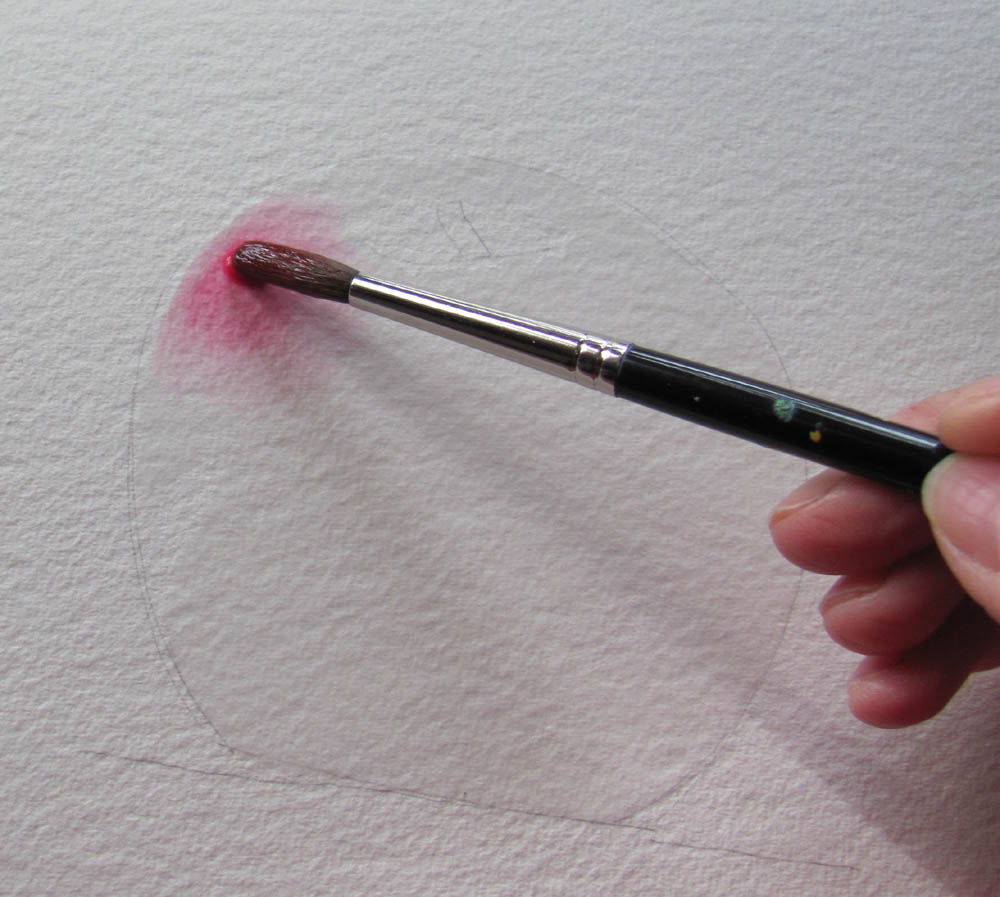
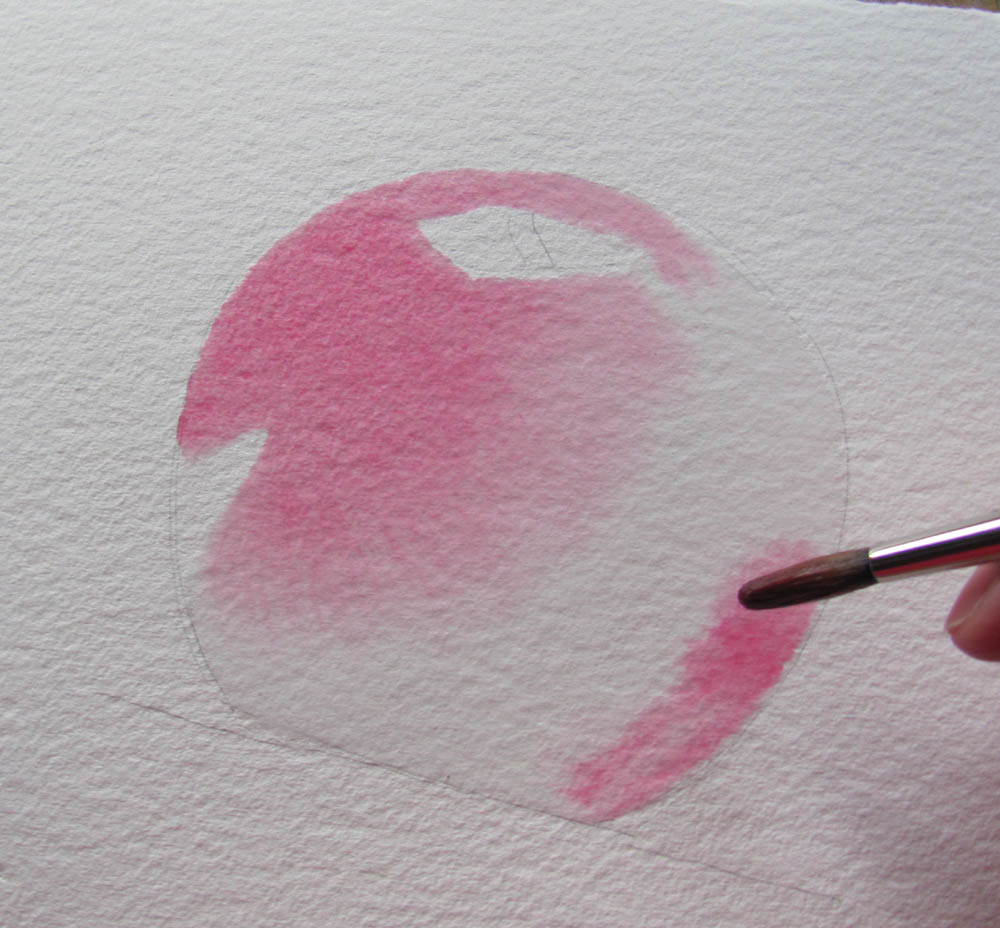
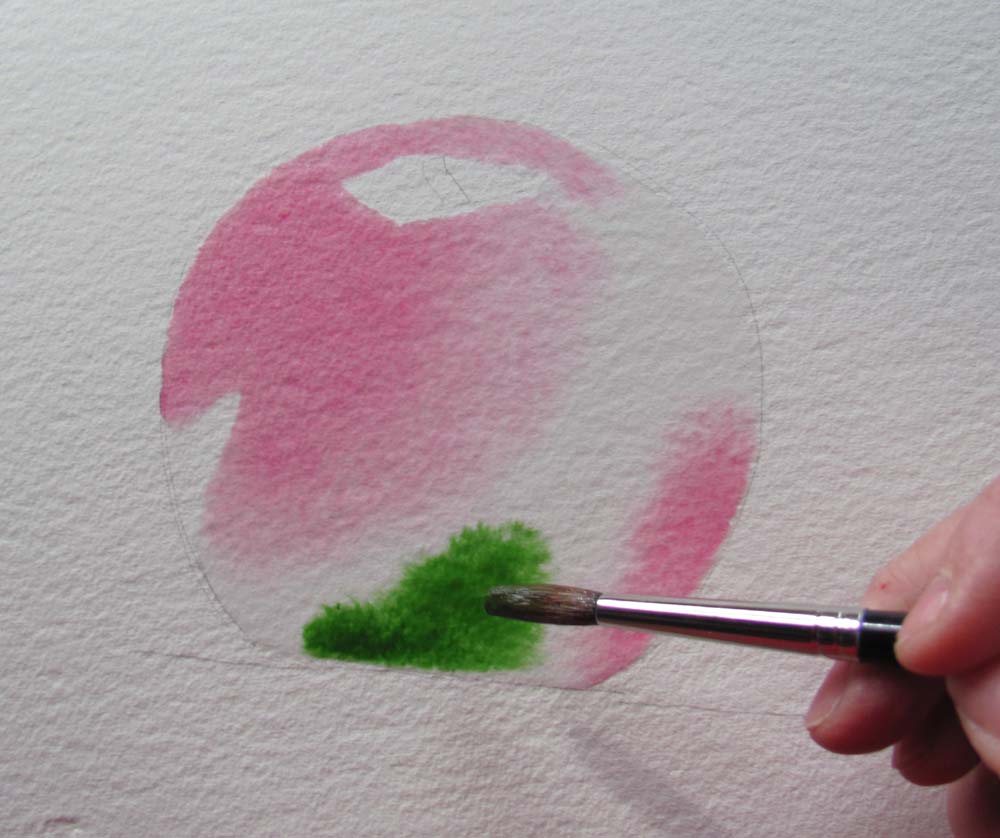
Step 1. Base Layer
My first layer of wash I call the “Base Layer”. This is generally a wet on wet wash using the actual colors of the subject, in this case, red and green for the apples (Permanent Rose*, Napthol Red, and Sap Green). The apples were first wet with pure water, then the colors were applied by just touching the brush to the paper. The paint is carried by the water, and the 2 colors mix beautifully, with just a few nudges of the brush. Too much brushwork at this point would muddy the colors. Remember, there are lots of layers of color to come, so there is plenty of time to tweak the image. Also, leave white areas for the very light areas and highlights on the apple.
A close up of one apple, Step 1:
The apples were first wet with pure water
Then the colors were applied by just touching the brush to the paper. Leave white areas for the very light areas and highlights on the apple.
The paint is carried by the water, and the 2 colors mix beautifully, with just a few nudges of the brush.
An extra bit of Permanent Rose on the lower left side, and blotting the hard edge around the stem.
The wash under the lace material is Burnt Sienna, Dioxazine Violet, and Permanent Rose, all flooded into a wet wash. Again, notice how well they mix when added to the wet paper. The background wash is Burnt Umber, Dioxazine Violet, and Ultramarine Blue.
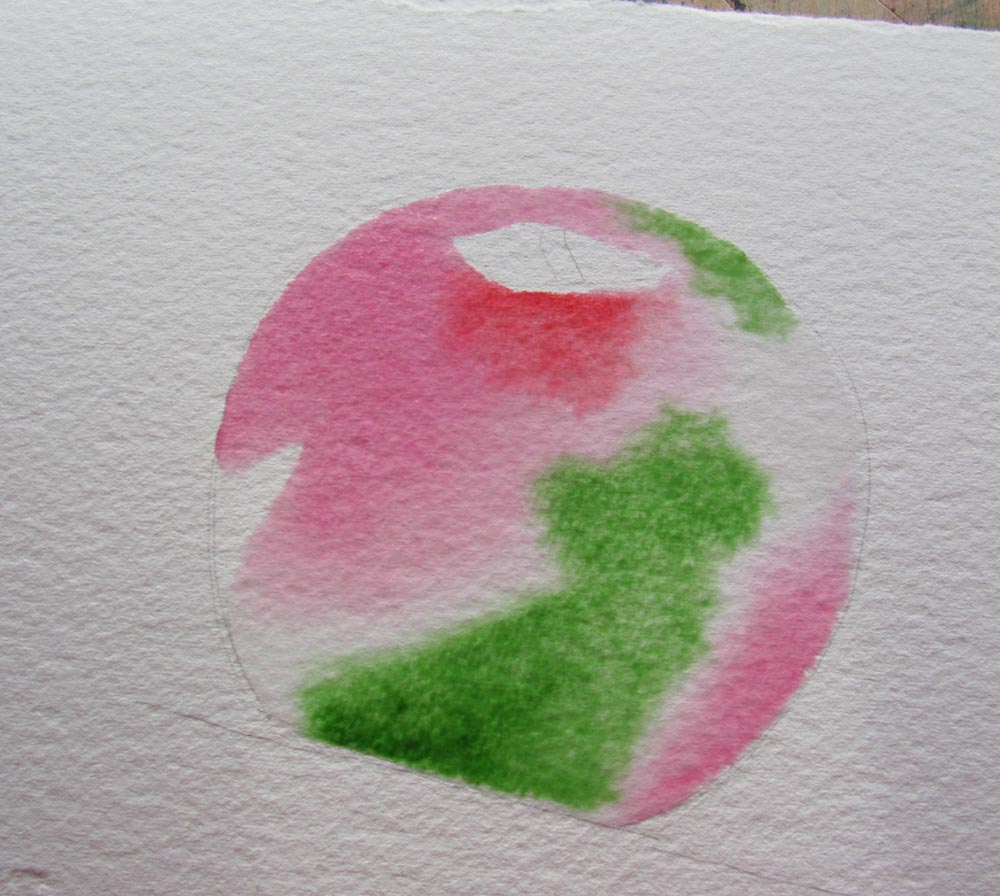
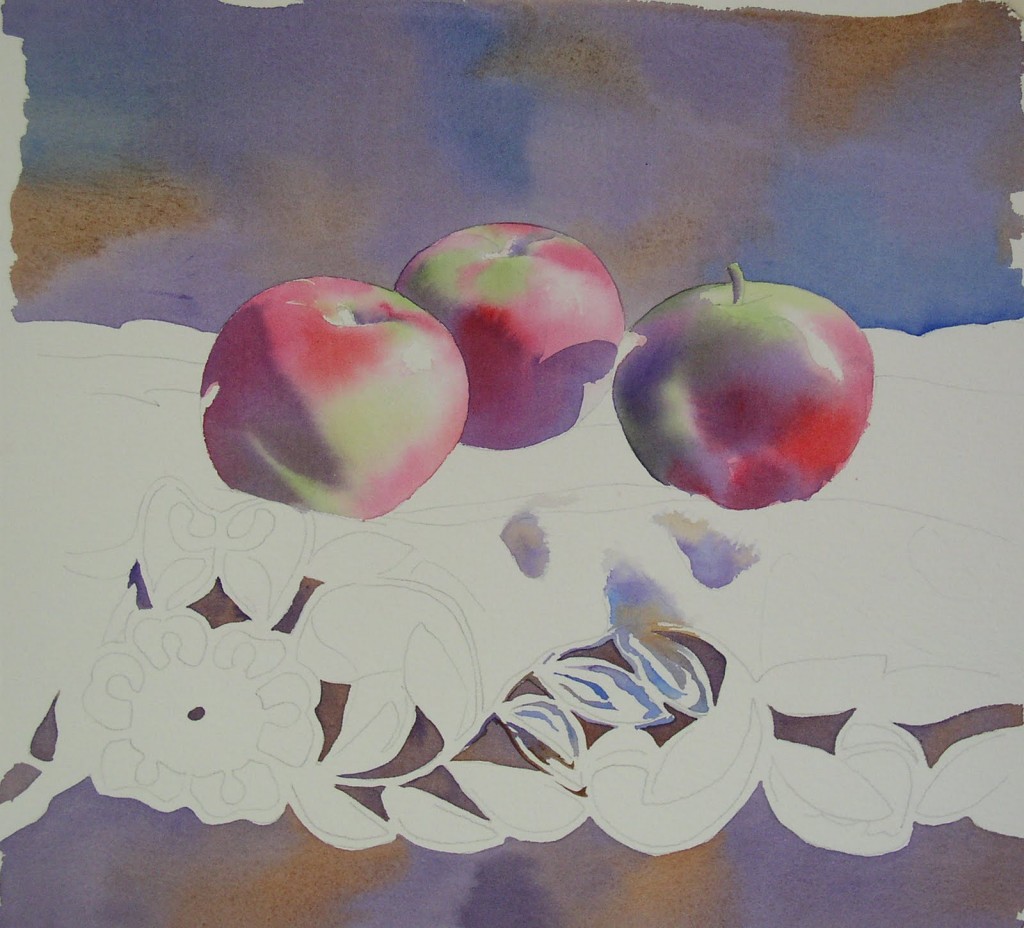
Step 2. Shadows (photo above)
I use Dioxazine Violet to paint the shadows on the apples, leaving the highlighted areas.
I begin painting the shadows and the detail on the lace using Dioxazine Violet, Cobalt Blue, and Raw Sienna. I don’t mix them, but just dip my brush into a different color from time to time, and let them mix themselves. It can look a little garish at this point, but I know I will be painting over them again , and the shadows will eventually be darkened which will unify the colors.
The lace detail and shadow is coming along. Although painting the lace is tedious, I know that rendering it carefully will make a better painting.
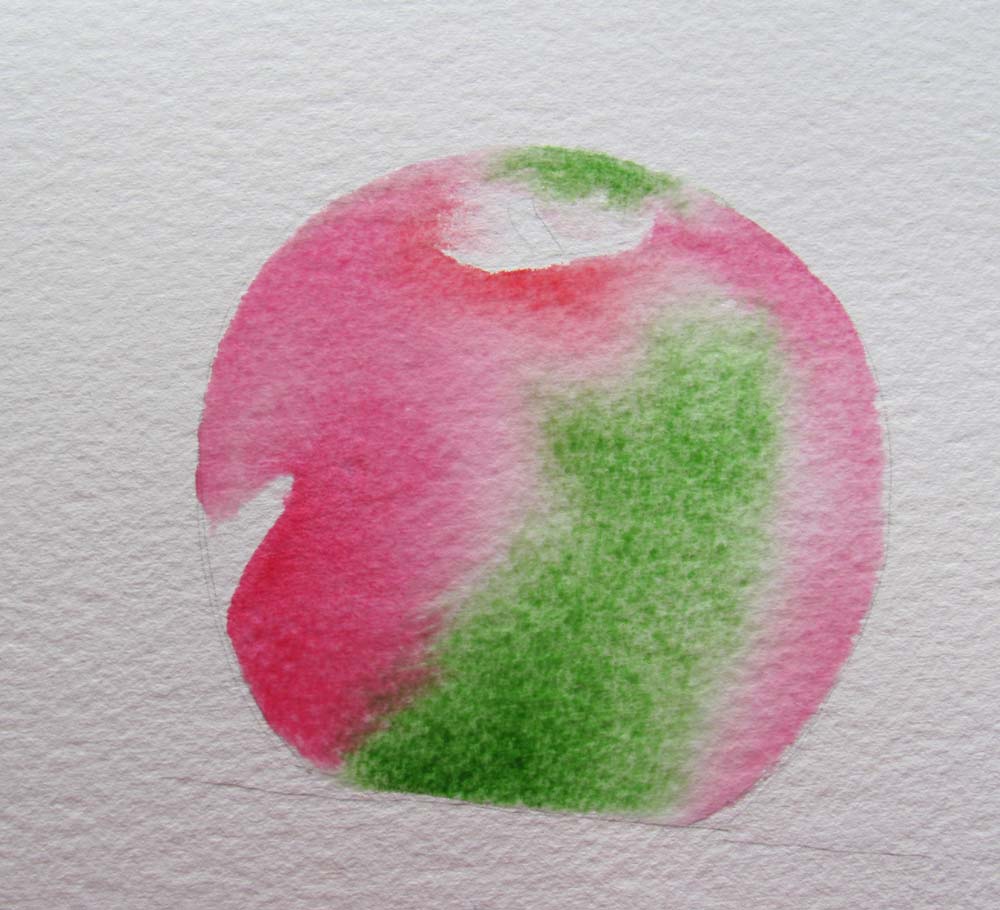
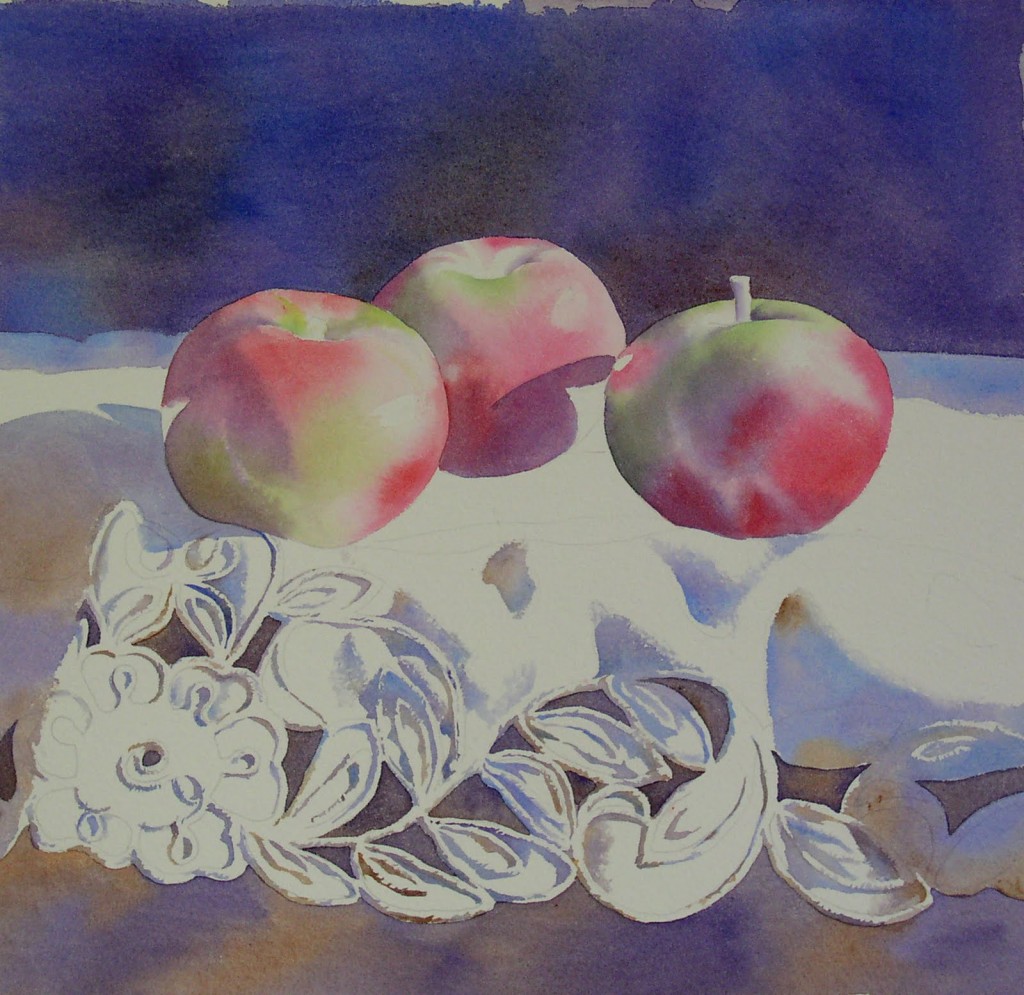
Step 3. Second Layer (photos above and below)
I painted a layer of Ultramarine Blue in the background, and a layer of Burnt Umber below the lace. You can see where I have a few more holes to fill in the lace. I painted another layer of green (Sap Green) and red (this time Alizarin Crimson) on the apples.
For Layer #2 on the apples, I wet the entire apple with water, then flood in the colors**. Remember to leave the highlights.
I painted a very light layer of Raw Sienna over the entire lace area. This helps unify the colors that I used for the shadows, and keeps the material from being too glaringly white, and attention grabbing.
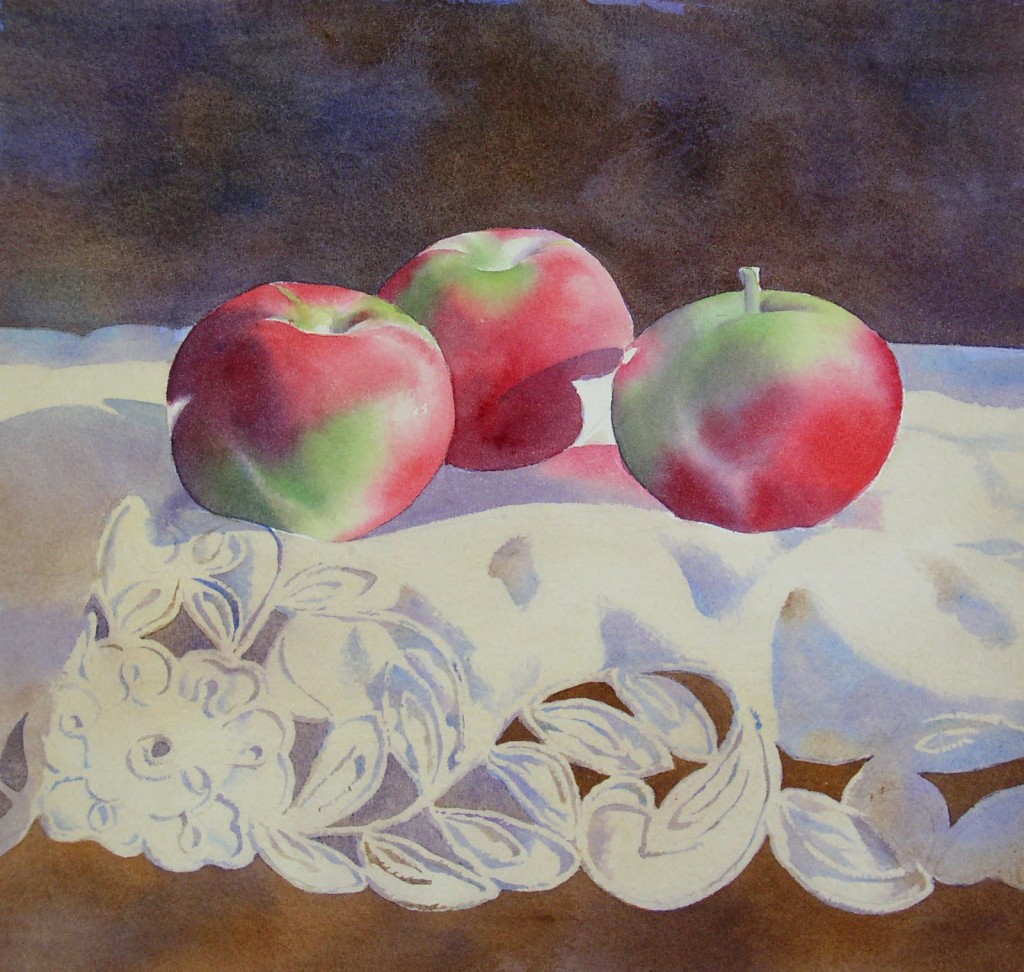
Step 4. Value adjusting (photo above)
The painting needs deeper shadows, and I would like the apples to have richer colors. I paint over the apple’s shadows using Dioxazine Purple in the red areas, and Prussian Blue in the green areas. I paint a little Cobalt Blue on the highlight on the middle apple, and a wee bit of Cadmium Orange on the top right of the first apple.
I deepen some parts if the folds in the lace, and work on the lace detail a little more.
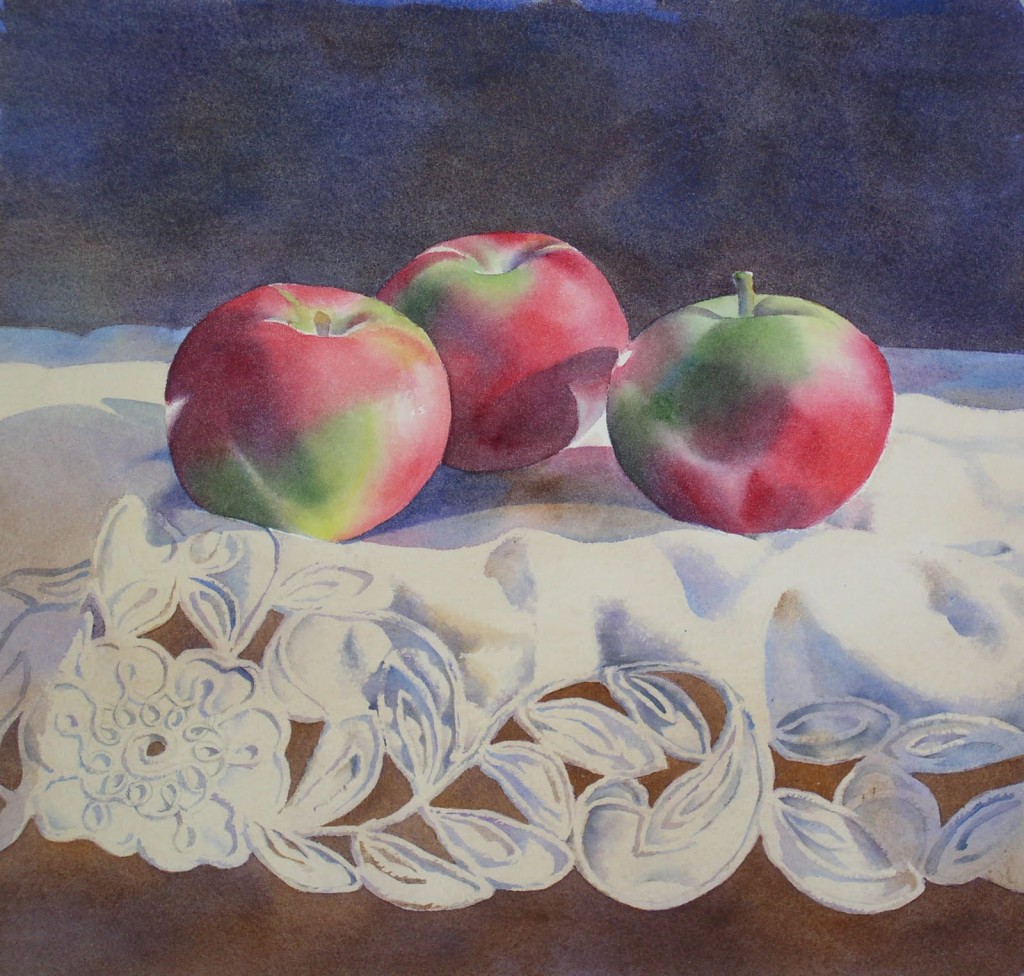
Step 5. Details (photo above)
Another layer of Alizarin Crimson and Sap Green on the apple, this time with a little Hookers Green for the cooler green areas.
I use Dioxazine Violet and Sepia on the stems of the apple. I deepen the shadows between the apples using Dioxazine Violet and Ultramarine Blue, with a little Alizarin Crimson.
More detail work on the lace, and another layer of Dioxazine Violet under the lace AND in the background.***
The final step is making really dark areas darker (the stems, and shadows right under the apples), and lightening some highlights. I scrub out some lighter areas around the stems, and the highlights and reflected lights with a small, stiff brush and plenty of water.
* when painting a red subject, I usually start with Permanent Rose. It is a rich and warm pink, and looks better then a lighter wash of Alizarin Crimson. I use Alizarin Crimson for dark, intense reds, but a washy version looks dull to me.
** Doesn’t the water wash out the color underneath? No, not as long as you aren’t brushing it too much. The dry paint will stay put for the most part, unless it is disturbed with a lot of brushing. Water, good, Brush, bad.
*** Why so much Dioxazine Violet??? Not quite sure why, but I love it. It is a lovely purple, but also the perfect neutral. It seems to work great as a shadow color on any other color, and seems to cool when a color needs to be cooled, or warm when a color needs to be warmed. Take note, that I almost never mix it with another color, but use it as a wash over another color.
Comments
Jerome _mdnsays
and they said watercolor is for amateurs.
Arielsays
This is one of the best tutorials I’ve seen on the internet! Thank you very much for your generosity in sharing your techniques. All your works look fresh, and inspiring, especially the flowers — So fresh I can almost smell them! 🙂
Miguelsays
Congratulations. The best step by step watercolor I have seen ever. It is fantastic explained and as a watercolour fan I love all the explanations and details sharing your work thank you Miguel
Dalesays
You make the apples seem as though I could pick one up and eat it. Wow, beautiful. Thank you for sharing your talent and tips with me/us. Dale Powell
wonderful instruction i have seen i need more tips
Stephaniesays
Thank you so much! Great technique and explanations!
Milindsays
Excellent…
shreyasays
Awesome tutorial 🙂 This is exactly what I was searching now.
Rohnsays
Please tell me what is the ‘pigeon’ watercolor painting technique.
Manuelsays
Brilliant Tutorial! One of the best Ive seen so far…
Thank you M
Maria D Sortinosays
BELLISIMO TUTORIAL, BEAUTIFUL YOUR COLORS, I DID 2 YEARS AGO, I DID NOT GO TO ME AS GOOD AS YOU. YOU COULD ME SAY THE MESCLA YOU USE FOR THE SHADOW OF VERY DARK TABLECLOTH THE FINE SHADOWS
Barbarasays
Beautiful, I would benefit much by seeing you do this, see your technique.


and they said watercolor is for amateurs.
This is one of the best tutorials I’ve seen on the internet! Thank you very much for your generosity in sharing your techniques. All your works look fresh, and inspiring, especially the flowers — So fresh I can almost smell them! 🙂
Congratulations. The best step by step watercolor I have seen ever. It is fantastic explained and as a watercolour fan I love all the explanations and details sharing your work
thank you
Miguel
You make the apples seem as though I could pick one up and eat it. Wow, beautiful. Thank you for sharing your talent and tips with me/us. Dale Powell
Wonderful instructions!
wonderful instruction i have seen i need more tips
Thank you so much! Great technique and explanations!
Excellent…
Awesome tutorial 🙂 This is exactly what I was searching now.
Please tell me what is the ‘pigeon’ watercolor painting technique.
Brilliant Tutorial!
One of the best Ive seen so far…
Thank you
M
BELLISIMO TUTORIAL, BEAUTIFUL YOUR COLORS, I DID 2 YEARS AGO, I DID NOT GO TO ME AS GOOD AS YOU. YOU COULD ME SAY THE MESCLA YOU USE FOR THE SHADOW OF VERY DARK TABLECLOTH THE FINE SHADOWS
Beautiful, I would benefit much by seeing you do this, see your technique.