About the Artist
In 2002, I picked up my art pencil again after 20+ years. During this break, I devoted my time to my family and building a career. Even though I earned my Bachelor of Fine Art degree at the University of Northern Iowa, my career path ventured away from the fine arts.
I am currently an IT Manager at a medical auditing firm in Des Moines, IA. My children are in college and it’s now time for me to explore my arts again! I live with my wonderful husband, Les, in the small town of Mitchellville, Iowa.
– Diane Wright
To learn more about Diane and to view her work, please visit her website:
https://www.dianewrightfineart.com/
Rock Drawing Tutorial by Diane Wright
While I haven’t had the opportunity to draw many rocks in my landscapes (yet), they can certainly add interest to any landscape. I consider them just one more opportunity to add a different texture to the scene.
There are different kinds of rock formations. From sandstone, shale, limestone, volcanic to boulders. Each one will hold different textures and ‘feel’ to them.
This lesson will be very specific and we are going to study the drawing of a close-up view of rocks. Our goal is two fold. 1) To understand the how to create the shape and depth of rocks, and 2) to learn how to create textured, realistic looking rocks.
Materials Needed:
F and 2B .5 mechanical pencils 4H and 2H clutch pencils Blu-Tack or kneaded eraser Battery operated eraser Strathmore 300 Series Bristol Board Smooth paper
Sketching
Sketching… Never underestimate the power of just sketching. I seldom just sit and watch television, but when I do, I usually have a folder full of photos and I just sketch. Here is a sketch of a group of rocks… .
Find some photos of rocks and sketch them. Don’t let the rest of the landscape intimidate you as you sketch the rocks. Pick out the sections that interest you and just sketch.

Creating Three-dimensionality and form
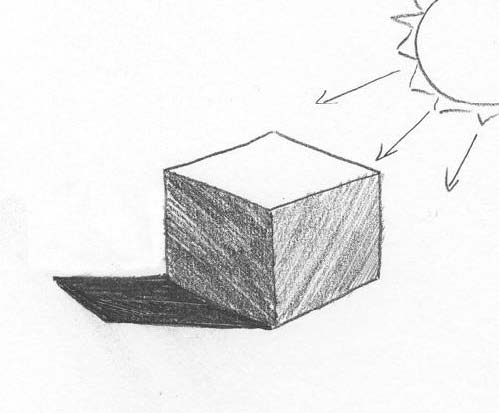
At first glance they seem to be easy to draw. I find they a bit more challenging than that. They beg to have three-dimensionality and form. Light and shading play an important roll in drawing realistic rocks.
I find the best comparison to make is to use a cube. In order to create this three-dimensional form we have to use light and shadow. The plane with the most direct sunlight is the brightest. The plane with the no sunlight is the darkest. With a strong light, the shadow will be short and dark.
Let’s relate this concept to a grouping of rocks. These rocks are drawn to emphasize their angles and planes. The light source is to the upper right.
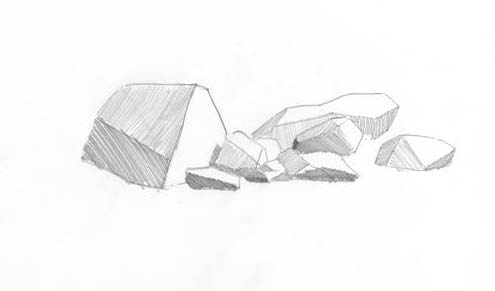
This sketch softens the edges of the rocks but the planes are still very visible, creating solid three-dimensional rocks.

I find most tutorials stop at this point when explaining how to draw rocks. Do you see the problem with this? Will these sketches really work in a realistic landscape? What’s missing or rather what is there too much of?? White. There is just not enough tone or detail too.
So let’s keep going… .
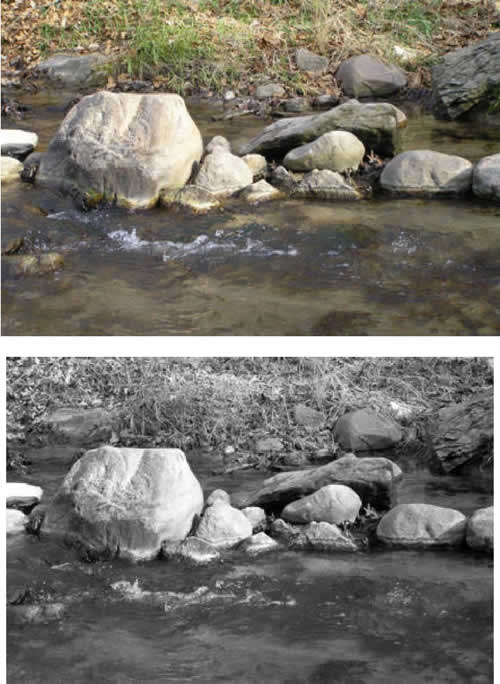
Here is the reference photo in both color and grayscale that we will be using for the rest of this tutorial. I like to draw and study from both images. The grayscale helps to match the tones, but color helps in the details.
Step 1
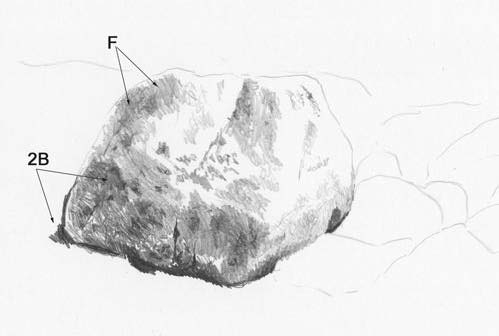
We are going to draw the large boulder on the left. I start with a 2B pencil and sketch in the darkest areas. The lighter areas are sketched in using an F lead weight. Using short random marks, I concentrate on the indents and shadowed areas. Be sure to draw in all of the darkest areas in this step (I will explain further in the third step)
Step 2
Once you have the preliminary details drawn, use the clutch pencil with a chisel edge to apply a smooth even layer over the surface. The lighter areas I use the 4H, and use 2H in the shadowed areas. Remember the planes and angles for lighting.
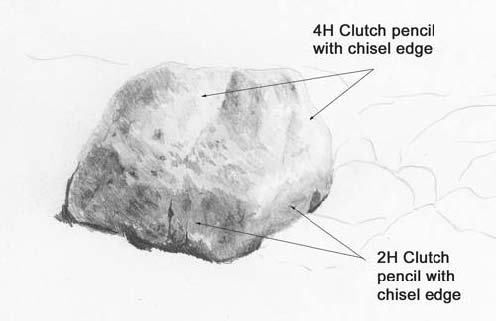
Step 3
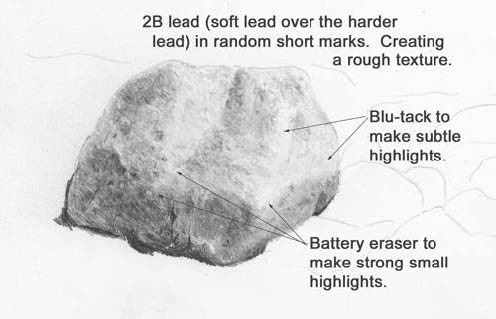
Now the fun starts! Using a softer lead in the mechanical pencil, start creating the texture! use random short marks to create pits and a rough surface. That’s right; use a softer lead over the harder lead. We all know that using softer lead over harder lead creates a very uneven surface. But it works wonders in creating a random, uneven texture for rocks.
The chisel edge is important as it creates a flat wide mark. To create a chisel edge, use sandpaper; angle your pencil and scrub!
Using these harder leads may be new to some of you, but they create wonderful light values that otherwise would be very difficult to achieve.
Continue building and layering. Use the Blu-Tack to create subtle highlights. Press the Blu-Tack onto an area and lift the graphite off. Use the battery-operated eraser to create small strong highlights.
I mentioned in step 1 to be sure you have all your darkest areas drawn BEFORE you proceed onto step 2. The reason should be obvious. Once the harder lead is laid down, you will not be able to achieve those rich blacks!
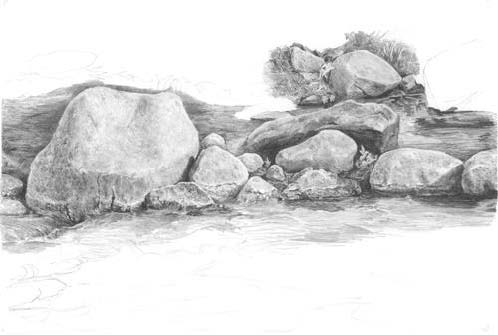
Here is my completed rock study…
Diane Wright © This Rock Drawing Tutorial and all Artwork is Copyright Diane Wright 2007
very beautiful sketch, this is one blog about the lessons to draw the best I’ve ever met. I like the illustrator’s technique sketch. the idea is also simple picture, the stones in the river is very interesting …. hmmmm
Thank you for a remarkable tutorial. For the beginner like me this is of particular value. Keeps us going and not disheartened!
Wish you all the best in your artistic career!
Kind regards, Jolanta
most of my life never been to art school,i learnt to draw by watching & trying out .&reading instructional books.your instructions are simple @ easy to follow to get realistic drawing…
Wow! The detail and feel are amazing. I like the way you can see how a sketch actually evolves. I think this might be a bit beyond me, but I’m going to try sketching from those photos, and maybe I’ll venture out and take some of my own at the weekend.
Great stuff, thanks!
.-= Jeff´s last blog ..How to screw up a corkscrew =-.
i used to experiment with pencil sketching as a child, i did some portraits and landscapes but soon realized that something was missing. even after a gap of some 35 years i keep staring at sketches and paintings of others and now know that i am not able to let go of the inner desire to sketch or paint. Thank you for re-kindling in me, the desire to take pencil and charcoal up once again in an effort to live my dream.
Hi Diane,
I would like to know if I could get the Beginners art instructions in DVD, and how much would it cost? I’m an artist but there is so much I haven’t learned yet cause I’ve never being able to stay with it long enough to learn what I need to learn….I do hope you can help me!!! I can draw and also I can paint, but I had whole lot rather paint than anything else, but I have a project to do and it requires for me to draw and I don’t know how to draw rocks. I read your instructions up above on rocks. I think I could learn it much better by doing and by a DVD.
Please reply to this letter, and it will be greatly appreciated!!!
Kay Nowicki
Thought that rocks are easy to draw but to draw them with correct details give me an ohh i see. Thanks to this post. There is always something to learn when you’re reading.
Most people think drawing rocks is easy. Well it isn’t, let me tell you. I’ve been drawing for a numbers of years now and I still have trouble with them. You wouldn’t think a rock would be so hard. Great tutorial. Very well explained and illustrated. Thanks
Good post. I learn something totally new and challenging on sites
I stumbleupon everyday. It’s always helpful to read articles from other authors and practice something from their sites.
I thought that drawing rocks was very easy. But I have a lot of problems trying to drawing it. With this tips
I will try again. I hope I could do it. I love this tutorial. Excellent job
Wow great rock history and study.
If I may ask what about labeling of rocks, don’t you do that too,as far as am concerned rock studying also deals with rock labeling.
Big thanks sir