Oil Portrait Painting Demo Step by Step – “Brittany”
Below is a detailed step by step oil portrait tutorial by the very talented artist Scott Burdick (see bio at the end of the tutorial). I hope you enjoy and find this interesting and educational. Scott has some wonderful instructional videos available for purchase over at his site here if you would like to continuing learning from him. Enjoy!
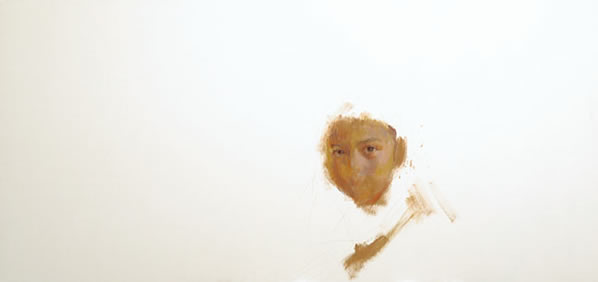
Once I’d figured out the correct size of my canvas (26″ by 50″), I started with a few basic charcoal marks to place the head and make sure I had it approximately life-size. For this painting I didn’t draw out any of the features since the subject is simple enough that I can just paint and work out the details as I go. The main advantage of this approach is that it keeps you from painting up to lines and ending up with stale brushwork. To paint this way requires a great deal of drawing practice since you are basically thinking about your drawing and proportions with every brushstroke, rather than concentrating on drawing first and then painting next.
Here you can see the underlying, large shapes that I started with. I’ve already started laying in the smaller shapes of the eyes over the top of the tone of the face, but you can still see the underlying shapes of the nose, mouth and chin before the details of those areas have been placed. Getting these large shapes correct before going into the details are the most essential part of your painting.
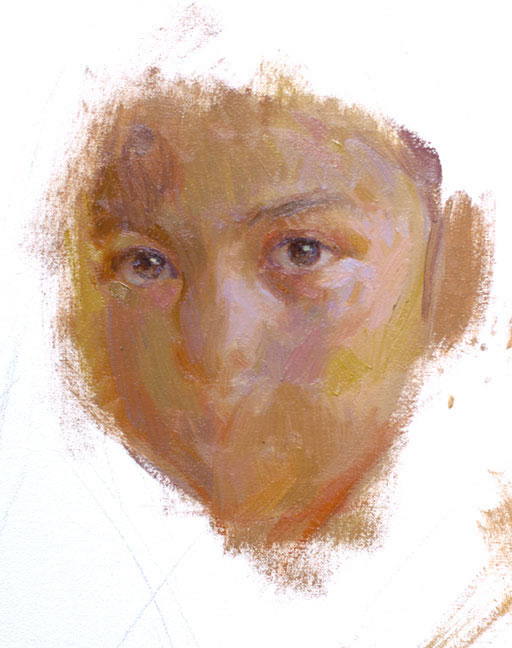
Now I continue working out the medium sized shapes of the nose and lip area. Notice how I’m not dividing the lips along anatomical divisions, but by the large light patterns, treating the upper and lower lips as the same shape both in the light and shadow. Always start with the largest, simplest shape you can and then go onto smaller shapes on top of this.
Each new element that I add is carefully compared to what’s already on the canvas. To determine the exact placement of the ear, for example, I first held up my brush horizontally across the photograph and checked where the top and bottom of the ear came in relation to the eyes and nose. Then, to find out how far to the left the ear should be, I measured the distance from the side of the model’s left eye to the outside edge of the ear (on the photograph) and compared that unit to portions of the face I’d already drawn. For instance, the distance from the outside edge of the model’s left eye to the outside edge of the ear is the same as the distance from the outside edge of the model’s left eye to the inside corner of her right eye. Since I already had the eyes worked out on the canvas, I simply used my brush to measure that distance and then made a mark where the outside edge of the ear will be. I do this constantly whenever I come to something new in a painting (especially if it is a large distance). Measuring and drawing will eventually become so natural that you do it almost without thinking and it takes but a couple of seconds.
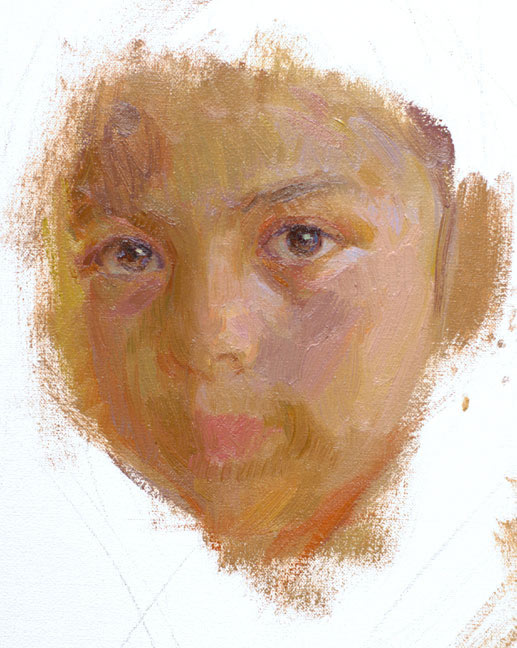
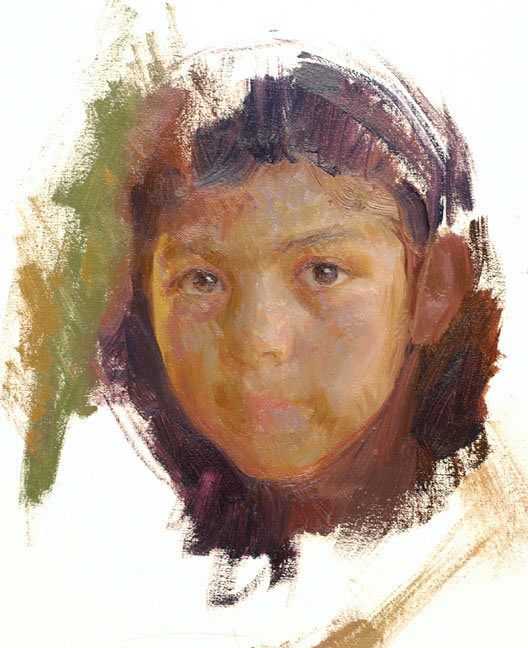
As I slowly define the boundaries of the face, I’m constantly holding my brush up horizontally and vertically to see where landmarks line up with things I’ve already painted. Notice also how nice a variety of edges you can achieve when working into paint already there.
I just slowly and methodically keep working from one thing to the next. With a palette knife, I block in some red strokes for the shirt.
Now I paint in the details of the lips and continue refining the features. You can leave things loose the way they were at the earlier stages or just start refining them until you have a very polished and detailed rendering. It’s really just a matter of what you’re going for in that particular painting.
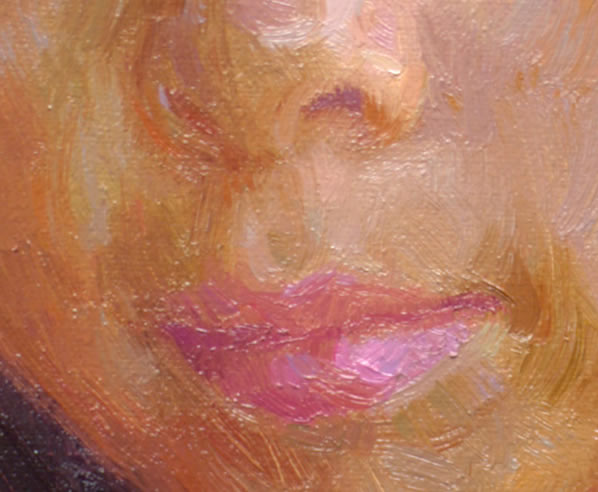
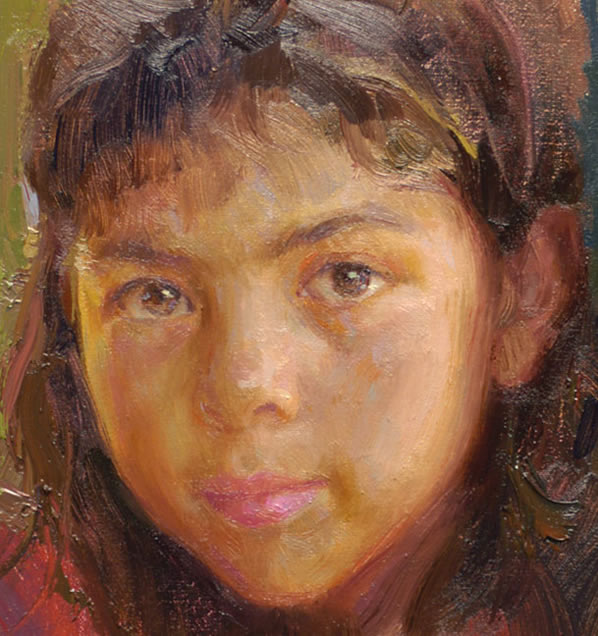
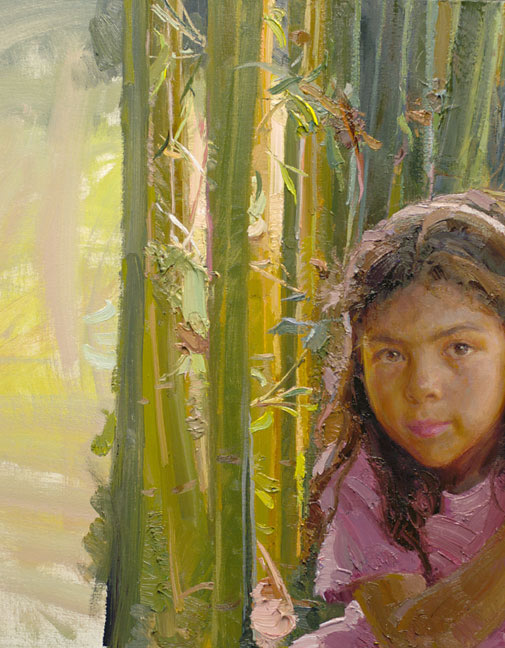
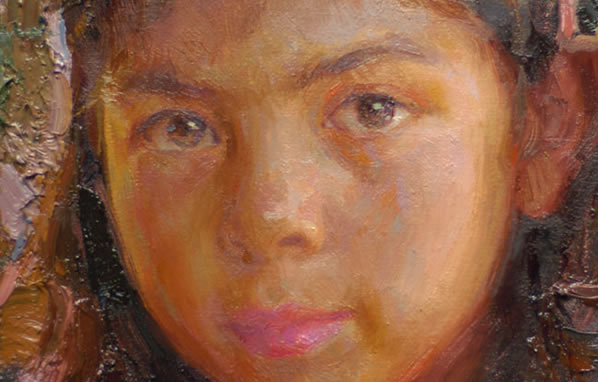
Here’s a close-up of the lips and nose so you can see the brushwork. Be especially conscious when doing the darks in areas like this that are surrounded by light lest you make the accents too dark. Squint and compare them to large areas of darks. Photographs will often push many of the darks into pure black, regardless of their actual relationship in real life. Think of these small dark accents the way you would if painting a tree branch against a light sky. The thinner the branch gets, the lighter it appears because it is more and more influenced by the value of the sky around it. This is what is happening with small darks like nostrils and the accents at the corners of the lips. The same is true, by the way for lights surrounded by darks. Think, in this case, of sky holes in trees. The smaller the openings, you must actually mix up a darker color.
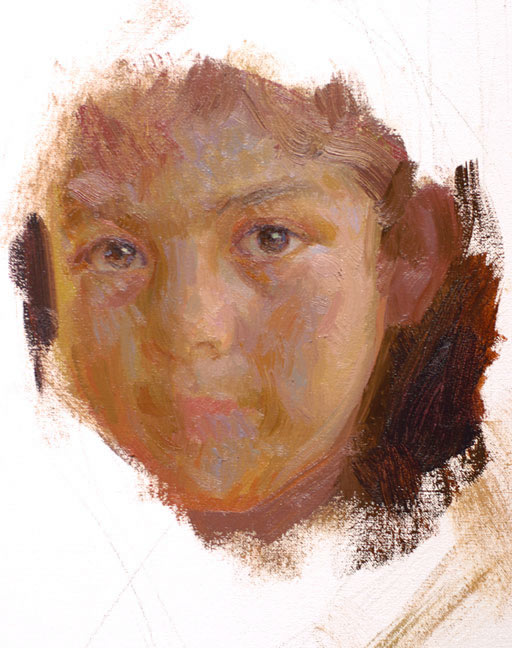
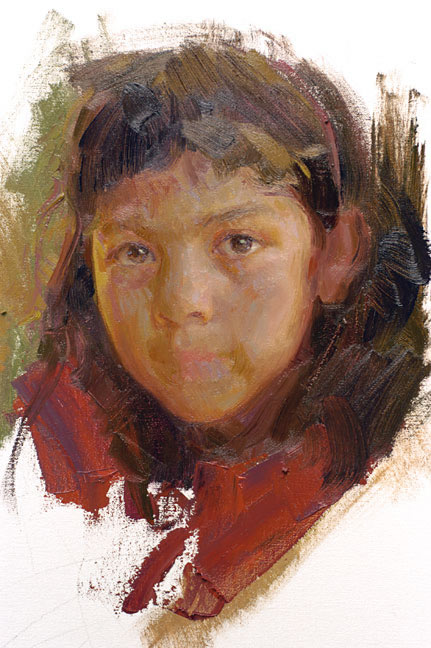
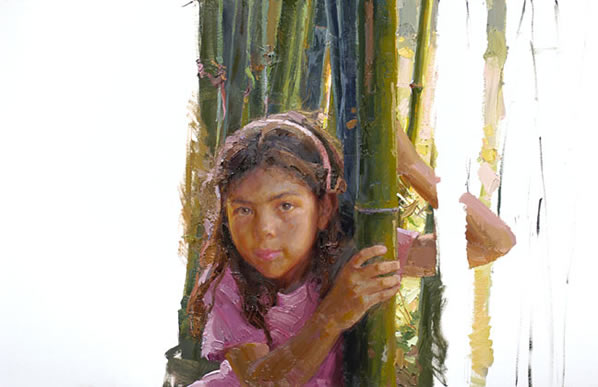
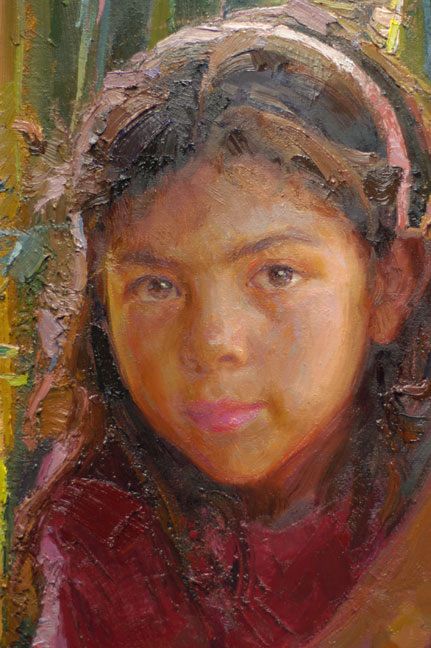
Here is the face for the most part finished in this oil portrait tutorial, though I do end up doing little adjustments throughout the rest of the painting as I see them.
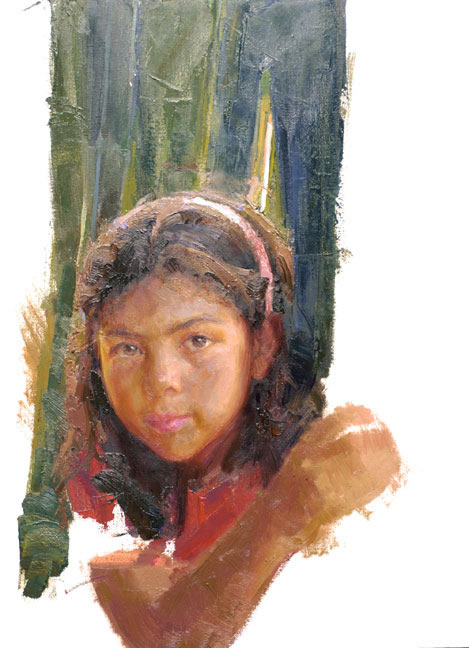
Here I start blocking in the hand and arm, starting with the large shapes first and measuring, measuring, measuring!
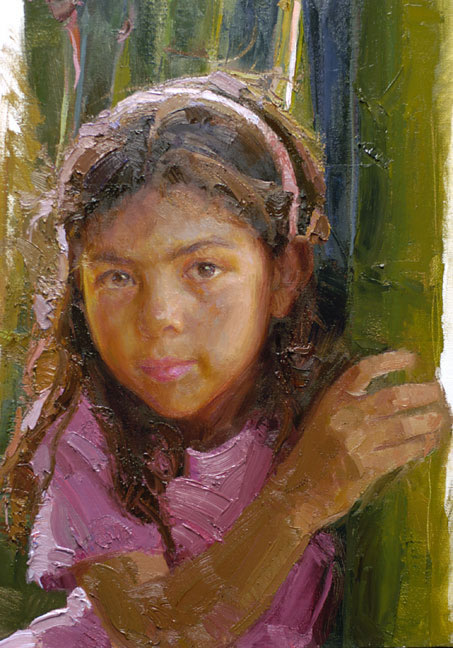
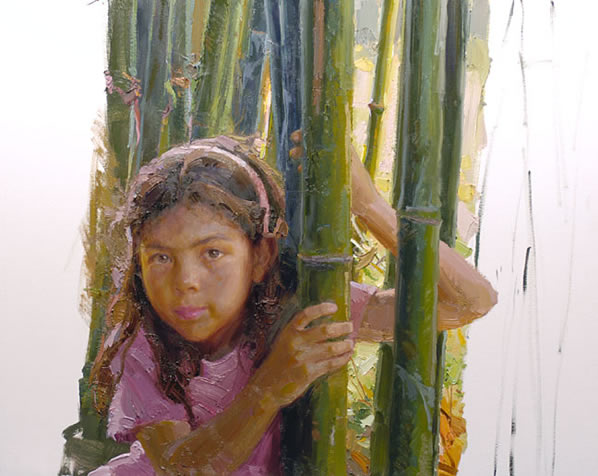
Getting into details in the hand and deciding to go with a lighter color for the shirt.
To make sure I get the left arm right, I take a few measurements and sketch in with my brush a few main shapes.
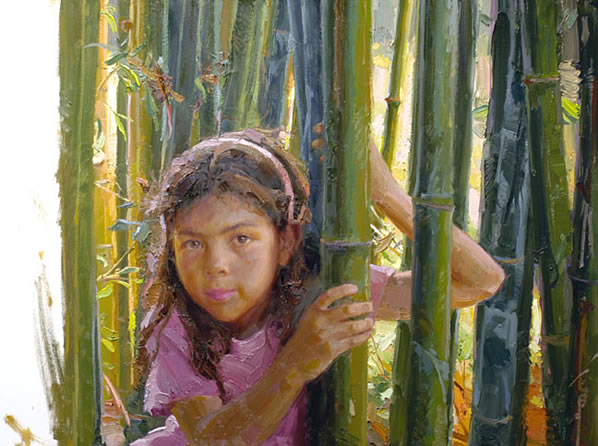
Once again, just slowly going from one shape to the next, fitting in each puzzle piece of the subject. I’m not thinking any differently when paining a tree, arm, or eye — they’re all just abstract shapes, of a certain value and color, in a precise place.
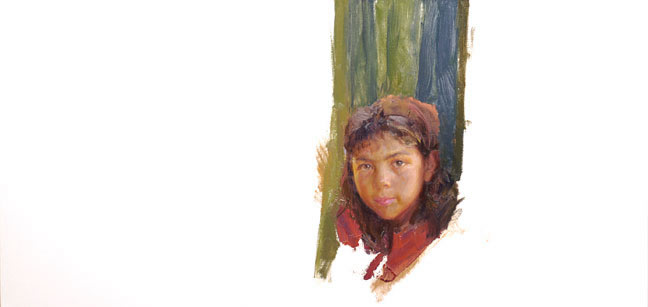
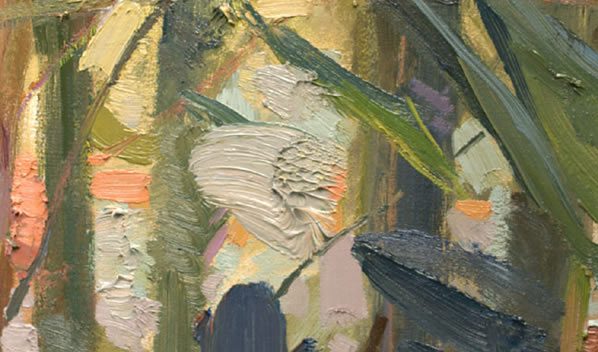
Using some mineral spirits, I think down the paint and wash in some colors to go behind the bamboo on the left. This is mainly just to kill down the white so I won’t be struggling to paint in between all the vertical shapes of the bamboo later on.
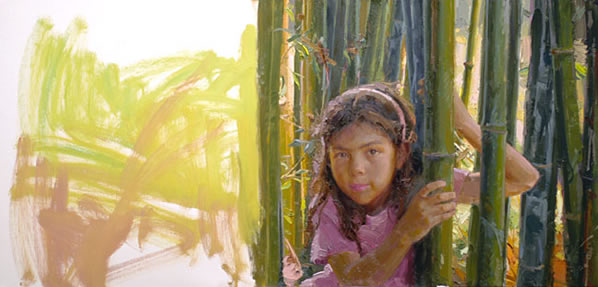
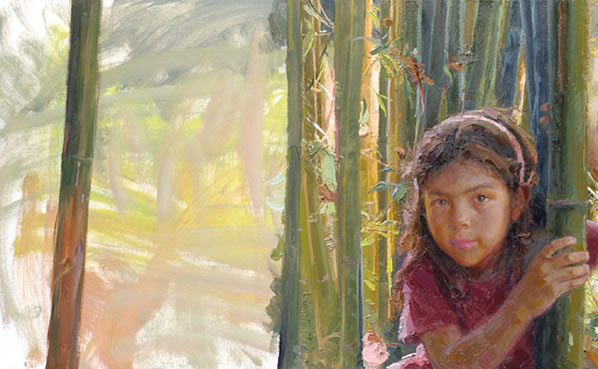
Changed my mind; I think the girl’s shirt was better the darker red, after all!
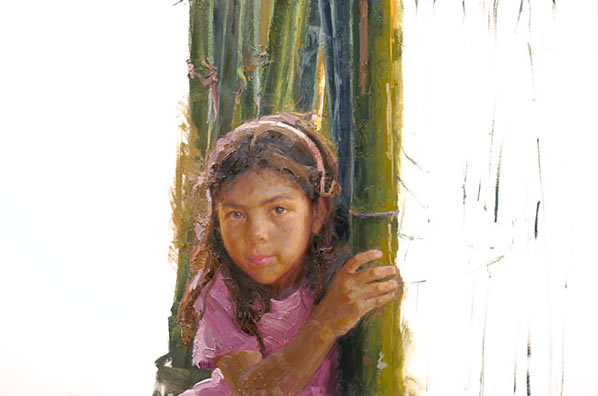
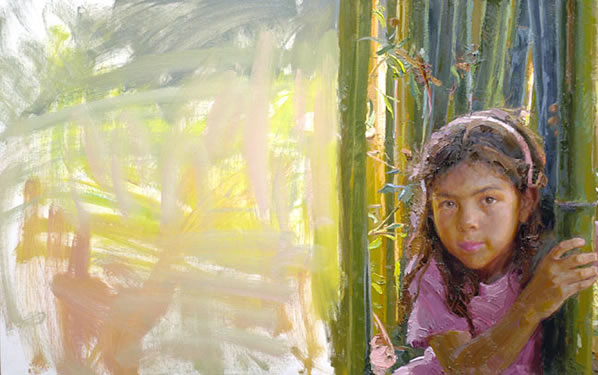
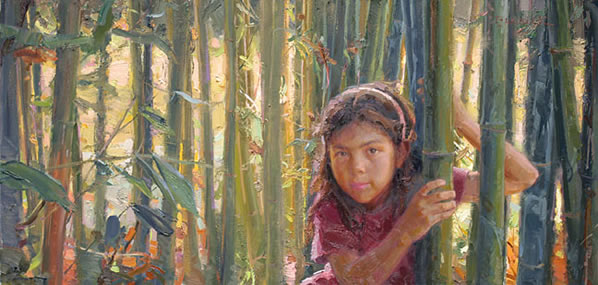
Here’s the final painting.
A big thanks to Scott Burdick for sharing this wonderful Oil Portrait Tutorial. I truly hope you enjoyed this Oil Painting Portrait Tutorial! Be sure to check out Scott’s Website Here when you have time. Please also leave a comment below if you enjoyed this demonstration. Thanks!
Biography
Scott Burdick was born in Chicago, Illinois in 1967 where his mother and father early on encouraged his interest in Art. “I spent a lot of time in hospitals as a child and remember my mother showing me how to transform simple shapes like circles, triangles, and squares into objects like planes, helicopters, and fish. It seemed such a magical thing and made spending so much time in casts and on crutches much more bearable.”
In high school, Scott began taking life-drawing classes at the American Academy of Art under the legendary Bill Parks. “Though I’d always loved drawing, it was Mr. Parks who filled me with the enthusiasm and discipline necessary to improve my skills. His love of painting and creative expression infected us all.” After finishing the Academy, Scott continued his study at the Palette and Chisel Art club, where he met his wife, painter Susan Lyon. “It’s a wonderful thing being able to paint together all the time and grow as artists together,” Scott says.
His ideas for paintings come from everywhere. “What makes a subject attractive to me are the same things that attract us all. The beauty of a young girl, the character of a weathered face, the solitude of a farm at sunset, or even the story itself behind someone or something that makes it interesting.” Scott believes it is the job of the artist to recognize this when it happens, analyze why, and use his technical skills to convey the feeling to someone else. He notes that some paintings are as simple as stopping at the sight of something interesting, while others may take more time to research than to actually paint.
Today, Scott and Susan live in a rural area of North Carolina. Surrounded by forests and the foothills of the Appalachian Mountains, their house is a perfect resting place after the many trips they take throughout the world in search of subject matter to paint.
Artist Statement
“I see painting as both a way of exploring the world and then as the vehicle of sharing those discoveries with others. I travel to find subjects to paint as much as paint so I can travel and expand my horizons. Through this unique language, one can say things that are impossible with words.”
Scott’s Website
Be sure to visit Scott’s Website to see more of his work and to learn more about him.
Be sure to also check out Scott’s drawing video, “Secrets of Drawing”, where Scott discusses the technical aspects of measuring, values, shapes, and all the considerations in drawing a portrait. You will see two portrait demonstrations, in addition to numerous side examples to illustrate the various points covered.
This was a great Portrait painting demonstration. Thanks much! I’m teaching two portrait painting classes and I believe this will be a great info! Thanks! Jan B
Lyndon Baxtersays
I agree with JanB, it is a lovely portrait with an unusual setting and well executed! There is one thing that bothers me though, I don’t know if its my old eyes but to me it appears that the proportions of the limbs are off, either her right shoulder is too close to her head or the left arm is slightly too long. But that aside, I really like your style.
dnadesignergenessays
Lovely portrait. Am trying to rev up my portrait & painting skills…Hope to come back here!
DNAdesignergenessays
Is a lovely portrait. So nice to see a more unusual background than just the textured–blurred background.
Chris Chalksays
Hi Scott, I love this portrait. Excellent work. Keep creating, Chris
Elize Spiessays
This is so colourfull and fresh I am inspired by your instructions and will follow it. Im am learning to paint faces at this stage.thank you Brittany.
elize
Yonnielsays
Thanks for showing how a masterfull painter plays with color !!!!!! Great demostration!!!!!!!
amandasays
oh my goodness I love this and only dream I could paint like this! i love oil painting. I love the way the paint feels and the smell is intoxicating. Everything feels right when i have a brush in my hand. But I know I’m not very good. i think i struggle most with color and values. I love seeing demonstrations like this, thank you Scott!
NEDAsays
HI Iam neda fram afghanistan I student at faculty of fine arts I like your painting


This was a great Portrait painting demonstration. Thanks much! I’m teaching two portrait painting classes and I believe this will be a great info! Thanks! Jan B
I agree with JanB, it is a lovely portrait with an unusual setting and well executed!
There is one thing that bothers me though, I don’t know if its my old eyes but to me it appears that the proportions of the limbs are off, either her right shoulder is too close to her head or the left arm is slightly too long.
But that aside, I really like your style.
Lovely portrait. Am trying to rev up my portrait & painting skills…Hope to come back here!
Is a lovely portrait. So nice to see a more unusual background than just the textured–blurred background.
Hi Scott, I love this portrait. Excellent work. Keep creating, Chris
This is so colourfull and fresh I am inspired by your instructions and will follow it. Im am learning to paint faces at this stage.thank you Brittany.
elize
Thanks for showing how a masterfull painter plays with color !!!!!! Great demostration!!!!!!!
oh my goodness I love this and only dream I could paint like this! i love oil painting. I love the way the paint feels and the smell is intoxicating. Everything feels right when i have a brush in my hand. But I know I’m not very good. i think i struggle most with color and values. I love seeing demonstrations like this, thank you Scott!
HI Iam neda fram afghanistan I student at faculty of fine arts
I like your painting
simply superb
Simply awesome..
This is wonderful displayed of colours, Have been longing for this style. Pls how many days do take to finish this painting with oil colours??