Please enjoy this free oil painting tutorial step by step by artist Jess Bates.
Oil Painting Tutorial Step by Step
Scumbling / Glazing is a method of applying very thin layers to the painting. It is effective for very smooth gradations, and also for adjusting dried layers. It can be used to great advantage to manipulate the reflective or absorptive light qualities inherent in pigments.
Scumbling and Glazing are transparent painting techniques.
[adinserter block="1"]Open Canvas technique is more of this same idea; starting with a transparent underpainting, and leaving areas of it uncovered whatever other techniques are used. For example: as with the build-up/ tonal approach above; or with wet-on-wet brushwork on top; or with scumbling and glazing layers on top. The important thing with “open canvas,” is that the underpainting itself is a dominant feature. Open canvas also tends to utilize scumbling and glazing as a primary application tool, rather than only as an adjustment tool.
“Scumbling” is scrubbing on a dryish layer of thick or stiff pigment. Scumbling tends to stick to the top of the canvas fibers (and the under-laying color shows through a bit)
Scumbling has a very reflective effect, and is good for building form and depth by creating the illusion that the surface is coming toward the viewer. Scumbled areas are bright from a distance. Too much scumbled surface makes the painting appear flat; opaque; and oxidized.
You can scumble with any pigment, but the best ones for advancing the surface are the lighter, clay-like pigments. The light clay-like pigments tend to be brittle and flakey.
“Glazing” is the opposite: adding a very transparent tinted wet medium layer. Glazing tends to settle in the crevices of the canvas texture (the top can be wiped off to show the original color, but the glaze down in the texture will alter the color tone of the underlying hue).
Glazing has a distancing effect, and is good for building form and depth by creating the illusion that the surface is further away, or receding. Glazed colors are saturated and jewel-like. Glazed colors appear dark from a distance. Too much glazing can make the surface look like it is under thick glass; or imagine stained glass pile up together; it will look muddy and brown.
You can glaze with any pigment. Some pigments will fade much more than others over time; and how you layer scumbling and glazing affects the basic physical structure of the painting. (improper application can result in cracking or flaking)
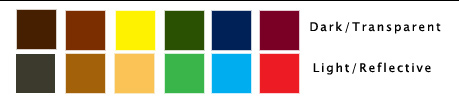
Pigments come in two types;
The dark transparent pigments are sort of slimy or jelly-like and behave like wood stain.
The dark staining pigments have smaller, rounder molecules which penetrate surfaces more, and don’t reflect as much light.
The bright reflective pigments are stiff and clay-like and behave more like chalk
The clay-like pigments have large rough molecules with many reflective surfaces
| Color | Light / Reflective | Dark/ Transparent |
| Brown: | Raw Umber | Burnt Umber |
| Orange: | Raw Sienna | Burnt Sienna |
| Yellow: | Yellow Ochre | Lemon or Cadmium Yellow Light |
| Green: | Permanent Green | Sap Green |
| Blue: | Cerulean Blue | Ultramarine Blue |
| Red: | Cadmium Red | Alizarin Crimson |
Note that although Yellow Ochre has a darker shade than lemon or Cad Yellow, it is listed in the ‘Light’ column. That is because it’s superior reflectivity and will show up strongly from a distance, whereas the more transparent Lemon and Cad Yellow will tend to disappear and be less visible from a distance. Also in mixed colors, Ochre has a defining reflectivity.
There are two very important things about how to use pigments to create strong and long-lasting paintings:
- The clay-like pigments which have large rough molecules help the layers stick together; like little tacks. And their rough molecules give subsequent layers something to grab onto; just like sanding a surface before gluing or painting improves adhesion. Therefore, layers high in the reflective pigments should always be alternated with layers of dark pigments to bind the dark layers securely together.
- The medium used to help the paint flow binds pigment within it. This is important because it separates pigments which might chemically react over time, and it prevents pigments from oxidizing and flaking. Medium also contains a different kind of flexible binder (Stand Oil) which helps prevent cracking. Too much medium build-up will become sticky and may sag over time. Because surface tension is pronounced in outer layers of paint; medium should be lean in Stand oil in the bottom layers and richer in Stand oil in top layers. An easy technique is to add a few drops of stand oil to your medium with every new layer.
Some archival things to consider: The dark staining pigments alone (exempting the top two on the left above) will eventually fade, loose their color or become quite transparent over (a long) time. 16th century paintings, for example often show this to a dismaying degree. A lean underpainting rich in the clay-like pigments which clearly delineates contrast will keep the overall composition stable throughout time.
It also helps to bind the color of these dark pigments by mixing them with the clay-like pigments, and using just enough medium to make the paint smoothly brushable. To get a scumbling effect, make the brush drier, not the paint stiffer.
Layer glaze as thin as possible. I often brush it on, then rub it off so that the next scumble layer can bind thoroughly with the scumble layer below. Thick layers of glaze will interfere with binding, and also appear as murkey dark areas.
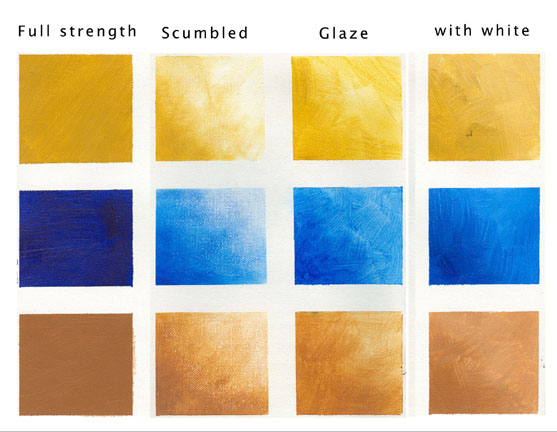
Pigment exercises to acquaint you with the properties of pigments:
Pick two pigments from the dark staining side, and the same color pigments from the light reflective side and do this exercise:
(tape off some squares on a piece of canvas or white-washed cardboard)
- On the first square apply and even opaque layer of full-strength pigment straight out of the tube.
- Mostly wipe off the brush (don’t clean with turpentine). Scrub the dry brush as shown to make another gradient
- Now dip the brush in a little medium, and apply to the third square.
- Separate a small amount of pigment and mix it gradually with white paint, mix together with your brush in a gradient.
Compare the results from close-up, then from a distance. You’ll notice that ADDING white doesn’t make the color brighter; only paler. And the brightest squares are the ones which have canvas showing through a bit.
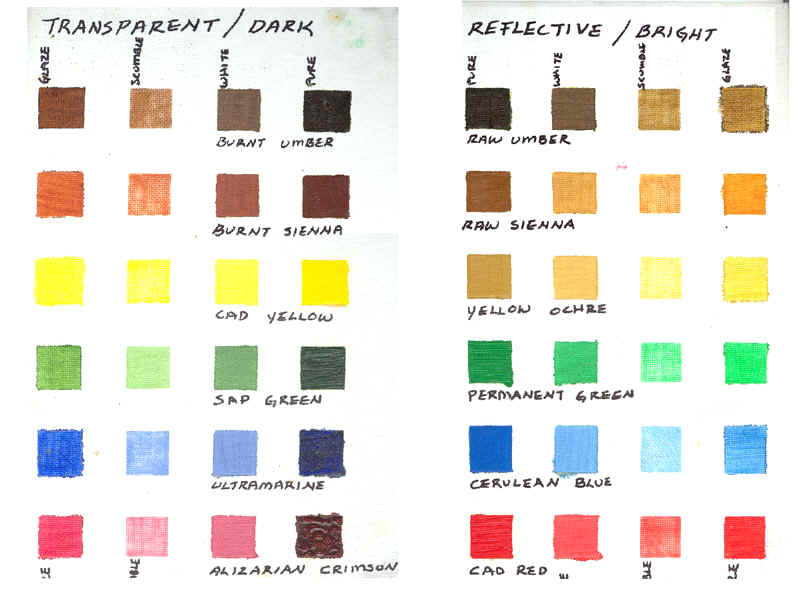
Now to get familiar with all the pigments, tape off another sheet of canvas, making four squares for each pigment and repeat the exercise.
Save this as a guide until you know how the pigments react to the different application techniques. Look at them from a distance and think about how the application affects color strength and brightness.
Here is an example of how to build an “Open Canvas” painting using only Scumbling and Glazing:
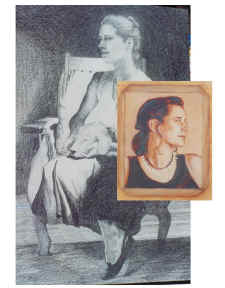
Planning first. Modeling sessions with the subject.
Tonal studies. (this one is painted just with Burnt Sienna. Underpainted by mixing with turpentine, then thinker paint, last some some glazing with added medium.
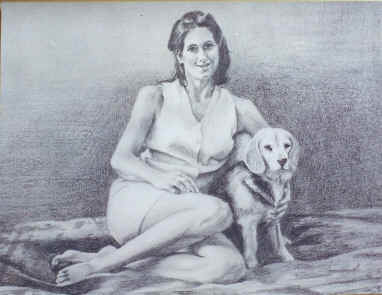
Keep at it until the composition and/or the subject looks good to you. This lady was too sexy in character to be done in the old-fashioned poses we started with.
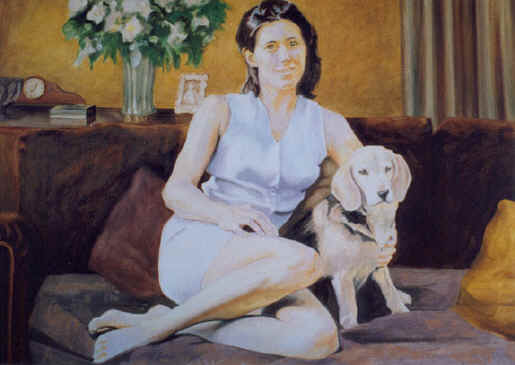
On the canvas, establish the Under-Painting. I sketch in using straight paint and turpentine, then a lean layer of the clay-like, reflective pigments.(this was a color-blockunderpainting)
In this sample, I wanted the background to contrast with the figure in value. I chose to start the figure very light, the background very dark, and work the layers of both toward the middle
However, overall when done, the figure and background will still be influenced by this under-painting.
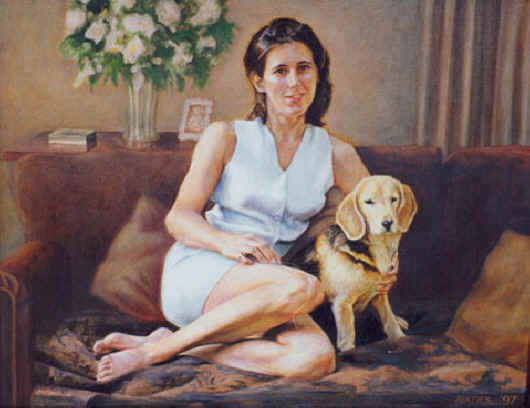
Second complete layer (Scumbled).
Light reflective layers added throughout the dark background.
Richer reflective pigments added on the figure.
Notice how the painting has become too reflective from all the clay-like pigments. It looks a little flat, and contrast with the couch is too drastic.
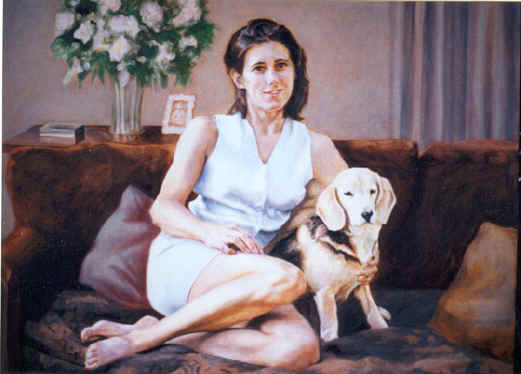
Third complete layer (Glazed and scumbled combined as needed to stabalize the depth).
[adinserter block="1"]Overall color adjustments and knocking back the chalkiness of the previous layer.
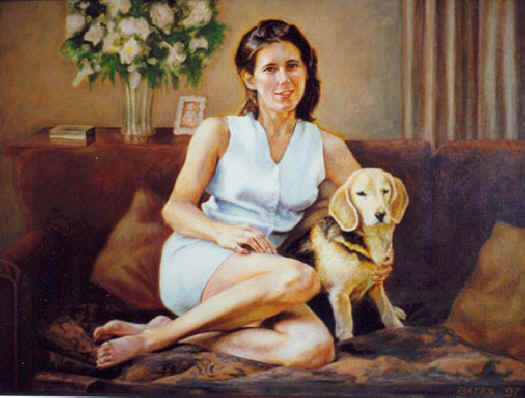
Fourth layer; intensifying color with thin Glazing ground in. Adding more warmth.
Notice how the Glazing has pushed the surface back and flattened it again somewhat, and it looks like a pane of colored glass has covered it.
A full layer of glaze OR a full layer of scumbling will flatten depth in a painting.
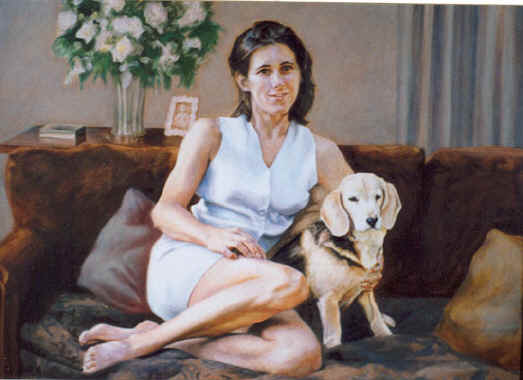
Final layer. Some partial Scumbling of reflective pigment to re-establish depth.(with more Stand oil added to the medium)
Let the painting dry for 30 days (or until no longer tacky to the touch) then apply a thin layer ofRETOUCH varnish.
After one year, gently wash the painting and re- varnish with a petroleum-based (not turpentine or white-spirit based) varnish.
Varnishes are available in matte or glossy. You can mix the two together (if they are the same ingredient type) to achieve different levels of semi-gloss.
If you use a turpentine based final varnish, removal of it someday might also remove your paint. If you use a Petroleum based varnish, petroleum based removers will not affect or remove the paint layers.
I hope you enjoyed this free oil painting tutorial step by step. Find more oil painting tutorials, tips and techniques from our site here.
Leave a Reply