Enjoy this free step by step oil painting landscape tutorial by artist Mike Callahan (see bio and website link at the bottom of this lesson).
“Secret Cove” – Oil Painting Landscape Techniques
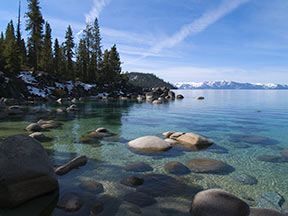
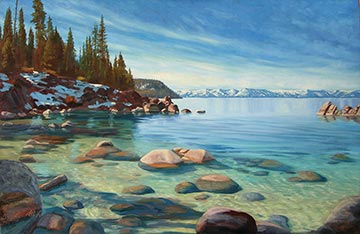
Above is a shot of the Secret Cove, Lake Tahoe, Nevada. I shot this photo early on Saturday, Mar. 10, 2007.
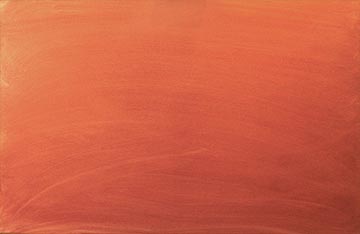
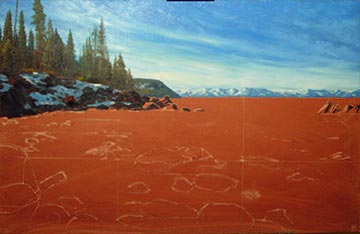
Below is my almost that I painted this scene on. The canvas measures 24″ x 38″. To begin with, I mixed up a burnt-orang-ish color and applied it in strokes to my canvas with my palette knife just to get going. Follow along and see the progress of the rest of this painting…
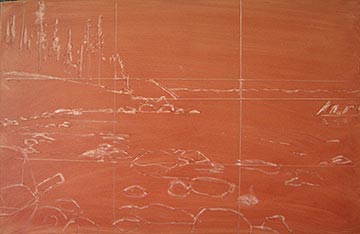
1.) After applying the paint with knife as shown in the initial shot, I wetted a paper towel with Turpenoid and spread it evenly over the whole canvas. At this point, I will wipe the paint down till it’s as thin as I want it.
2.) From there, I dip a small bristle brush (about a size 2 flat) in Turpenoid as well and use it to draw with. I initially divide my canvas into thirds both horizontally and verically which aids both my composition and drawing.
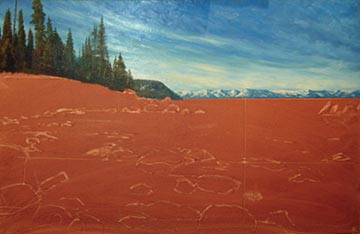
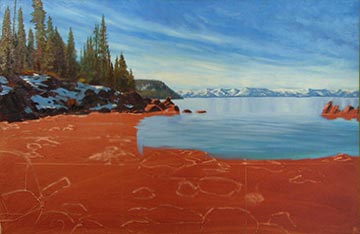
3.) I dove right in and painted my sky right on top of my wet underpaint. I was sure to practice my “fat over lean” principle by mixing plenty of medium ( I use M. Graham’s Alkyd/Walnut oil mix and thin it about 50% with Turpenoid) and mix it liberally into my sky colors (making them “fat” with oil). It slides right off my brush and sticks to the “lean” under-paint.
4.) I got a late start on this painting because I had to stretch the canvas and by then it was late in the day, so I painted in the far mountains keeping them light and very blu-ish to pull off the atmospheric perspective I’m after. I mix a fair amount of sky color with the greens and browns for the small bit of the middle mountain slope and then called it a day.
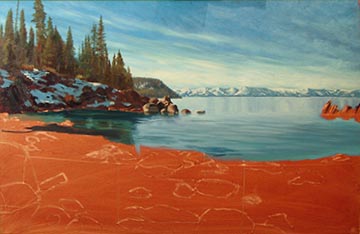
5.) The next morning, I got up at 4:30 AM and painted for a little over an hour before going to my day job. I paint in the foreground trees and since my sky is now pretty dry, I mix in some of the left-over sky color around the edges of the trees where bough meets sky.
6.) Tuesday morning’s progress continues with the painting of the bank and snow. The snow which is mostly in shadow is very blue, but somewhat purple-ish in color because it is the reflection of all the ambient light but not the direct early morning sunlight (except in a couple of spots). Since the ambient light is mostly from sky and water to put it in simple terms, then the snow in the shade will be very blu-ish.
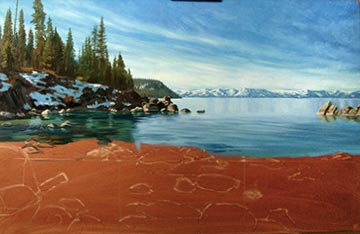
7.) Wednesday’s hour plus is spent concentrating on te reflected water in the distance. This painting posed a particular challenge for me because I had to paint reflected water as it comes forward and turns into the clear see-through water that will make this scene unmistakeably Tahoe.
8.) Thursday brings more challenges. The reflective water becomes clear, but on the left, the clarity is also a bit in shadow and reflects the trees a bit as well. I concentrate a lot on value and color to get it right and as a result, as you can see, my progress is slowed considerably.
9.) Friday’s hour is slow going too. This water, with rocks above and below it is tricky to paint so I move slowly deliberating with myself over nearly every stroke.
10.) It’s now Saturday morning and I begin to paint the clear water as it is in direct sunlight. What you see here is about an hour’s progress too. Go to the next page to see how I continued for most of the rest of the day.
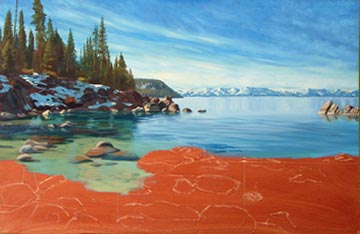
11.) More rocks and sand – as the water nears the viewer, the less it reflects the sky and since Tahoe is so clear, the more sand color one sees.
12.) As I continue, I have to bear in mind that most of the rocks I’m painting are under water and therefore have a darker value, however, as they break the water’s surface, but are still wet, they take on a different value than either the part under water or the totally dry rock surface.
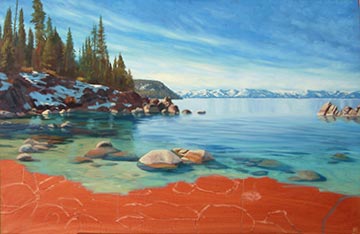
13.) For this hour I paint in the wet and dry rocks in the shadows of the trees. Another factor to consider is that contrast increases the nearer an object, in general. This is a little tricky to be sure.
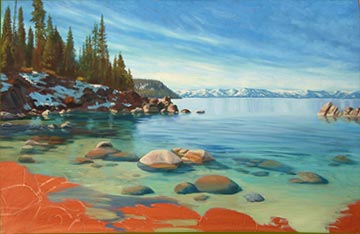
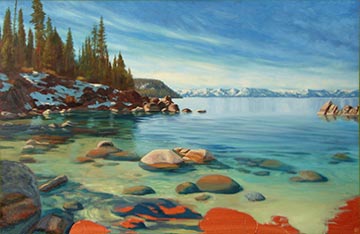
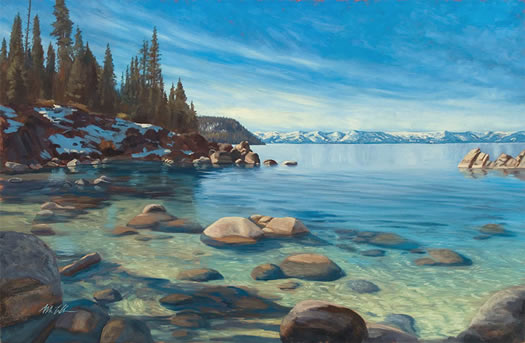
14.) I finally near completion of this oil painting landscape tutorial by painting in the ripples that are in the shallow sand area as well as the rippled surface reflections…below is the final piece.
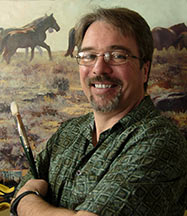
Nationally recognized, award winning artist Mike Callahan is a fourth generation Nevada native who counts himself privileged to grow up in what he believes to be one of the most beautiful places on earth, the eastern Sierra Nevada mountains near Reno, Nevada where he still lives today. While he has been painting since childhood, he has only been painting in earnest for about the last 5 or 6 years.
Says Mike, “The topography of this area is simply phenomenal; one can go from the high desert to mountainous alpine settings in less than an hour. It is this beautiful and varied landscape that ends up being the subject for a vast majority of my paintings.”
However, if you look through the paintings on Mike’s website, you will quickly see that the Sierra landscape isn’t the only subject Mike typically paints. He also enjoys painting Western themes as well as figurative and portraits.
As you look at Mike’s work, you will notice a great color harmony throughout. While the colors in his paintings run the full spectrum of color seen in nature, harmony is maintained by Mike limiting himself to only three colors plus white on his palette. Instead of referring to this as a limited palette, Mike thinks of it as an unlimited palette as he has not found any color he desires to use that he can’t create from those primary colors.
Mike’s work has been featured in numerous solo, group, and juried shows including the 54th Juried Exhibition at the Haggin Museum in Stockton, California, the second 100 in PaintAmerica’s 2008 Paint the Parks competition, and in May of 2008, Mike received national honors at the Oil Painters of America’s National Juried Show of Traditional Oils winning a coveted Award of Excellence for his painting “Wild Mustangs.”
I love this demo! Nice work. I saved it for a future painting project. MORE DEMOS, PLEASE! I especially love seascapes. How about some demos on seascapes? Keep them coming! Thanks.
Judysays
Really love this, its absolutely beautiful. Also have saved it. You’ve set it out and explained each step so easily. Thank you.
minijamessays
wow It’s really fantastic ,I really enjoyed it . It is simply great Thanks to god for such a great artists.
June Smithsays
Thank you Mike
This is so beautiful and very well explained — I have printed it off – and I am so thankful to have this information
Absolutly beautiful! not too many people can do this. Cheers. Daniel
haksays
It’s just fantastic the manner the artist changes each day of his own style that every good artists do. Mike you’re just too good. Keep it up with your style’
geraldsays
Your surely a master piece,I’m a beginner an I reali wana learn more about oilpainting,I’m excualy into landscaping,can u perhaps help me?


I love this demo! Nice work. I saved it for a future painting project. MORE DEMOS, PLEASE! I especially love seascapes. How about some demos on seascapes? Keep them coming! Thanks.
Really love this, its absolutely beautiful. Also have saved it. You’ve set it out and explained each step so easily. Thank you.
wow It’s really fantastic ,I really enjoyed it . It is simply great Thanks to god for such a great artists.
Thank you Mike
This is so beautiful and very well explained — I have printed it off
– and I am so thankful to have this information
I love the rocks — well — all of it
June Smith
Lucan Ont. Canada
This is really wonderful–thank you so much for sharing! And for making this so easy to follow…just beautiful:)
Sarah
WOW! Really beautiful Art pictures…..Great work keep it up!
Fantastic….I am just a green bean…nice to see beautiful things!
Absolutly beautiful! not too many people can do this.
Cheers. Daniel
It’s just fantastic the manner the artist changes each day of his own style that every good artists do. Mike you’re just too good. Keep it up with your style’
Your surely a master piece,I’m a beginner an I reali wana learn more about oilpainting,I’m excualy into landscaping,can u perhaps help me?