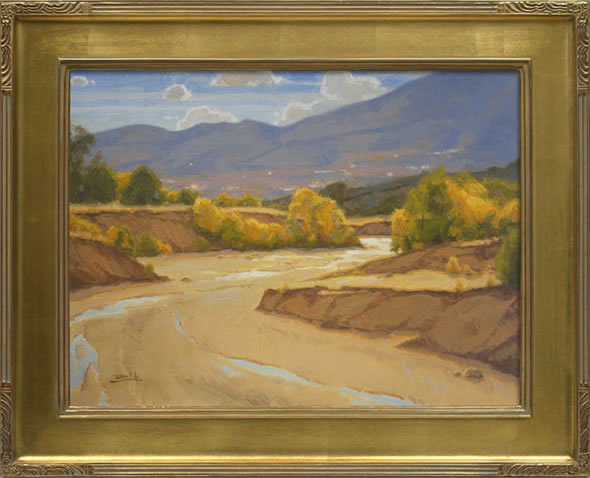
Enjoy this free step by step tutorial on landscape painting techniques from artist Dan Schultz (see bio and website link at the end of the lesson below).
How to Paint a Landscape with Oils – Landscape Painting Techniques
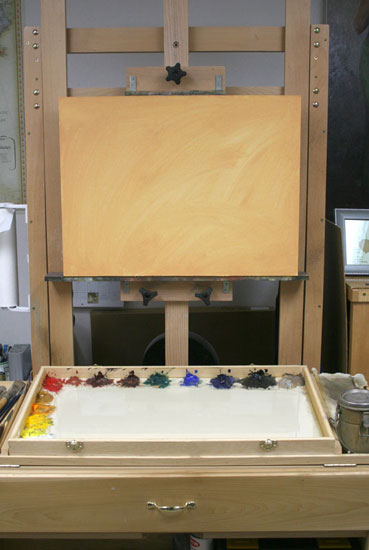
Step 1: Prepare to Paint
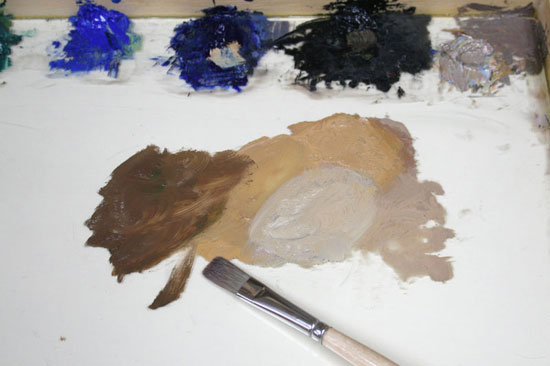
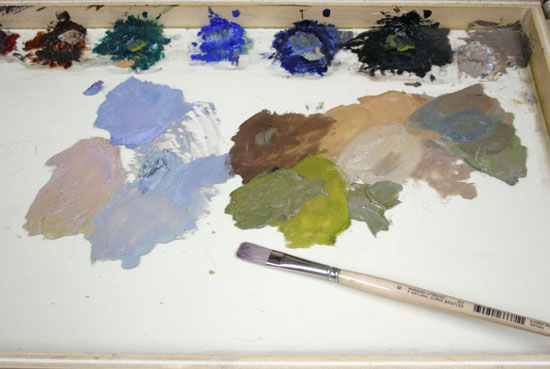
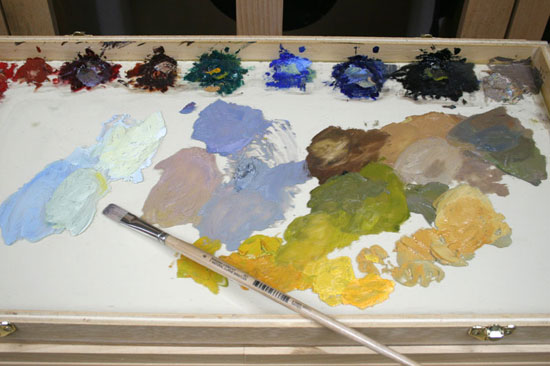
For this 18″ x 24″ studio painting lesson teaching landscape painting techniques, I used Claessens double-oil-primed linen canvas, #15 (my usual painting surface), mounted on 1/2″ Gator Board. I applied an initial wash to the canvas with a color that I hoped would end up being pretty close to my final color for the creek bed in the foreground. I don’t use any medium with my paint, just mineral spirits (Gamsol made by Gamblin) that I sometimes use to thin the paint (which I did for the initial wash, then lightly wiped it with a paper towel). I also laid out all my palette colors (listed below).
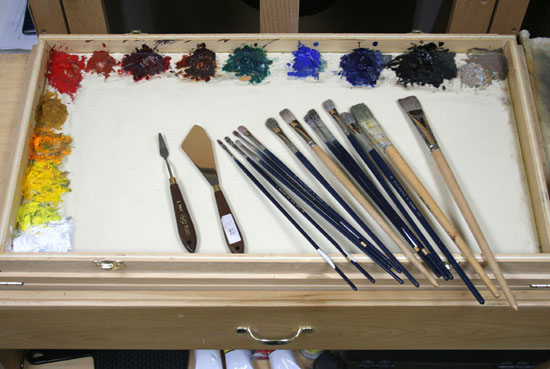
Royal Langnickel sable flats (series 5590), sizes 2 – 12
Assorted palette knives for painting, mixing paint and cleaning my palette
Paint:
(Starting from the bottom left on my palette and working upwards and to the right.)
Titanium White (Utrecht)
Cadmium Lemon (Winsor & Newton)
Cadmium Yellow (M. Graham & Co.)
Cadmium Yellow Deep (Utrecht)
Yellow Ochre (Winsor & Newton)
Cadmium Red (M. Graham & Co.)
Venetian Red (Gamblin)
Permanent Alizarin Crimson (Gamblin)
Transparent Oxide Red (Rembrandt)
Viridian (Gamblin)
Cobalt Blue (Winsor & Newton)
Ultramarine Deep (Rembrandt)
Ivory Black (M. Graham & Co.
The last pile is a gray mixture made from mixing the leftover paint on my palette from my last painting.
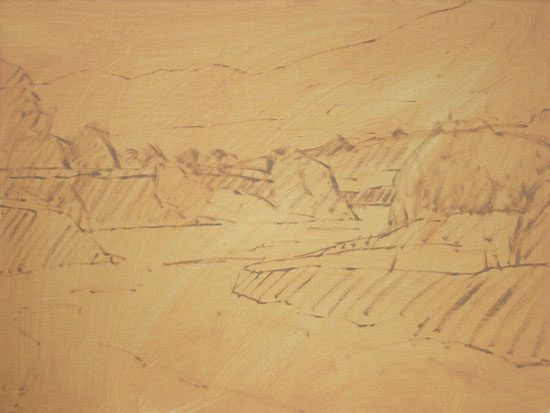
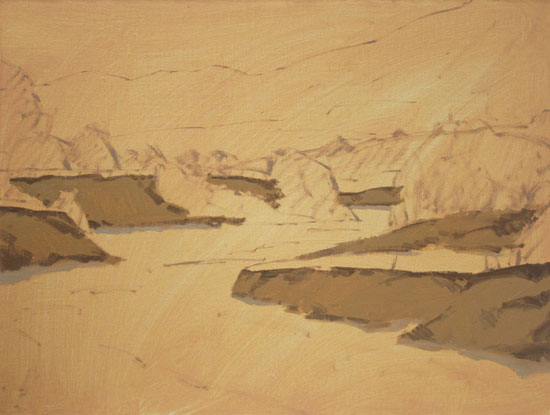
Step 2: Draw the Scene on the Canvas
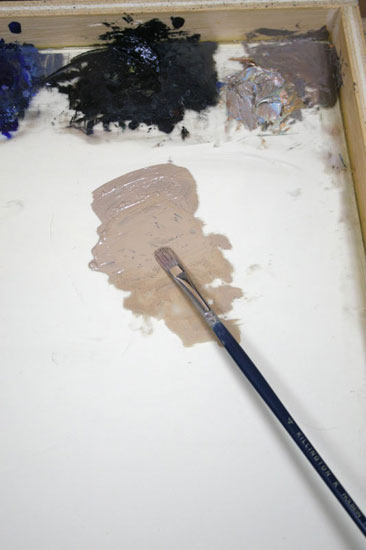
Continuing on with our landscape painting techniques….Using a #4 Holbein Killington bristle flat brush, I used some of the gray mixture on my palette to draw my scene. (It really doesn’t matter much what color is used for the drawing since it will eventually be covered up anyway. I usually just try to use a color that isn’t too intense and that is dark enough in value for me to see it over the initial wash.) I thinned the paint with some mineral spirits so that it would flow off my brush easily and tried to keep the drawing simple and accurate.
Step 3: Start the Block-In
My next step was to determine the color and value of my darker foreground shadows and to mix it right next to the color I used for the drawing step. I had already decided that I wanted those shadows to be lighter than I had painted them in the plein air painting, so I compared the shadows between the two paintings to make sure I was on the right track. I used a #6 Utrecht bristle flat brush for these block-in steps while being careful to keep my paint consistency just thick enough to cover each area. (I apply thicker paint in certain areas later in the process.)
Step 4: Continue the Block-In
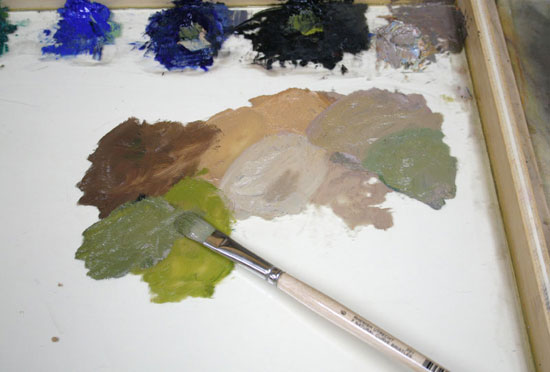
I then continued to the shapes next to the shadows and blocked them in with the approximate values and colors of each shape. (Notice that I continue to mix the colors on my palette right next to (touching) the other colors. This allows me to squint and compare the values right on my palette, then I can double-check value and color accuracy once I block in the shapes on the canvas.) Throughout this process, I did a lot of squinting at my palette mixtures, my source painting and at the larger painting to compare the value relationships between shapes.
Step 5: Continue the Block-In
Next, I continued by blocking in the mountain areas while trying to keep them simple. I wanted to get the majority of the canvas covered with the most accurate values and colors I could before I got into much detail. (It gets easier to accurately compare values and colors as more of the canvas gets covered.) Notice that I continued to work outward from my initial block-in areas to the areas next to them.
Step 6: Continue the Block-In
I began to fill in the lighter tree areas while continuing my efforts to keep the shapes simple. I used a #2 Holbein Killington bristle flat brush in some of those smaller shapes in the trees, and applied the paint a little more thickly.
Step 7: Continue the Block-In
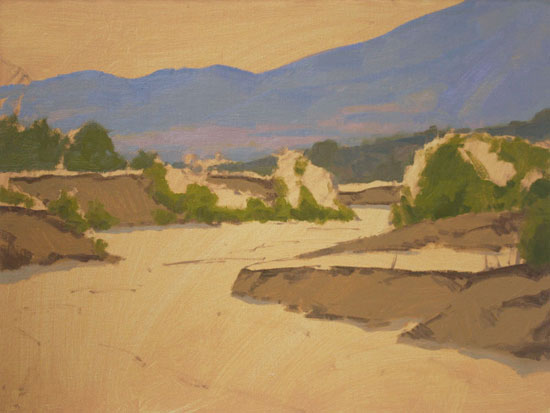
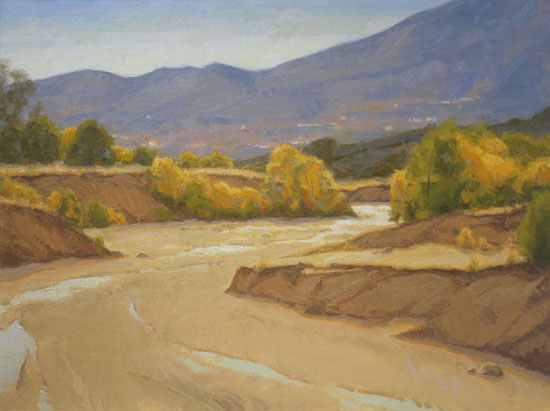
Using the #6 Utrecht bristle flat brush again, I filled in the sky, but didn’t try to complete it yet with clouds, etc. You can see now that my initial wash on the canvas has definitely helped my process. If I had been working up to this point on a white canvas, almost the entire bottom portion of the painting would be glaring white (making it more difficult to compare the values and colors of my other shapes). Thankfully, the initial wash ended up being fairly close to the color I wanted for the creek bed.
Step 8: Continue the Block-In
Next, I blocked in a color for the whole creek bed and started to place the areas of water.
Step 9: Refine the Shapes
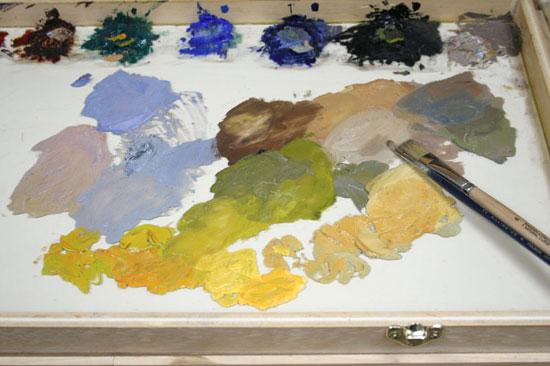
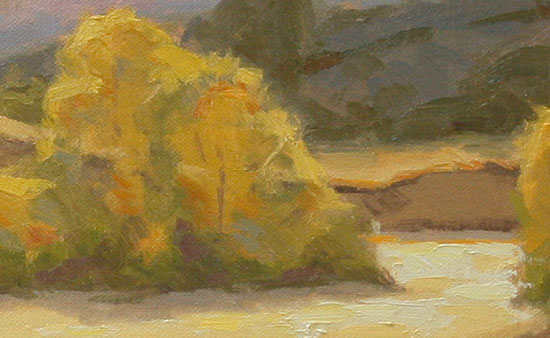
After all that block-in work, I finally began to refine some shapes by adding details. Since my focal area is just to the right of center in the painting (the bright trees and the reflecting water in the creek bed), I started refining there first. That way I could compare all the other areas in the painting to that area, letting it predominate with the most details. In this and the following refining steps, I began using #2, #4 and #6 Royal Langnickel sable flats. Their softness allows paint to be easily applied on top of wet paint, even if the paint is thick. They are also very useful for softening edges.
Step 10: Refining
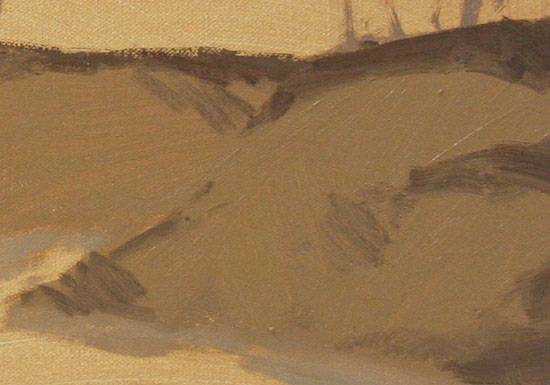
In this step, I revisited my initial shadow areas to bring them to more of a finish. I still tried to keep them simple and somewhat stylized rather than smooth them out. This helps add some excitement to those areas.
Step 11: Refining
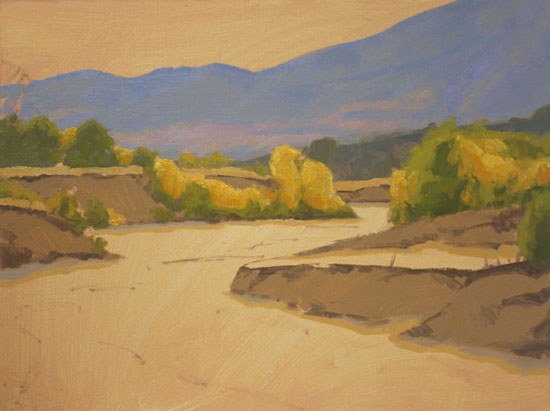
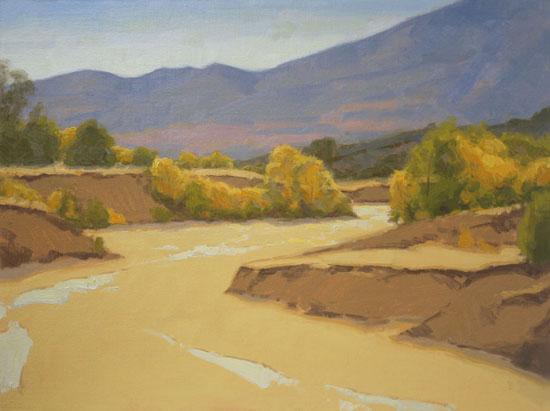
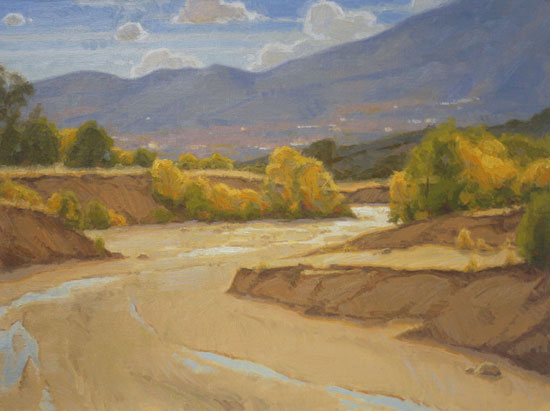
I realized that the color I had chosen for the creek bed was more intense than I wanted, so I repainted that whole area and then added details there.
Step 12: Refining
Next, I returned to the mountain areas to add details. Throughout all these refining steps and various landscape painting techniques, I continued comparing back to my focal area so that it would still be the most dominant.
Step 13: Refining
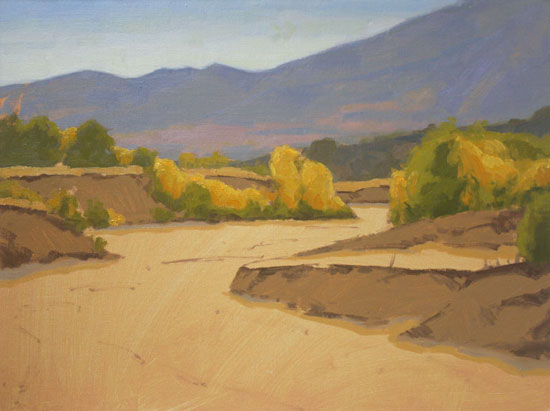
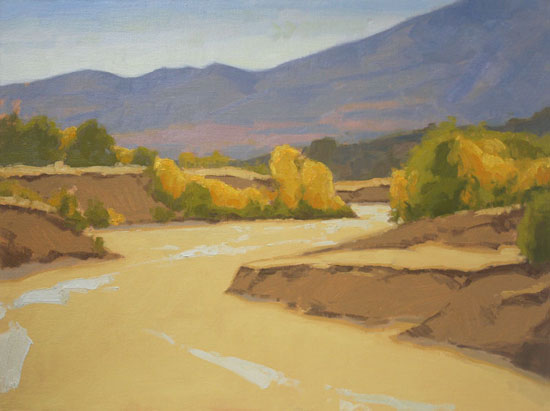
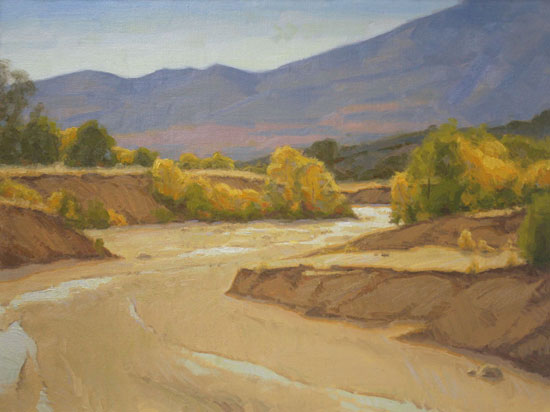
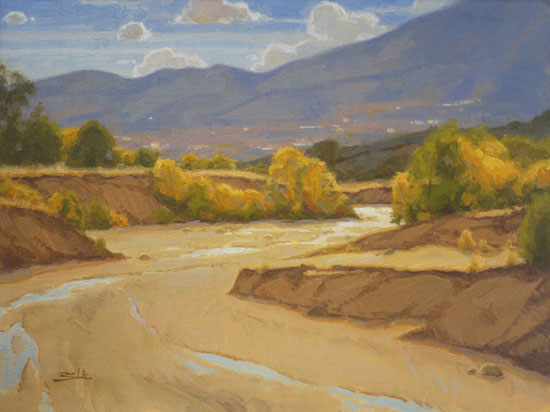
The last area to complete was the sky which I wanted to break up with a few clouds. There weren’t really any in my plein air piece, so I figured out a design that would work for that area. I also decided to give shapes to the clouds that would mirror the shapes of the trees below, which would help unify the background and the foreground. Then I looked over the whole painting to make sure every part was working well, and made adjustments where they were needed. In these last few steps, I repeatedly checked the painting’s reflection in a mirror. Seeing the image in reverse helps me find mistakes that I’ve missed. Often an edge that is too sharp or a distracting brush stroke needs to be softened.
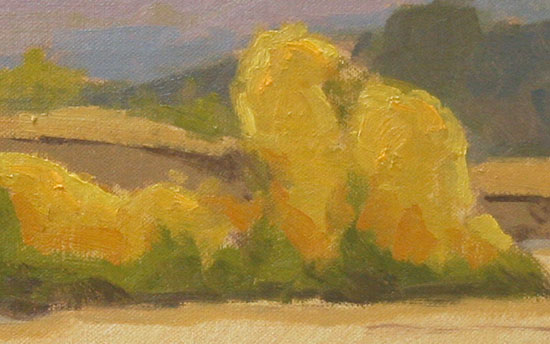
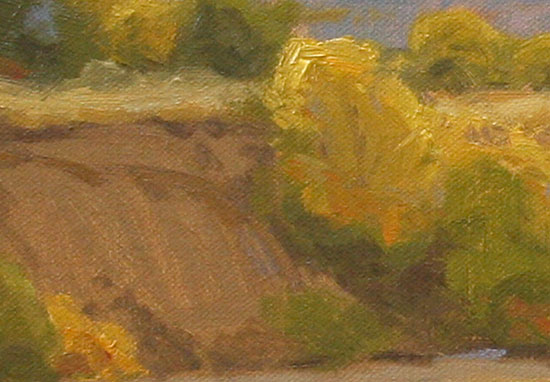
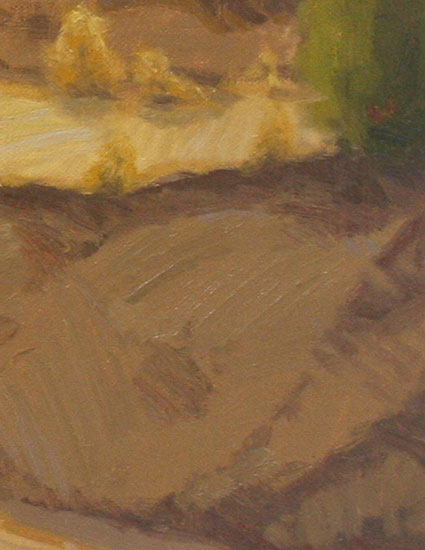
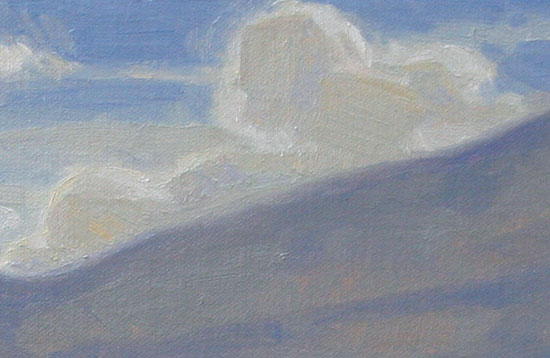
Step 14 – Varnish Painting
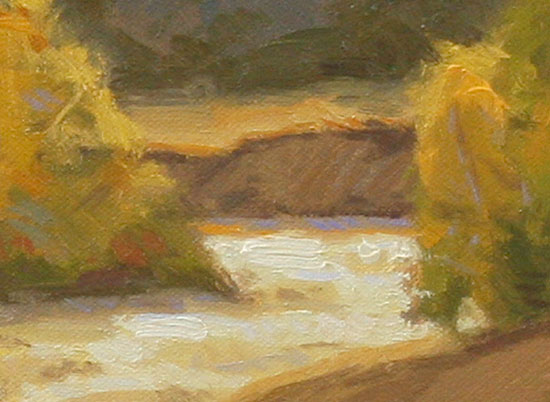
All that I did for this last step was to sign the painting and varnish it. I can often get a better photo of the painting (with less glare) once it is dry and has been varnished. I included some close-up photos below.
Visual art is a language — a means of communication. As an artist, I realize that something is communicated through my work each time it is viewed whether it’s what I want to communicate, or something entirely different that is brought to the experience by the viewer. But as I communicate using this visual language through images of people, images of landscapes, and sometimes images that combine the two, I hope to relate to others the beauty of God’s creation and that through it, I believe he communicates with us. I feel that it is my responsibility to help remind others of the importance of visual art and that it can be admired, embraced, enjoyed and understood.
My interest in making artwork that portrays people stems from my intrigue with people’s ability to create connections between each other. I have long enjoyed creating images of people whether it be a portrait, a child or a woman in a tranquil landscape. I believe that people can easily relate on a personal level to images of other people. And it seems like everyone can relate to an image of a landscape that reminds them of a favorite place. When I work outdoors — standing at my easel with the landscape laid out before me — I feel a connection to the scene that I’m painting. And each time, I feel like I see more beauty in the world than I did the time before.
In order to capture these connections and relate them to the viewer, I often choose a color scheme that is simple and harmonious, which makes my paintings sometimes appear to have one overall dominant color. This allows me to express my connection with each work of art I create, and allows the viewer to experience a direct connection back to the me as the artist. I also experience this connection while viewing favorite works by other artists. They transport me to another world — one of exciting color, texture and emotion that can lift my spirit and renew my passion as an artist. I believe that you too can liberate your senses through the wonder of art and discover that it speaks to you. It only takes a few moments to begin to understand the language, and as you learn, it will become even more meaningful.
Every month or so, Dan sends out announcements about new artwork, upcoming shows and other news. If you would like to receive these announcements please take a moment to sign up for his newsletter by following the link below:
Great demo, easy to follow and explained very well. I love the way it turned out, and the simplified instructions. made quite an impression on me. Look forward to more. Is oil your only medium? many thanks lamoine
Julie Owenssays
Thanks for the great demo. I learned at least two things.
Leslie Matiaciosays
Great demo. One question, why so many different brands of paint? Are those the ones you prefer?
Thanks for the comments. To answer Lamoine’s question, I work mostly in oil, but often do some charcoal work and the occasional watercolor. And Leslie: I’ve just kind of ended up using different brands of paint due to certain colors being somewhat unique to a particular brand. It’s hard to find all the colors that I’ve become used to in the same brand. For example, I bought some Cadmium Yellow Deep from a certain brand because I assumed it would be a light orange, but it turned out to be much yellower that I expected. So I basically have found colors I like in particular brands, then have tried to stick with those colors in those brands.
I would love to have a video of how to paint, I am very intersted in painting . Please let me know how I can get a free video. I live in Newfoundland Canada .
I have put together an entire section on free videos. To access it, look for the “Video” link up top in the navigation bar. I am constantly adding new videos and sections. If there are any specific videos on painting you would like to see, please send me your suggestions using the contact form on the following page:
Dan, good job overall. Thank you for being willing to share your work. I do think you could have increased the feelings of depth by using atmospheric perspective to slightly vary the color/value/temp/edge softness on the stream bed, banks and trees as they receded. You did an excellent job of modeling the distant mountain. The cloud shapes may have been more dramatic if you had consolidated some of the shapes. I hope you don’t mind the criticism, but I have always appreciated insights from other painters about my work. It helps me get to where I want to be much quicker. Keep up the good work!!
I just wanted to announce that this painting has just received the First Place award in the 10th Annual American Impressionist Society National Show, awarded by artist Quang Ho. The award is a great honor not only because it was given by such an esteemed artist, but also because of the high-quality of all the other works in the show. There were 644 entries submitted for this year’s show; 189 of those were accepted and are on display at Saks Galleries through December 1st, 2009.
Dan…thanks for all you have shown…this month and next I have watercolor pictures of flowers of Vietnam…My flowers are actually starting to look so much better that I’m not embarrassed to show people them….still working on the clouds though..
Richard Mcdanielsays
I admire painters who make some wonders with their brushes and paints to enchant us by their artistic skills. Hope that, art is an intrinsic talent which buds inside oneself, who loves and adores painting like anything! Such kind of feeling of inborn spirit I got after seeing the step by step explanation of landscape painting. It is great to see, looks natural and definitely speaks the professionalism of that artisan genuinely!
be4rtsays
Good instruction, but in my opinion you are too wasteful of paint. good but also be free to play and to process the colors to express, may be even better this so that you have taken with our usual vedio see you play and mix the paint brush. or may boost the body style will affect a work of art: D


Great demo, easy to follow and explained very well. I love the way it turned out, and the simplified instructions. made quite an impression on me. Look forward to more. Is oil your only medium? many thanks lamoine
Thanks for the great demo. I learned at least two things.
Great demo. One question, why so many different brands of paint? Are those the ones you prefer?
Thanks for the comments. To answer Lamoine’s question, I work mostly in oil, but often do some charcoal work and the occasional watercolor. And Leslie: I’ve just kind of ended up using different brands of paint due to certain colors being somewhat unique to a particular brand. It’s hard to find all the colors that I’ve become used to in the same brand. For example, I bought some Cadmium Yellow Deep from a certain brand because I assumed it would be a light orange, but it turned out to be much yellower that I expected. So I basically have found colors I like in particular brands, then have tried to stick with those colors in those brands.
I have some more demonstrations on my website….
http://www.danschultzfineart.com/information/demos.html
I would love to have a video of how to paint, I am very intersted in painting . Please let me know how I can get a free video. I live in Newfoundland Canada .
Sincerley
Gloria Bailey
Hi Gloria,
I have put together an entire section on free videos. To access it, look for the “Video” link up top in the navigation bar.
I am constantly adding new videos and sections. If there are any specific videos on painting you would like to see, please
send me your suggestions using the contact form on the following page:
https://www.artinstructionblog.com/contact
– Ralph Serpe
Webmaster…
Dan, good job overall. Thank you for being willing to share your work. I do think you could have increased the feelings of depth by using atmospheric perspective to slightly vary the color/value/temp/edge softness on the stream bed, banks and trees as they receded. You did an excellent job of modeling the distant mountain. The cloud shapes may have been more dramatic if you had consolidated some of the shapes. I hope you don’t mind the criticism, but I have always appreciated insights from other painters about my work. It helps me get to where I want to be much quicker. Keep up the good work!!
I just wanted to announce that this painting has just received the First Place award in the 10th Annual American Impressionist Society National Show, awarded by artist Quang Ho. The award is a great honor not only because it was given by such an esteemed artist, but also because of the high-quality of all the other works in the show. There were 644 entries submitted for this year’s show; 189 of those were accepted and are on display at Saks Galleries through December 1st, 2009.
http://www.americanimpressionistsociety.org/
http://www.saksgalleries.com/
God Bless and may you be blessed for sharing.
Dan…thanks for all you have shown…this month and next I have watercolor pictures of flowers of Vietnam…My flowers are actually starting to look so much better that I’m not embarrassed to show people them….still working on the clouds though..
I admire painters who make some wonders with their brushes and paints to enchant us by their artistic skills. Hope that, art is an intrinsic talent which buds inside oneself, who loves and adores painting like anything!
Such kind of feeling of inborn spirit I got after seeing the step by step explanation of landscape painting. It is great to see, looks natural and definitely speaks the professionalism of that artisan genuinely!
Good instruction, but in my opinion you are too wasteful of paint.
good but also be free to play and to process the colors to express, may be even better this so that you have taken with our usual vedio see you play and mix the paint brush.
or may boost the body style will affect a work of art: D