Painting A Zinnia With Acrylic Washes
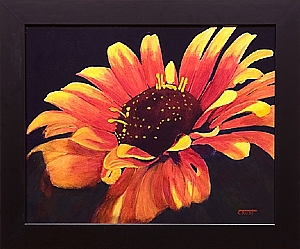
This is an acrylic painting demonstration of a Zowie Zinnia I created from a photograph I captured at the Colorado State University Floral Testing Site in 2008. The purpose of this demo is to show how Acylics, with good pigment content, can create lovely washes for the artist, almost similar to those achieved with watercolors. This demo uses an Ampersand Aquaboard, and Stephen Quiller Acrylics.
Step 1: The Initial Washes
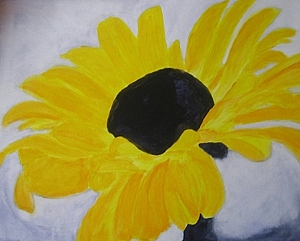
I applied my first two coats of Stephen Quiller Acrylics…using Cad Yellow. Did a very light wash of Cad Orange for shading, and created a light neutral gray with the yellow and Stephen’s own Quiller Violet to overlay the vibrant white of the board’s background. I took the same color darker for the flower center and stem. This entire step is more to give me a blueprint as it were, of where I want to be going, and a guidance of color with an underlayment of hues.
Step 2: The Intermediary Washes
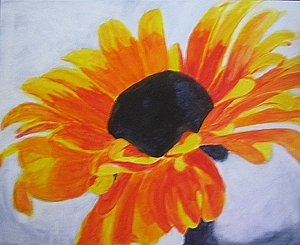
This second round of washes used the same colors on the flowers as before, but I upped the heat a little with Quin Red. That and the mixes I created from the group were then used to begin creating petal definition.
Step 3: The Final Washes Before Beginning Details
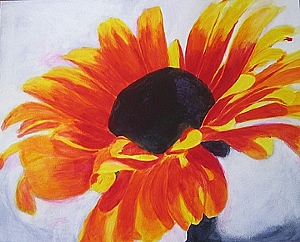
Next I added my first wash of Magenta. I will come back in later and brighten it up even more when I do the detail work. Again, more time spent defining of the flower petals and shadows.
Step 4: Beginning The Background
Before I begin the final detail work, I wanted to begin placing my background to get an overall feel for the painting. All colors in the background are values created using the flower petals and their complimentaries, with the intention of creating varying degrees of neutrals to amplify the already vibrant painting. I am quite pleased at how it is looking.
Step 5: Softening and Defining
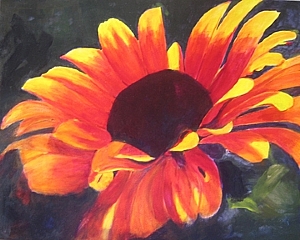
In this image I have spent a little more time delineating petals, adding shadows, correcting petal shapes, and beginning to soften edges and play with the background colors a little more. I am still keeping to the limited color palette I started with.
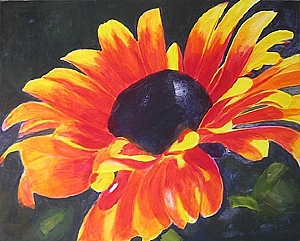
Step 6: Clean Up
This was basically the final step before adding the Stamens. I took out a few unnecessary small petals. Reshaped a few to look nicer. Darkened my background as the vibrant colors just weren’t popping as much as I had wanted with the softer background. While I did hate sacrificing that, it just wasn’t allowing the glow I was looking for. I also added the final bit of Magenta and Quiller Violet to the petals.
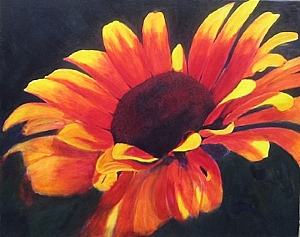
All that is left is a final coat on the background to even it out where there are thinner areas that soaked into the Ampersand Aquaboard; add the stamens, and sign it. 🙂
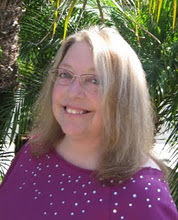
About Cyd Rust
Growing up in a family of painters, it was not surprising that I was only nine years old when my Grandmother entered me in my first juried show. Life as a child was a joyful blend of unrestricted creativity and unconditional love. Art overflowed the small house my grandparents lived in. Artists constantly came and went, and every medium imaginable was held within its walls at some time.
In 1994 I moved to Loveland Colorado where I immersed myself in classes at The Loveland Academy of Fine Arts, taking thousands of hours of study from some of the top artists in the world.
I found my niche in sculpture, and it wasn’t long before my work was held in numerous private collections, and I had been accepted into juried shows across the United States, including showings at the Palm Springs Desert Museum and the prestigious North American Sculpture Exhibition.
In 2008, after overcoming cancer, I realized I needed color in my life, almost as a form of celebration for being alive. So I put away the brown clay and began to paint.
I love to paint. Often the sun rises and sets before I even realize the day is gone… so absorbed have I been in the process of creating. I love using color, and shapes to express myself in a way that brings joy to me and I hope, to those who view my art.
Cyd Rust is an award winning Painter and Sculptor, who’s memberships include the Artist’s Association of Northern Colorado, the Thompson Valley Art League, and also Associate Membership in the National Sculpture Society.
Please take a moment to Visit Cyd’s Websites:
https://www.paintingamileofcanvas.com/
Find more acrylic painting lessons and techniques from our site here.
hello Cyd Rust I like how you do your Flowers very beautiful work Craig.
dear Cyd, Loved the technique of your painting. I am a beginner, now that I have recently retired. I have a drawing of an orange poppy, stems, leaves and some unopened buds. I have not started to paint it, maybe I could use your ideas for painting the poppies. 🙂 Will have a go and see what happens. Thank you. Medusa
Hi Cyd,I would just like to say your work is fantastic.I will aspire to be like you [painting wise]. Not easy to say I’m self taught & still on going. Thankyou for the inspiration.
I was just reading through your technique… And it is so easy to understand and I am going to try it on my next project.. I had been painting flowers but not good at it.. Self taught if i may say… But I am still trying.. It helps me with my boredom and feeling so empty after my son died.. Thank you
Thank you everyone for the kind compliments. I am glad the demo was easy for you to understand. I loved painting this. Flowers always look so simple, right? But sometimes it is hard to see just how many layers are really in there. ? Cyd
I love this and am using it for a project. If all goes well, I may even put a picture of the finished project on here. Thank you so much!
-Mitch-