About Vincent
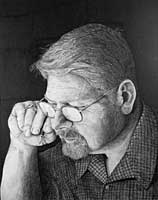 My life has been influenced over the years by many things. First is my fundamental belief in God and second my family and the rural up-bringing that I have had. These two basic values have guided me and given me a love for nature, history, and the country life style.
I have always loved to draw and paint but, in 1996, I decided that it was more than just a hobby for me. I was not happy with the occasional sketch or quick scribble. I began seriously considering the world around me and then working out the God given talent toward a perfecting of a personal style so that I could render the scenes that I so dearly love. It is that perfecting process that has guided me to where I am now. No, I have not arrived. Nor have I attained perfection. On the contrary, I believe my journey has merely served to push me on toward the mark. It has given me feelings of accomplishment and greatened my respect for God’s creation.
Follow this link to visit Vincent’s Website
Leaf Work – Tree Foliage
(Click Images for Larger Views)
I have come to the part of the drawing that is considered by some to be the most difficult when drawing trees. The leaf work can be broken down into steps just as the tree trunk itself. You will need to look at the leaf clumps and observe how the light reflects on them and then note the individual leaves as to how each one interacts with the other.
In most cases, you will not see each leaf completely. You will see extensions of each with overlapping views, and perhaps only a few leaves completely. That makes our work easier. Remembering our light source again and how it is reflected on the leaf clumps and the individual leaves, we must next observe how gravity and wind is affecting the leaves in our reference photo. Again, many factors determine how our subject looks. As branches grow out away from the tree trunk they get smaller. This sounds very basic but, it is important to how we do our work. As the branch gets smaller the weight of the leaves are affected by gravity and other forces such as wind or humidity or precipitation. They show that stress by bowing down toward the ground. Still others may be slightly lifted up by the wind. This “attention to detail” will make the difference between an OK drawing and a realistic drawing.
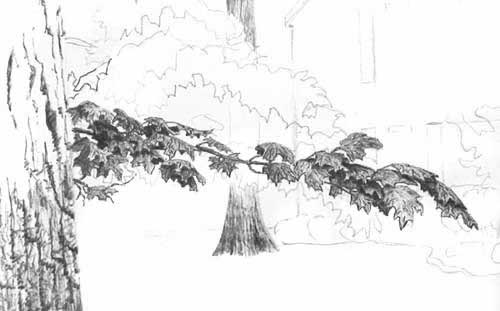
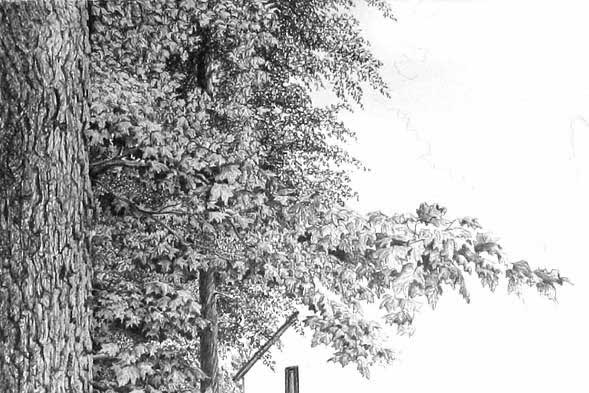
In the drawing below, the small branches and limbs are growing out of the tree trunk from the sides that are away from us, or just to our right or left. None are growing out of the viewer’s immediate view or in front of the tree trunk. This means there will be a full view of the trunk all the way up the page in this drawing. It also means that there will not be any leaves or branches drawn in front of the trunk.
The image above is how the finished branch and leaf clump looks. Now I will explain how I got it.
The Basic Technique
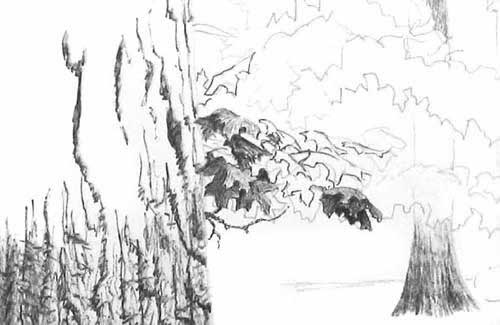
Take your Fine point pen, insure it has good ink flow and clean the ball tip. I started with the leaf that is closest to the tree trunk and farthest away from the viewer. Not much of the leaf is seen. Very lightly draw just the bottom portion of the leaf edge outline. Move to the next leaf closest to the viewer. Very lightly draw this leaf edge. Pay close attention to the way the edge of the leaf looks. Do this for all the leaves that are in the section that you are working on. Refer back to the reference photo often as you go.
NOTE: I will usually draw through an entire leaf clump or branch section before I go back to add tone or detail. But, for this tutorial I have stopped and added these in the middle of the branch section, to show you how the individual leaves will work together to make the image look complete.
You can see in the image above that I have still not drawn a complete leaf. Here is where I get to tell you a secret. Well, it may not be a big one but, it’s a secret none the less!
When the viewer looks at your work in its completed state, the eye picks up key indications that the brain has learned over time to tell it what the person is looking at. Those keys trigger memories that say, “That’s a tree” or “those are leaves”. If you, as the artist, can trigger enough of those keys then your work will be seen as realistic or believable. In a sense, we are fooling the brain. What does all this mean to you and me? It means that as long as you can draw a bit of a leaf many times and put them in a position that looks natural then you can draw a believable or realistic tree. You still have to practice and you still must develop your eye as an artist to be able to render what you see. But, it makes the task that much easier. At least it does from my humble point of view.
Once you have worked through the leaf clump or branch section, stop and assess where you are at with it. If it looks like what you want or as it is in the reference photo, then you are done with the outline work. If not, add what you need.
Detail and tone work
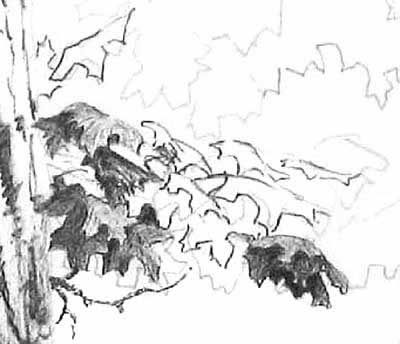
Next comes the detail and tone work. Still using your Fine point pen, look at the individual leaves. What can you see? If all you can see is tone or light reflection then don’t put in any detail lines. But, if you can see details, go ahead and put them in. These would be holes or dark spots, veins or insect eggs. I have even put in small caterpillars at times. After you are happy with the detail lines, it’s time to put in the tones and shadows. The drag method works well here. For leaf work it’s a much smaller motion and done very carefully. You must pay attention to the outline of the leaf and the growth pattern of the leaf when making the drag stroke. I also pay attention to how the leaf is formed or bent to determine what direction I make the drag stroke in. In this close-up view you can see the different layers of tone on each leaf and the use of direction of stroke to show growth pattern in each leaf. You can also see the overlapping shadow of the top leaves on the lower leaves as indicated by a step darker tone just below the upper leaf edge.
Once the leaf clump is outlined, the detail and tone work is completed and I have built the layers to create depth in the shadows I put in the actual branch itself. I start at the point closest to the tree trunk and work my way out to the end of the leaf clump. I use the Fine point pen to do this and work in a light line stroke from left to right. Once I get the basic flow of the branch in I will add small twig work and finally a few leaf stems. After that I go back and add layers in areas of the branch to show cast shadows from overlapping leaves. I then put in the final tone layers to show shadow from the opposite side of the branch from the light source
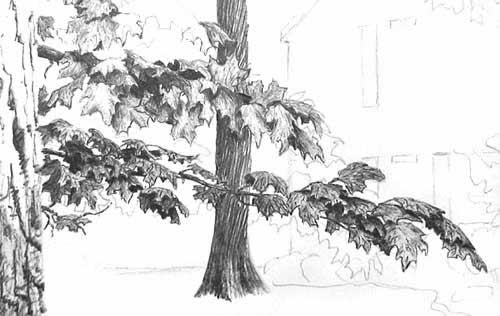
As you can see in this image, there really are only one or two leaves that are close to being drawn completely. Most of the leaves are really only portions or ends of leaves. I only used the darkest of tones in areas that overlapping leaves prevent almost all of the light from getting through. The next branch above is done as this first one was.
You can see, in this image, that I have drawn what I call a “completed leaf”. It’s just above the start of the main leaf clump in the second branch near the tree trunk. These leaves will be approximately the same size since they are close together in the image and relatively the same distance from the viewer.
! Remember, as objects in the scene get farther away from the viewer they need to get smaller. Details also get less obvious. This helps to create depth in the image. Consistency in this reduction in size and detail throughout the drawing will help build a realistic or believable drawing.
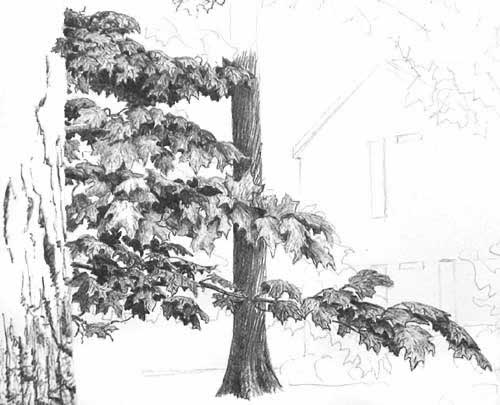
This is the second leaf clump finished. You can see that I left it a bit lighter than the first clump. There is a bit more light showing on sections of this leaf clump than on the lower one and I want to leave myself some highlights to work with a bit further into the drawing. So, for now it will be left as it is. You can also see in the image that I went on and finished putting in the first and second layers of line work in the tree in the mid-ground on the far bank. I will come back to this in a later phase.
The third leaf clump is one that has a lot of underside leaf work showing. It is important that you show this detail in a tree drawing such as this to build height as well as depth in your drawing.
From the viewer’s perspective in this image the bottom of some leaves are seen. To draw this I proceed as before with my Fine point pen and do the light edge lines. Then I determine which leaves are actually portions of ones from the opposite side of the leaf clump or ones that are bottom views. I take my Fine point pen and put light layers of ink in to show shadows with the darkest ones being the leaf portions that would be farthest away from the viewer or totally in shadow on the underside of the clump. There are between 3 and 4 layers in the general dark tones with up to 6 or 7 layers in the darkest. I use the very tip of the pen to go back over the bottom of each leaf at the darkest edges to push, as it were, the darkest edges back under the leaf clump. I use a medium pressure for this. Not enough to indent the paper surface deeply but, enough to insure that the ink coverage is consistent and dark.
In this image you can also see how the longest of the branches extends into the view of the home. It is important to maintain the direction of the leaf points as they are pulled by gravity out and downward naturally. The shadows show the underside of leaves and the highlights show leaves that are closer to the viewer as the sunlight reflects off the smoother top surface. While turned up leaves show both highlights and shadowed sides and edges. Still others appear almost white on the paper as they catch more light from the sun. Careful consideration to the reference photo is imperative here to get a rendered image that reflects the scene so closely that it is recognized without question by the property owner or anyone who would know the property. This more exact interpretation is not as important when drawing a scene that is fictitious or not to be recognized as being a certain specific location.
I hope that these instructions have been helpful to you in rendering leaf work in your drawings. The following section, “Tutorial 3”, will be on Mid-ground and Distant Trees and leaf-work. They all play important roles in producing a believable image and must be given careful consideration. If you have any questions on this section, or the tutorial as a whole, please feel free to email me and I will be glad to answer you. Your comments are appreciated.



Good page.
Congratulations from France.
A truly great site! Very well-written, crisp illustrations and no fluff! I am quite pleased to look at the lessons and learn from them each time I do.
Again, well-done,
Steven
Indio, CA., U.S.A.
Thanks for applying some time in order to compose
“How to Draw Leaves On a Tree – Pen and Ink Drawing Tutorial”.
Thanks for a second time ,Mckinley
Really great info. I am a beginner and need all of the easy-to-explain directions that I can find, Really nice work…but I would like the pictures to be bigger. Thanks!
Thank you sir for your guidance