Experimenting with Liquid Acrylic,” an insightful post on how to use acrylic ink, presented by artist Linda Gunn. This post discusses the creative applications of acrylic ink, showcasing Linda Gunn’s approach and mastery of this vibrant medium. Throughout the post, you’ll discover a range of techniques and tips that Linda uses to bring her artwork to life. From the initial steps of handling liquid acrylics to advanced strategies for achieving depth and texture, Linda’s guidance is inspiring and practical. This post is perfect for artists looking to expand their repertoire and explore the rich possibilities of acrylic ink.
About the Artist – Linda Gunn
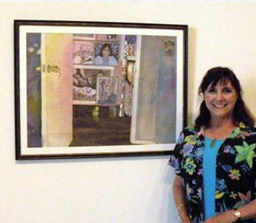
Linda’s artwork has an ethereal, fanciful quality that is derivative of her childhood. She was influenced at an early age by her Disney-Artist Grandfather and the works of Norman Rockwell, Andrew Whyeth and other prominent artists and illustrators of the time.
Linda’s connection to England is evident in many of her works, as is her love of animals. She is a highly skilled artist who utilizes the notes, photos and sketches from many sketchbooks and travel journals. She has the unique ability of recalling the fairytale aspect of her childhood memories to add a little magic in her paintings.
Her paintings have been published in numerous books and magazines and are collected internationally. Linda is listed in Who’s Who of American Women and Who’s Who in Art of Great Britain.
She was founding director of the US Chapter of NAPA/National Acrylic Painters Association from 1995 through 204 when NAPA became ISAP, The International Society of Acrylic Painters.
Linda Gunn is an Artist, Author, Illustrator, Instructor and is a native of Long Beach, California.
Be sure to check out Linda’s Website below to learn more about her and to view more of her work:
Experimenting with Liquid Acrylic -Acrylic Ink Tutorial
(Click images throughout tutorial for larger views)
Introduction
I began painting in watercolor more than 15 years ago. As my skill level evolved, I constantly searched for a magic ingredient to help me improve my paintings. However, I believe and teach that emotional content, not paint media, makes for a successful painting. So why did I continue to search for that special product? Because often an innovative new paint medium can make it that much easier to convey that emotional message.
I discovered liquid acrylic ink to be my magic wand. This pigmented acrylic is finely ground to take on the consistentcy of ink, and flows easily through an airbrush. Benefits include lightfastness, bright color with the initial wash, no color lifting when dry, diluted soft effects, crystal-clear transparent glazes, the ability to cover up mistakes, and, when the paint is still wet, the ability to perform all watercolor techniques.
I prefer FW’s Liquid Acrylic Ink because it’s the most fluid acrylic I’ve found. Water spreads it well. Liquid acrylic can be applied to the painting directly from its bottle. The other acrylics need to be thinned with water when I use them as watercolor. With liquid acrylic, it’s nice to be able to eliminate that time-consuming process of taking the “squish” out of paint.
The Starting Point
Before I paint, I review my sketches, written observations and photographs. I look for subjects that have an interesting composition and/or strong lighting. When I started in watercolor, I avoided painting the center of interest in my paintings because I feared making a major mistake. My first full-sheet flower painting had a wonderful background with leaves, flowers and stems weaving in and out of light and shadow. But I was afraid to paint the detailed flowers that I sketched in the foreground. Once I had completed the background, I put the painting under my bed, where it stayed for six months.
During this time, painting backgrounds was my specialty. But I finally decided that if I wanted to get anywhere as a painter, I’d have to bite the bullet and finish the painting that was under my bed. To my surprise, I had learned the necessary techniques for painting details from my background painting experience. The same painting that cowered under my bed for six months was later displayed in a watercolor painting exhibition.
EXPRESSIVE SUBJECT MATTER
I’ve never had a problem finding subject matter for my paintings, I have several sketchbooks that I use for watercolor sketches, documenting personal observations and the visual descriptions of details a quick sketch can’t portray. I also take a lot of photographs. My sketches and written observations help me “bring back the moment” when I decide what photograph or photographs I’ll be using as a reference. After all, a good painting should be more than an exact copy of a great photograph.
It was from studying the working methods of Andrew Wyeth, Winslow Homer and Edward Hopper that I learned that the best paintings are a personal statement of one’s life experiences. Every one of us interprets life’s experiences in a unique way. What a wonderful challenge we artists have to communicate our own “personal vision” through our paintings. An artist’s personal vision is simply an illustration of how that artist sees and interprets things that are beautiful, emotionally moving or visually striking.
Many professional artists paint a variety of paintings centering around the same subject or theme. Painting in a series helped me develop as an artist. I find that when I plan more than two paintings, I’m not so inclined to paint tightly. I have a so-what-if-I-make-a-mistake attitude that turns every painting into a learning experience.
FLAWLESS BACKGROUNDS
Five years ago I watched artist Nita Engle demonstrate her famous “pouring technique.” After masking out all the white values, Engle would pour watercolor paint directly onto very wet paper, turning the paper to let the water mix the paint. This has become my own secret to beautiful, flawless backgrounds, skies and landscapes. I began experimenting with Engle’s technique by using any media that would allow water to be its agent. Along with watercolor, I’ve used acrylics, inks, watercolor dyes, gouache, and, most recently, liquid acrylic.
Pouring paint is a very entertaining demonstration for my beginning students. What could be less intimidating than covering the whole piece of paper with paint simply by pouring on the pigments and letting the water mix them?
I’ve found that watercolor paint requires a lot of mixing to get a good-size puddle suitable to pour. To save time, I began using Luma Liquid Watercolors – a medium that’s actually bright, transparent dyes. The dyes are very intense so I usually dilute them for a softer effect.
I start a new painting by staining the entire piece of watercolor paper. To do this, I quickly pour three diluted colors of paint onto very wet watercolor paper, then tip the paper so the excess water and paint run off. I leave the paint on the paper for a short time, just long enough so that it lightly stains the paper. This way, I’ve already established my lightest values and the background is done! My planned composition is then painted over the dyes with traditional watercolor. The only deterrent to using these dyes is that several of the colors are not lightfast. To keep my Luma paintings from fading, I frame them with UV-protected Plexiglass. Pouring paint is a very entertaining demonstration for my beginning students. What could be less intimidating than covering the whole piece of paper with paint simply by pouring on the pigments and letting the water mix them? I’ve found that watercolor paint requires a lot of mixing to get a good-size puddle suitable to pour. To save time, I began using Luma Liquid Watercolors – a medium that’s actually bright, transparent dyes. The dyes are very intense so I usually dilute them for a softer effect.
Test Driving Liquid Acrylics
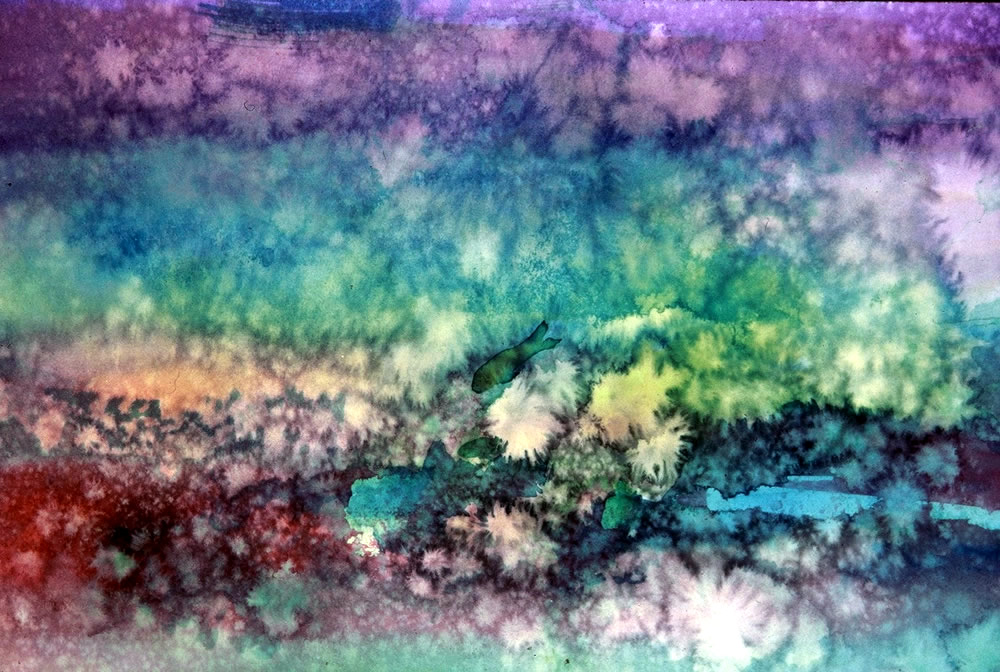
Here’s a fun experiment using liquid acrylic:Wet an entire piece of hot pressed paper, then drop any three primary colors of FW Liquid Acrylic onto the paper. Now, turn and tip the paper so that the water mixes the paint and covers the whole paper. Add more paint if you want it brighter. (This is a messy process; do it in a sink or tub if you don’t have paper towels and quick hands.)Now, lay the paper flat. When the shininess of the wet paper is gone, spray it with water from a pump-type spray bottle. (I use a Windex bottle — I’ve found it produces the best effects.) A spray of fine mist has no effect on the damp acrylic. You’ll be delighted with your instant results, which should resemble the look of transparent stained glass.Let the painting dry, then rewet it. With a large wide brush, glaze over your painting with any of the transparent liquid acrylics. (The acrylic bottles are printed either transparent or opaque on their labels. ( After the glaze has dried, the painting will be ready for your personal creative inspiration.
EXPERIMENTATION
Every painting is a learning experience, and when I use liquid acrylic, it becomes a learning experiment. I get so excited with the result that I find myself using the experiment as background for a representational painting. When dry, acrylic can’t be removed, but it can be painted over to cover mistakes or bring out an interesting area. To keep my paintings transparent, I use many thin, diluted layers of paint. When applied too thickly, the acrylic will seal the watercolor paper, which makes the paper non-absorbent. With each layer of paint, the surface starts to build up. Too many layers or too much paint right from the bottle will give your painting a plastic sheen. When I find this happening in my work, I cover the shiny parts of my painting with collage papers and repaint them. The collage papers create an atmospheric softening effect.
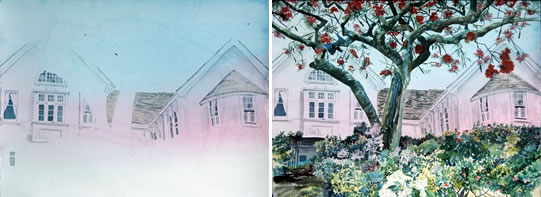
You can see how I used liquid acrylic to paint Flamboyant (22 x 30). I’ve found that liquid acrylic doesn’t make me a more skillful painter. It doesn’t inspire brilliant subject matter or make my style mistake proof. But it does make it easier to skillfully manipulate my brush. Thus, liquid acrylic helps me render brilliant subject matter when I am so inspired. And when I make a mistake in liquid acrylic, I don’t throw up my arms in defeat – it gives me a second chance.
But the most important thing liquid acrylic has done for my painting skill is give me the confidence to paint beyond the background, and pull my half-painted masterpieces out from under the bed.
Step By Step Acrylic Ink Tutorial
1. Establish the Background

I first used a Robert Simmons white sable 3-inch brush to wet the entire piece of 300-lb. hot-pressed paper. I then poured diluted Rowney blue, flame red and process yellow onto the wet paper. (I prepared these three mixtures separately in small cups before wetting the paper.) As soon as the last cup of diluted paint was poured, I held the paper in a vertical position so the excess paint and water ran off. I then laid the paper flat to dry.
I next sketched the house and tree branches. I painted the dark of the house with the same three colors that I mixed on my palette. I used one drop of paint from each bottle to make black and painted the details on the house using a Robert Simmons white sable No. 6 brush. For the roof of the house, I used a glaze of diluted yellow ochre. Notice the flawless blue sky, pink house and yellow foreground. These will be the lightest values in the finished painting.
2. Create the Focal Point
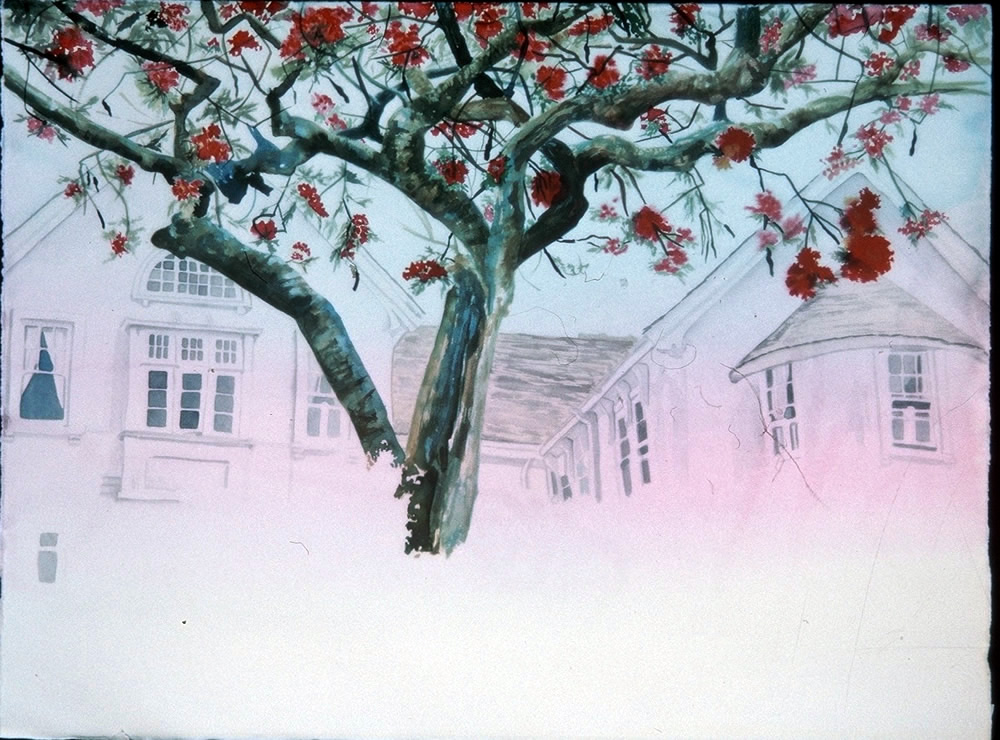
I next painted the red flowers of the tree. The brightest blossoms were simply a single drop of flame red dropped onto damp paper with a touch of yellow ochre. (I used both directly from the bottle.) The lighter receding blossoms were painted on dry paper with diluted paint. I then painted the trunk, branches and foliage of the tree using the basic watercolor technique of painting light to dark. I added antelope brown as my fifth color. With this step, I completed the sky, house, and tree.
3. Be Inventive
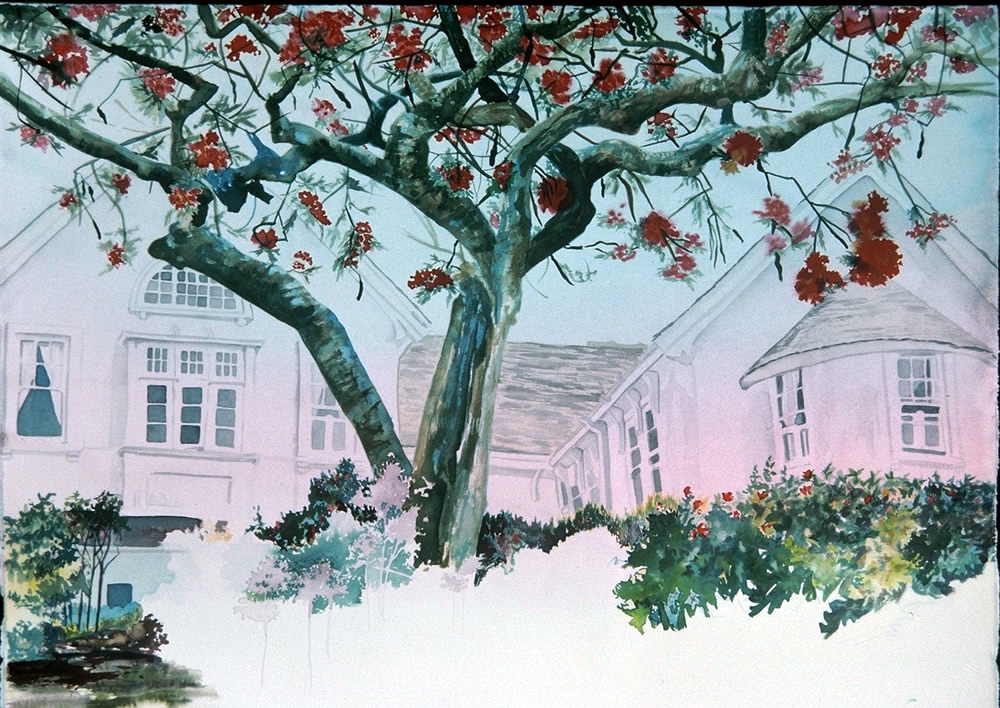
The foliage close to the house appears very detailed, but is actually only a play of color, shapes and values. This is the part of the painting I enjoy most. Once the design and mood have been established, I’m free to be inventive. I mixed color on my painting instead of on my palette, saving yet another step. I established the foliage using light blue, and then added one or both yellow to make the various greens. Some colors were mixed on the wet paper and others on dry paper as a glaze. For the darker areas, I added red and more blue. This was done one small section at a time using a No. 2 and No. 6 white sable brush.
4. Fill in the Foliage
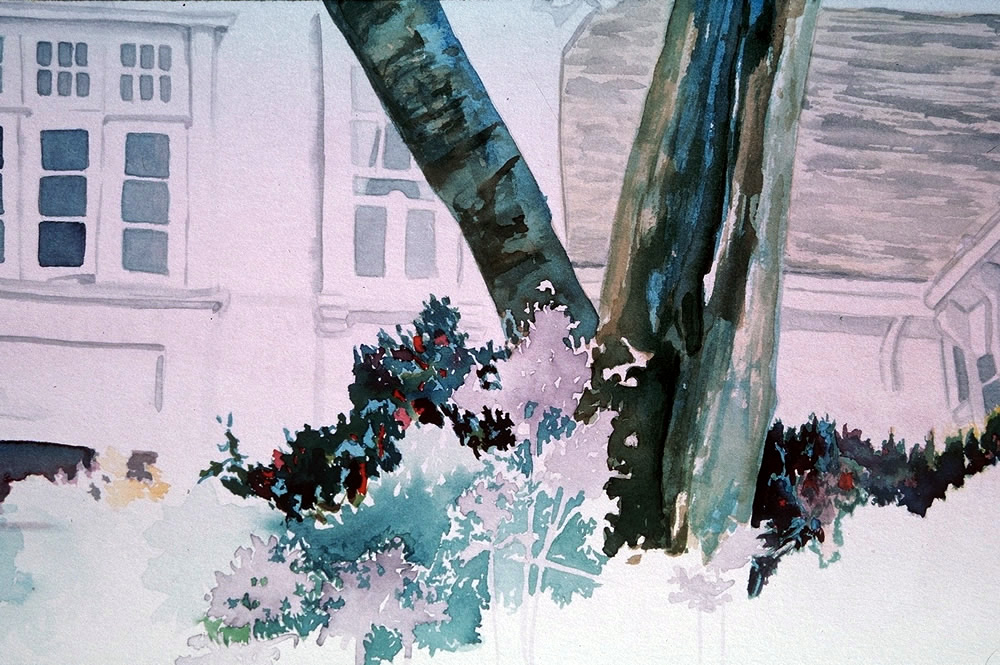
To delineate the foliage in the foreground, I used my familiar background painting techniques. For example, to create an underwater atmosphere, the splashing surf, or a misty sky, I’d use a spray bottle of water to slatter the paint, rather than traditional painting. With several transparent glazes over tissued-out clouds, you can create a powerful sky or, by tissuing-out trees, creat an unlabored landscape. After the apint has dried, I painted my planned composition over and around the underpainted background.
5. Add More Flowers
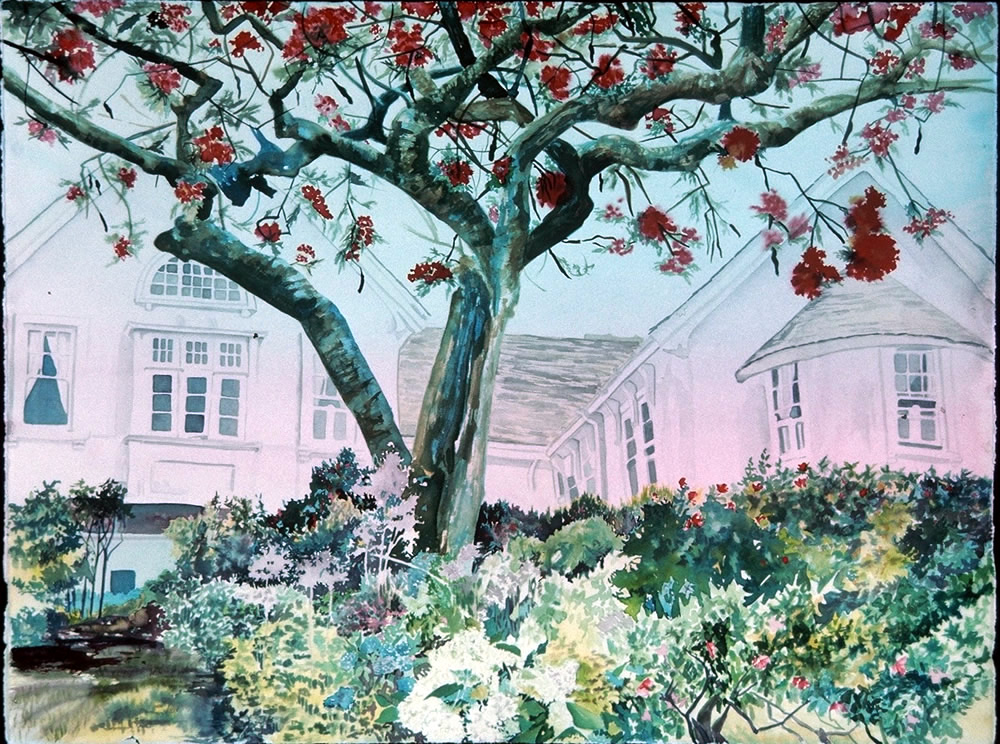
As a rule, objects in the immediate foreground of a painting have the most clairty. In my painting, I felt I needed more flowers in the garden than were portrayed in the photograph. So I looked through my gardening magazines and found a great photograph of a flowering bush. To complete the garden, I painted around each plant with a dark value before painting the details of each bush. I placed the flowering detailed bush at the bottom and center of the painting to give the painting more depth.
6. Finishing Touches
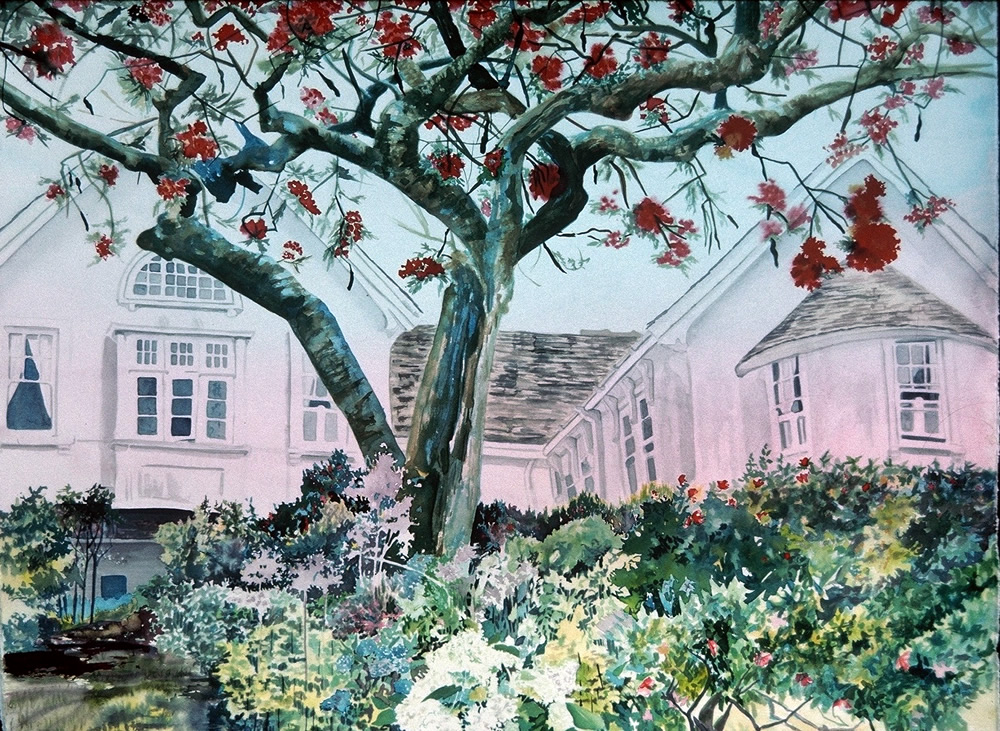
To complete Flamboyant (22 x 30), I darkened the values on the house and added yellow glazes to the foliage in the foreground.
I hope you enjoyed this Acrylic Ink Demo. Be sure to check out Linda’s Website below to learn more about her and to view more of her work:
Skillshare – Acrylic Painting Classes
To further your acrylic painting journey, consider exploring Skillshare. They offer a wide range of classes in one convenient location, perfect for beginners and seasoned artists alike, with no disruptive ads. Join today and get one month free! Affiliate Disclosure: I will receive a commission if you sign up for SkillShare with the above link and decide to become a member after your free month. Read our affiliate disclosure here.
Get One Free Month of Skillshare!
Find more acrylic painting tutorials, tips and techniques here.
Leave a Reply