My work fits into two very different and unrelated categories: realism and abstract. Each style allows me to challenge different parts of my personality. Drawing realistically indulges the side of me that loves detail and is a perfectionist. It challenges me technically and I am always pushing to create more accurate drawings. The abstract works reflect my interest in colour and form. I am able to work loosely and fluidly, reacting to the painting as I go. It is sometimes a relief to shift from the tight discipline of realistic drawing to this type of work, but it can be equally relieving to go from these open-ended paintings to getting lost in the details of a drawing.
A very important part of drawing realistically is shading: the variation in value from shadows to highlights that describe the shape of something. By improving your shading, you can greatly improve the quality of your drawings. Shading isn’t difficult to learn, but it does take some practice. You can learn how to make your drawings more realistic by understanding light, controlling your pencil, and blending.
To learn more about Miranda, please take a moment to visit her websites below:
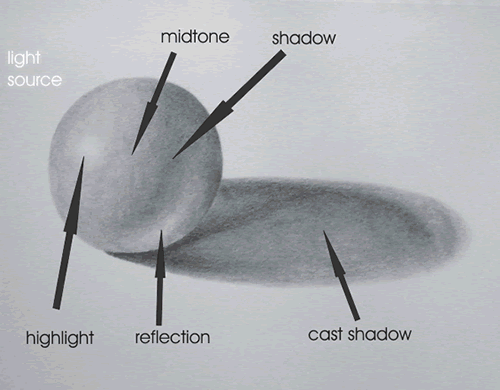
In your drawings, you will generally have one light source, which determines the location of highlights and the direction of shadows. The spot where the light hits your subject directly is called the highlight, and is usually pure white. The side facing away from the light source will be in shadow. The midtones refer to the gradation of tones between the shadow and the highlight. Most objects will also have an area of reflected light. This reflection happens when light hits the surface next to your object and bounces back. You will notice that these values blend into each other smoothly, which communicates to us the shape of the object. The only time you will see a hard edge is when there is a cast shadow, otherwise the tones change gradually. The closer the cast shadow is to the object, the darker it will be, fading as it moves farther away.
Control Your Pencil
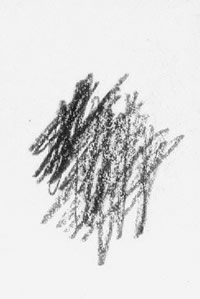
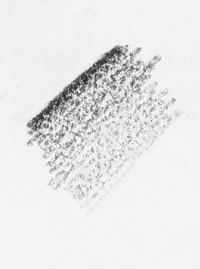
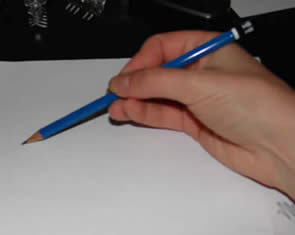
The key to smooth shading is learning how to control your pencil. You need to be aware of how you hold the pencil, how you apply your strokes, and how hard you press. For darker shadows, press slightly harder and slowly lessen the pressure as you work away. Keep in mind that you shouldn’t have to press very hard; if you want darker shadows, build them with layers of graphite. Your pencil strokes should be even and regular. You don’t want to be able to see the paper between your lines. Try to make your pencil strokes in the same direction to get smoother results. This is easier if you hold your pencil closer to the end and at an angle, using the side of the lead to shade.
The wrong way!
The right way!
Blending
Some people like the texture of the paper showing through, but I find you get the best shading results by blending. A blending stick is a small tube of tightly rolled paper that lets you smooth out pencil shading. You can use it the same way you use your pencil: on an angle with regular strokes. Again, you won’t’ need to press hard! Start at the lightest value and work towards the shadows. If your blending stick gets too dark, wipe it on a clean sheet of paper, or press it into your kneaded eraser. Learning how to shade well isn’t difficult, but it will take practice. With each drawing you’ll find yourself getting better. Remember, don’t be too timid with your shadows; a nice dark shadow will give your drawing depth. Let’s practice our new skills!
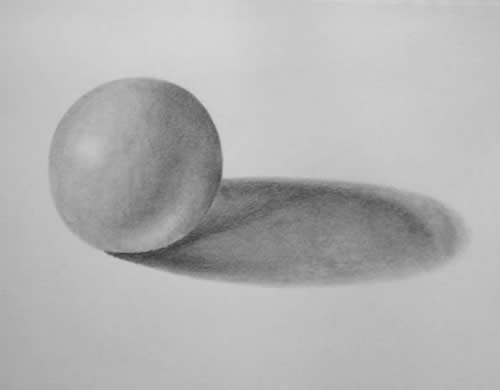
How to Shade a Sphere
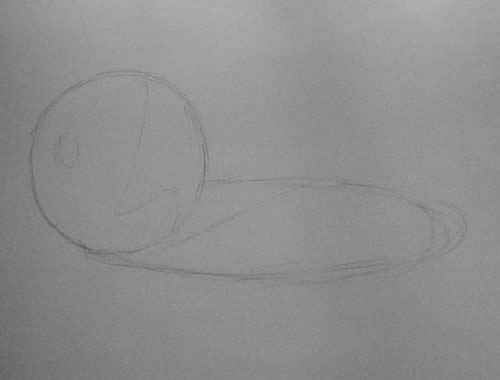
A sphere is a good example because all of our elements are present: highlight, shadow, midtones, reflection, and cast shadow. To set up a maquette to draw from, get a ball and shine a table lamp toward it. This is a great way to train yourself to see the different elements of shading.
First, draw the outline of your sphere and the shadow it casts. Outline the edges of your shadows and highlights. Draw the highlight a little bit bigger than what you want it to end up being. You will be blending into it and you’ll want to keep the highlight as white as possible.
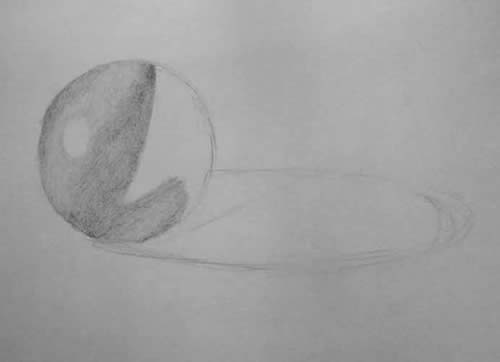
Using a medium pencil, like a B, very lightly shade the area around the highlight. Work your way to the edge of the sphere and the edge of the shadow. Squint to see the more subtle shading of this shape, and add another darker layer along the edge of the shadow. You don’t need to press any harder, just keep shading the same area until it gradually gets darker.
Using a softer pencil, like a 2B, shade in the entire shadow area. You don’t want to be able to see the transition between the midtone and the shadow area, so try to make it gradual. Again, add another darker layer where you see the darkest shadows.
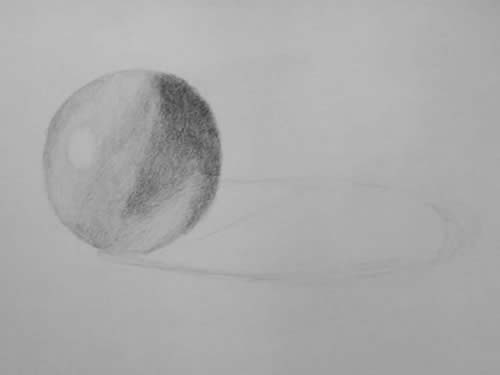
Use your blending stick to blend your pencil marks together. It’s important to work from light to dark so your stick doesn’t get too dirty. If it does, wipe it on a piece of scrap paper or press it into your kneaded eraser. You want the white of the paper to show through as the brightest part of the highlight, so blend inwards, keeping the center free of graphite.
The cast shadow directly under the sphere is the darkest value, so use an even softer pencil, like a 4B, to shade it. Switch back to your 2B to shade in the rest of the shadow.
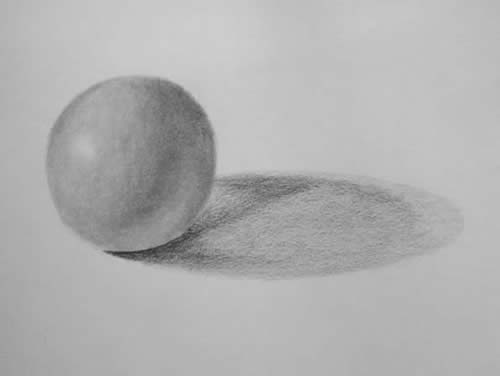
Blend out the cast shadow, paying close attention to the edges. The edges closest to the sphere are sharper, and get softer farther away. Lastly, use your kneaded eraser to clean up your edges and re-define your highlight and the reflection. Voila, a sphere!
Now you can use your skills to realistically draw virtually anything with a rounded shape. The rules are the same! A highlight, a range of midtones, the shadow with a reflection, and a cast shadow!
Happy drawing!
Comments
himanisays
thankx for this wonderful lesson.
shibisays
thanks..
landonsays
thanks it helped alot
leonardosays
thanks man! I really like drawing, but I was never very good after learning that we’ll see if I improve! Thanks!
Wayne Tullysays
I do like this shading tutorial, as it is a favourite thing of mine to shade my drawings when I have the time and something that I sometimes forget about is choosing a light source for my subject, as sometimes I just guess.
Many thanks for this post, because I’ll link it to my blog, as I have a post coming up on shading a fantasy art drawing done in pen and ink and this link would fit perfectly. cheers now!
Janesays
Thank you! I think the most important thing on shading pencil drawings is how to process highlight and the material of the objects.
Dr Harisays
thanks a lot
kimberleysays
good website very good advice, took abit of time to read though
kimberleysays
thanks, the lessos are great. 🙂
kohzadsays
i’m an art teacher. nice drawing! but i can’t understand the different tonal areas in the cast shadow???
KIRAN SINGHsays
I LOVE YOUR TUTORIALS AND I HAD REALLY IMPROVED BYE………
Firas Sameersays
I believe that if someone has the painting gift from god he/she can paint and draw anything and will get improved after practicing painting.
I like this article and I think it would be hard for non-gifted people to implement it perfectly, so try it and discover yourself if this was your first time ever.
You might want to see some of my paintings using a pencil several years back I hope that Miranda give me her opinions and suggestions, I will post some others soon using oil and other tools:
i am very thankful because u see my problem of shadowing
sophysays
THANK YOU SOOOOOOOOOOO MUCH!!!!!!!!!!
Anonymoussays
Wow wonderful lesson… I really like to drew shades but if i am try to make something in my mind so always its make wrong but when i am drew to something so its looking good. I think i have not that talent which a drawing master have. So wish me luck for my hard work.
Jordan Ketterersays
This help me so much in my art class, and my shading.
Ardissays
Hello! I’m at work browsing your blog from my new iphone 3gs! Just wanted to say I love reading your blog and look forward to all your posts! Keep up the superb work!
Tunji Philipssays
I enjoyed the tutorial,i hope this help me a lot.
samra farooqsays
thanks for yur tutorial on shading .this thing will really help me to shade my still life drawings.i have been learning how to draw on my own with a bit help of my sis who is an artist her self. uptill now i was learning how to draw basic structure and was improving my lines and my proportions and teach me.after my sis told me that i now should start shading my objects and she will teach me i thought i should get a bit of know how about shading before she teaches me how to . So, thank you for yur tutorial. pray that i get admittion in some good university of fine arts.
KYUNGsays
I’m terrible with this. I tried my first sphere today and it looks so wrong…but I’m not quite sure what I am doing wrong since I am going from dark to light and blending. But no matter what, it looks so off…
Adamsays
Thanks for this great tutorial. I love to draw but am horrible at it.. This had helped greatly… Thx again
Jerry Marcussays
Have always tried to draw,, especially the face itself, and have not gotten it well as resenblance.. But thanks for the leason sesion.
Hey Miranda! Thanks for sharing this beautiful article. I am so bad in shades but I think After this lesson, I will definitely able to shade perfectly.
Shading is a fundamental technique in pencil drawing that can bring depth, dimension and realism to your artwork. Whether you’re shading a simple object or a complex portrait, this blog post offers valuable tips and techniques to enhance your shading skills and take your pencil drawings to the next level.


thankx for this wonderful lesson.
thanks..
thanks it helped alot
thanks man!
I really like drawing, but I was never very good after learning that we’ll see if I improve!
Thanks!
I do like this shading tutorial, as it is a favourite thing of mine to shade my drawings when I have the time and something that I sometimes forget about is choosing a light source for my subject, as sometimes I just guess.
Many thanks for this post, because I’ll link it to my blog, as I have a post coming up on shading a fantasy art drawing done in pen and ink and this link would fit perfectly. cheers now!
Thank you! I think the most important thing on shading pencil drawings is how to process highlight and the material of the objects.
thanks a lot
good website very good advice, took abit of time to read though
thanks, the lessos are great. 🙂
i’m an art teacher. nice drawing! but i can’t understand the different tonal areas in the cast shadow???
I LOVE YOUR TUTORIALS AND I HAD REALLY IMPROVED BYE………
I believe that if someone has the painting gift from god he/she can paint and draw anything and will get improved after practicing painting.
I like this article and I think it would be hard for non-gifted people to implement it perfectly, so try it and discover yourself if this was your first time ever.
You might want to see some of my paintings using a pencil several years back I hope that Miranda give me her opinions and suggestions, I will post some others soon using oil and other tools:
http://www.dealingwithwindows.com/category/blog/painting-skills/
regards
i am very thankful because u see my problem of shadowing
THANK YOU SOOOOOOOOOOO MUCH!!!!!!!!!!
Wow wonderful lesson… I really like to drew shades but if i am try to make something in my mind so always its make wrong but when i am drew to something so its looking good. I think i have not that talent which a drawing master have. So wish me luck for my hard work.
This help me so much in my art class, and my shading.
Hello! I’m at work browsing your blog from my new iphone 3gs! Just wanted to say I love reading your blog and look forward to all your posts! Keep up the superb work!
I enjoyed the tutorial,i hope this help me a lot.
thanks for yur tutorial on shading .this thing will really help me to shade my still life drawings.i have been learning how to draw on my own with a bit help of my sis who is an artist her self. uptill now i was learning how to draw basic structure and was improving my lines and my proportions and teach me.after my sis told me that i now should start shading my objects and she will teach me i thought i should get a bit of know how about shading before she teaches me how to .
So, thank you for yur tutorial. pray that i get admittion in some good university of fine arts.
I’m terrible with this. I tried my first sphere today and it looks so wrong…but I’m not quite sure what I am doing wrong since I am going from dark to light and blending. But no matter what, it looks so off…
Thanks for this great tutorial. I love to draw but am horrible at it.. This had helped greatly… Thx again
Have always tried to draw,, especially the face itself, and have not gotten it well as resenblance.. But thanks for the leason sesion.
thanx for every thing you have taught me.
This is very well explained. This helped me out a lot!
Thanks! really appreciate this. am done drawing but my shading always destroys everything. with this lesson I’ll be able to shade correctly. I guess.
your teachings are awesome and cool
Your art lessons remind me of a quote by Ana Monnar ” Sharing will enrich everyone with more knowledge”. Keep up the good work Miranda.
Hey Miranda! Thanks for sharing this beautiful article. I am so bad in shades but I think After this lesson, I will definitely able to shade perfectly.
Shading is a fundamental technique in pencil drawing that can bring depth, dimension and realism to your artwork. Whether you’re shading a simple object or a complex portrait, this blog post offers valuable tips and techniques to enhance your shading skills and take your pencil drawings to the next level.