Enjoy this wonderful step by step colored pencil tutorial by artist Paula Pertile.
Step-by-Step Colored Pencil Drawing Tutorial
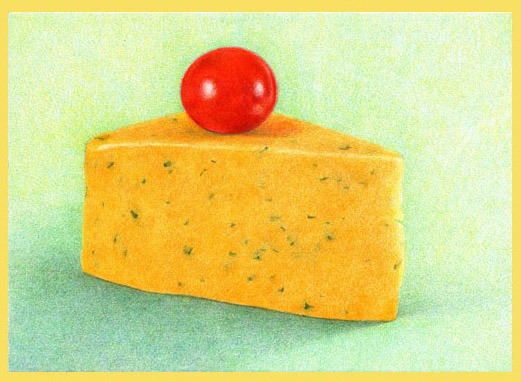
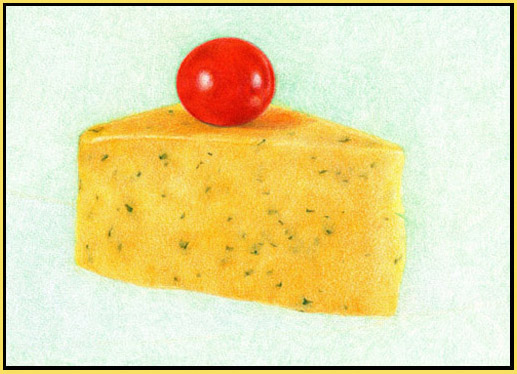
“Cotswald Cheese with Cherry Tomato”
This is a lovely wedge of Cotswald cheese (which has bits of herbs in it) with a little cherry tomato on top.
I will show you step-by-step how it was created. I used Faber-Castell Polychromo colored pencils on Strathmore 500 Series cold pressed illustration board.
The pencil colors used are Yellow Ochre, Canary Yellow, Grey Green, Cadmium Orange, Orange Yellow, Chrome Green, Sea Green, Geranium Lake, Scarlet Red, Dark Red, Light Flesh, Deep Red, True Green, Light Green, Light Ultramarine.
The finished piece is 5 x 7 inches.
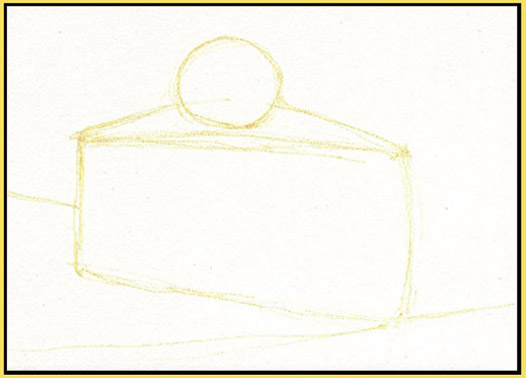
Step 1
I sketched in the composition with Yellow Ochre. In real life it was much lighter than this. I darkened it up in Photoshop to show it here. I also purposely made the cheese a bit shorter, and also deleted the wood panelling and green tabletop. (If I was serious about using the photo for reference, I’d have set it up with something white in the background to begin with.)
~~~~~~~~~~~~~~~~~~~~~~~~~~~
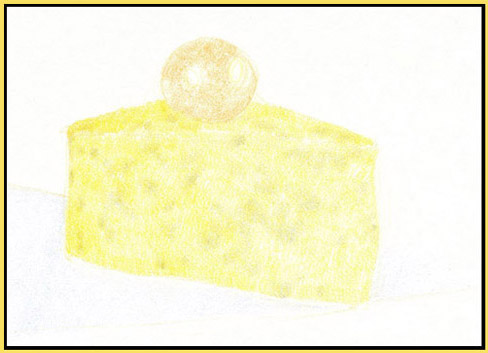
Step 2
Here I wanted to establish some color on the whole piece, just to get started. Using a light pressure, I did an over all wash of Canary Yellow on the cheese, then started to indicate some of the shadowy bits with Grey Green. I did some light Cadmium Orange on the tomato, leaving the highlights. I also did a pale pale pale wash of Sky Blue for the cast shadow (which barely shows up here.)
~~~~~~~~~~~~~~~~~~~~~~~~
Step 3
Here I did Orange Yellow and Cadmium Orange over the whole cheese. I also used an eraser to indicate the highlight on the top edge.
~~~~~~~~~~~~~~~~~~~~~~~~~~
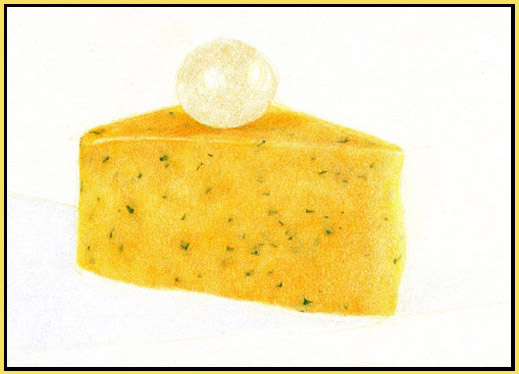
Step 4
Now its starting to get fun. I did the green bits with Chrome Green, Sea Green and Grey Green. I used a heavier pressure for the greens, since they’re darker bits. I’m also not slavishly copying every little green bit exactly like it is in the photo. Some pieces are the same, but I’ve also done some editing and rearranging.
~~~~~~~~~~~~~~~~~~~~~~~~
Step 5
Here I went farther with the cheese. I did more Cadmium Orange over the whole thing, and also added a shadow for the tomato on the top of the cheese. I worked on the edge highlight too.
~~~~~~~~~~~~~~~~~~~~~~~~
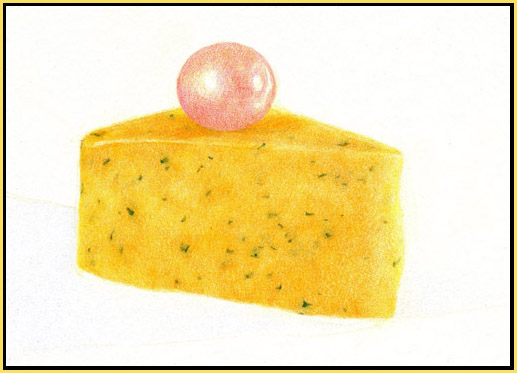
Step 6
Now I’m starting to work on the tomato. I did Geranium Lake over the whole thing, with a little bit of Cadmium Orange.
~~~~~~~~~~~~~~~~~~~~~~~
Step 7
I developed the tomato further here, with Scartlet Red, Dark Red, Cadmium Orange and a little Light Flesh in the highlights.
~~~~~~~~~~~~~~~~~~
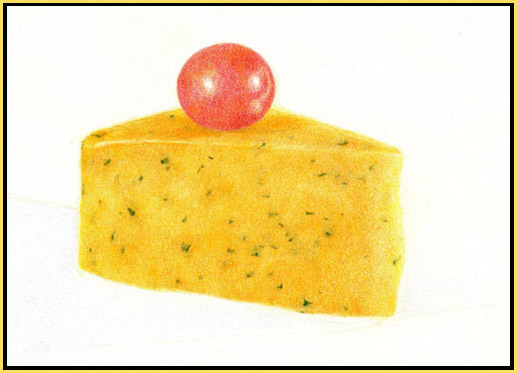
Step 8
Yes, I know this looks weird. I needed to go darker, so added Scarlet Red, Deep Red, Dark Red, and more Geranium Lake. I also filled in the highlights because they didn’t look right anymore.
~~~~~~~~~~~~~~~~~~~~
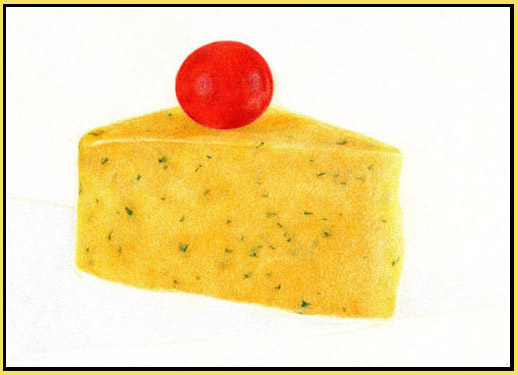
Step 9
I fixed it. I put the highlights back in with a Helix battery powered eraser. I also added some more darks for shadows. And I lightly outlined the cheese and tomato with True Green.
~~~~~~~~~~~~~~~~~~
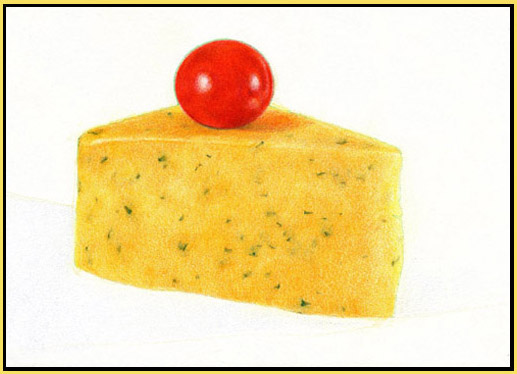
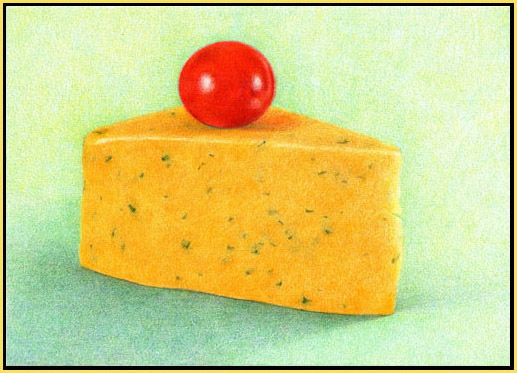
Step 10
Now I’m starting the background. I did an even layer of True Green over the whole thing.
~~~~~~~~~~~~~~~~~~
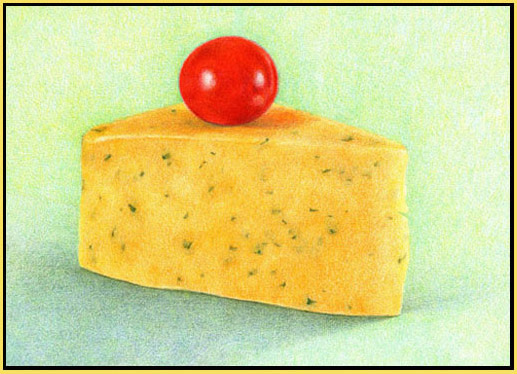
Step 11
Almost finished. I added more True Green, plus Light Green all over the background. Then I used Chrome Green and Light Ultramarine for the shadow. I did more tweaking in the tomato’s cast shadow as well.
~~~~~~~~~~~~~~~~~~
Step 12
The finished piece. I added more Cadmium Orange over the cheese, and more True Green in the shadow.
I hope you enjoyed this wonderful step by step colored pencil tutorial by Artist Paula Pertile.
About Paula:
I was born and raised in Sacramento, CA, USA, where it gets very very very HOT in the Summer. WAY too hot. I played the piano, took tap dancing lessons, did my homework, and spent a lot of time sitting directly in front of the air conditioner.
I always liked to ‘color’, and in the third grade I won a coloring contest sponsored by a local coffee shop. My prize was a banana split, a bank radio and FIVE whole dollars.
WOW!
You could make money just for coloring? The seed was planted.
After that I grew up, went away to school to study architecture at Cal Poly, then went away to school AGAIN to study illustration at the Academy of Art in San Francisco.
I’ve made my living drawing and coloring in one way or another ever since, and it covers a pretty wide spectrum! I’ve painted flames on the sides of vans, drawn bus maps, drawn plans for hospitals and parking garages, designed retail displays, drawn pictures for movies, and done some advertising and editorial illustration.
Now I do childrens’ books, licensing, and sell my own work in a more “fine art” kind of way.
I live with my kitties who all help me color and take naps and knit.
Lovely picture and a great explanation of each step. I am a beginner artist but I think I can learn well from this which is the idea and such a simple and nice picture it makes.
Chrissays
Paula, Thank you for improving my edges and shadows. I read your instructions and went right to my “problem painting” basket and improved two watercolors and cured a third. Usually I don’t read articles that aren’t watercolor based, now that’s fixed too!
Rinkiesays
Omg!!! It’s a beautiful drawing.. I had no idea coloured pencil drawing can be made as wonderful.. i love your colour pencil demo and i am gonna try it! Thanks so much for the demo
….truly wonderful. What a God-given talent!! Fantastic
Jen S.says
Paula, Breathtaking work! My works are just annoying compared to some of yours..
Chasitysays
Great tutorial, cant believe its not real 🙂
TimothyBsays
I really like the step by step process of how the final picture came to life – looks very very good. I don’t think I could do that in a million years !


Lovely picture and a great explanation of each step. I am a beginner artist but I think I can learn well from this which is the idea and such a simple and nice picture it makes.
Paula, Thank you for improving my edges and shadows. I read your instructions and went right to my “problem painting” basket and improved two watercolors and cured a third. Usually I don’t read articles that aren’t watercolor based, now that’s fixed too!
Omg!!! It’s a beautiful drawing.. I had no idea coloured pencil drawing can be made as wonderful.. i love your colour pencil demo and i am gonna try it! Thanks so much for the demo
That’s a great tutorial, and I love the result! It is amazing to see how much you can do with pencil.
How to Sell Art Online’s last blog post..Selling Art Online – Case Study
….truly wonderful. What a God-given talent!! Fantastic
Paula, Breathtaking work! My works are just annoying compared to some of yours..
Great tutorial, cant believe its not real 🙂
I really like the step by step process of how the final picture came to life – looks very very good. I don’t think I could do that in a million years !
Now I’m hungry.
This website certainly has all of the information I needed concerning this subject and
didn’t know who to ask.